PHP/MySQL - City of Bath College Moodle
advertisement

Access Images from Database using Dropdown Menu
JavaScript
Use JavaScript to create a drop down selection menu to change an image on a web page.
1. Create a folder called images
2. Obtain 5 images, and resize to size 400 * 300 pixels
3. Save these with short lowercase names inside the images folder, e.g.
lynx.jpg
flower.jpg
goat.jpg
rock.jpg
notice.jpg
Create a web page in which the user can select an image from a list menu (here is an example) :
<html>
<head>
<title>showphotos</title>
<script language="javascript">
function showphoto()
{
document.images.pic.src=
document.photos.selected.options[document.photos.selected.
selectedIndex].value
}
</script>
</head>
<body>
<form name="photos">
<select name="selected" onChange="showphoto()">
<option value="images/goat.jpg">Goat</option>
<option value="images/lynx.jpg">Lynx</option>
<option value="images/notice.jpg">Notice</option>
<option value="images/flower.jpg">Flower</option>
<option value="images/rock.jpg">Rock</option>
</select>
</form>
<img src="images/goat.jpg" width="400" height="300" name="pic">
</body>
</html>
When selecting the photo from the dropdown, it should automatically change on the page.
PHP/MySQL
It is possible to dynamically create the options on the list menu by embedding PHP and MySQL script on
web page. This can be done by selecting all the images in a folder and loading into an array.
1. Using PHPMyAdmin, create a new table images inside a database
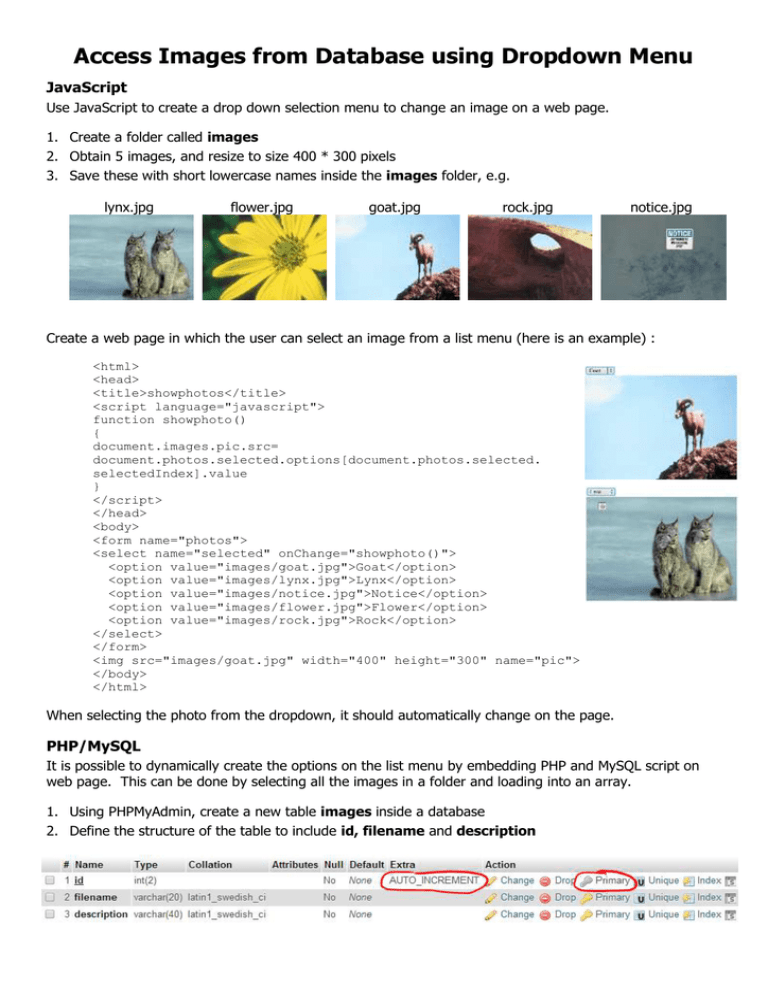
2. Define the structure of the table to include id, filename and description
3. Add records by entering the filenames
(ensure these match the filenames of the
images in the images folder) and
description (short). There should be at
least 5 records
4. Add a MySQL connection script to the web
page, e.g.
$con = mysqli_connect("localhost","root","","photographer_dw");
if (!$con) {
die('Connect Error: '.mysqli_connect_errno());
}
5. Add a query script to load up the data into an array, e.g. $result and create a variable $options:
$result = mysqli_query($con,"SELECT * FROM images");
$options = "";
6. Add a while loop to create a string $options using a concatenation operator ‘.=’ which accumulates
and adds on the existing variable each time the loop takes place:
while ($row=mysqli_fetch_array($result))
{
$filename="images/".$row["filename"];
$description=$row["description"];
$options.="<option ". "value=\"$filename\">".$description."</option>"."<br/>";
}
The backslashes are escape characters required to ensure that the speech marks "" are stored as variables
7. Change the <form> tag removing the HTML in between and replacing with this:
<form name="photos"><select name="selected" onChange="showphoto()">
<?php echo $options; ?>
</select>
</form>
Here is the full source code:
<html>
<head><title>Show Photo</title>
<script language="javascript">
function showphoto()
{
document.images.pic.src=
document.photos.selected.options[document.photos.selected.selectedIndex].value
}
</script>
</head>
<?php
$con = mysqli_connect("localhost","root","","photographer_dw");
if (!$con) {
die('Connect Error: '.mysqli_connect_errno());
}
$result = mysqli_query($con,"SELECT * FROM images");
$options="";
while ($row=mysqli_fetch_array($result))
{
$filename="images/".$row["filename"];
$description=$row["description"];
$options.="<option ". "value=\"$filename\">".$description."</option>"."<br/>";
}
?>
<body>
<form name="photos"><select name="selected" onChange="showphoto()">
<?php echo $options; ?>
</select>
</form>
<img src="images/goat.jpg" width="400" height="300" name="pic"/>
</body>
</html>
Further Exercises - add more images
1. Inside the images folder, place several more images, and then update the database by adding the
names and descriptions of the images (the id field should automatically number itself)
2. Test the web page to ensure the list menu includes the additional images. The PHP while loop should
load the additional images automatically. You should find it easy to add images once the script works.
3. If you have time, improve the web page by adding code and style
Test Plan
Create a simple test plan in which you test out different scenarios.
Consider desired outcomes, e.g. user-friendly error message to replace the default error
Test No.
Scenario
Actual outcome
Desired outcome
1
Image missing from
folder
Blank space where image should
be located
Simple message to inform user
image is missing
2
Incorrect database
specified
Complicated error code
Write error to log file so web
master can fix problem
3
Error Handling
Consider setting up an error handler to sensitive avoid code potentially being exposed. Create a
customised user friendly error message
The error number could be written to a log file and written to a secure folder on the server, outside the
public access, so the web master can gain access to the error. Error information can also be emailed to
the web master directly, although this will require the server to be set up to email.


