SETTING UP A MATH COURSE IN ALEKS
advertisement
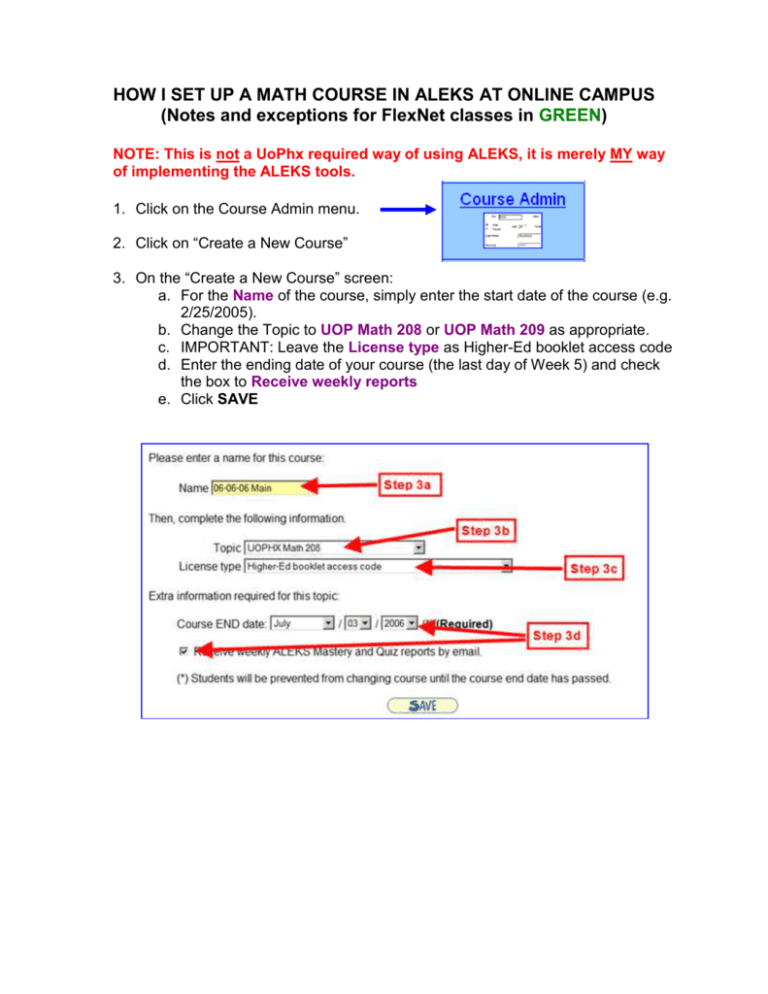
HOW I SET UP A MATH COURSE IN ALEKS AT ONLINE CAMPUS (Notes and exceptions for FlexNet classes in GREEN) NOTE: This is not a UoPhx required way of using ALEKS, it is merely MY way of implementing the ALEKS tools. 1. Click on the Course Admin menu. 2. Click on “Create a New Course” 3. On the “Create a New Course” screen: a. For the Name of the course, simply enter the start date of the course (e.g. 2/25/2005). b. Change the Topic to UOP Math 208 or UOP Math 209 as appropriate. c. IMPORTANT: Leave the License type as Higher-Ed booklet access code d. Enter the ending date of your course (the last day of Week 5) and check the box to Receive weekly reports e. Click SAVE 4. On the next screen, verify the start date, the topic, your name, and the license type. Write down the Course code to share with your students. 5. Click on “Customize this course” 6. On the “Customize a course” screen, a. Click on “Course name or topic taught” if you need to fix any items that are inaccurate from the previous screen (on step #3 above). b. Click on “Book used for teaching.” Verify that the proper Dugo book is showing then click SAVE. Then return to the Customize a course screen. c. Do not click on Content Editor – we are not allowed to change any of the learning objectives. d. Click on “Worksheets.” Check the box to send worksheet answer keys to students then click SAVE. Now that the course is set up, you need to set up quizzes and assessments. We’ll do assessments first: ASSESSMENTS What we will do next is create an assessment on the first day of each new week to assess the progress during the previous week. ALEKS already gives automatic assessments, but they usually come at inopportune times. Thus, we’ll create our own schedule of assessments and block the automatic ALEKS assessments. We can’t cancel all assessments in ALEKS, so it is best to choose the schedule rather than let ALEKS choose the schedule. 7. Click on the Taking Actions menu. 8. Enter the name of End of Wk 1 Assessment. Indicate the date of your first day of Week 2 then click NEXT. Click “Detailed scheduling options.” Do NOT click SAVE at this time. This is important: Set the date for the first day of Week 2 and set the time to 3:00 AM. Do not check the notify students box. Prevent automatic assessments up to 7 days before, and make sure to keep this assessment available "until the next scheduled assessment." Then click SAVE: 9. Create an Assessment for each week of class as explained in step #9 above. End of Week 2 Assessment should be scheduled for the first day of Week 3. End of Week 3 Assessment should be scheduled for the first day of Week 4 End of Week 4 Assessment should be scheduled for the first day of Week 5 End of Week 5 Assessment should be scheduled for the day AFTER class ends. QUIZZES What we will do next is create practice quizzes for weekly quizzes and for the final exam. You are not required to use ALEKS for the quizzes or the final exam. Remember, this is a pattern of the way I use ALEKS. Weekly quizzes and a final exam are already created in ALEKS. I use those quizzes/exams but I add practice quizzes and final exams. My philosophy is that students can practice for the quiz or final exam as many times as they want, but students can have only ONE attempt at the “real” quiz or exam. Thus, I copy each weekly quiz and make a practice quiz out of it. 10. Click on the Taking Actions menu. 11. Click “Create a Quiz” 12. Name the quiz, such as PRACTICE for Wk 1 Quiz (do not click Next) 13. Click on “Copy the specifications from another quiz” as shown by the red arrow in the graphic below: 14. Click on the ALEKS prepared quiz for Week 1 (thus, you are creating a practice quiz for Week 1 that is exactly like the “real” quiz for Week 1). 15. Click Confirm 16. Click the link to “Customize this Quiz” 17. On the bottom next screen, click “Change how this quiz is made available to your students.” 18. On the customize screen, choose the middle option button then click NEXT: 19. On the next screen, enter a due date. I remove the check marks from the three check boxes. Mark the radio option for “Students can take this quiz an unlimited number of times.” Then click NEXT and your quiz is set up. 20. Repeat steps 11-12 for PRACTICE for Wk 2 Quiz. 21. Repeat steps 11-21 for PRACTICE for Wk 3 Quiz. 22. Repeat steps 11-21 for PRACTICE for Wk 4 Quiz. 23. Repeat steps 11-21 for PRACTICE for Final Exam. Whew! Your class is finally set up. You can go back into the customization screen (step #20 above) and make the quiz temporarily unavailable. Just remember to go back in at the start of each week and make it available again. So that you don’t have to do all of this each time you teach Math 208 or Math 209, I go into the Course Admin button and create another new course, call this one TEMPLATE. Then instead of clicking on SAVE, I will copy the settings from my other new course. Each time I need a new course in the future, I will merely copy the TEMPLATE. This way, I only have to create Math 208 once and Math 209 once. I have ALEKS help, mini-movies, mini-lessons, handouts, online tutoring, and quiz helps on my personal Web site (www.JoleneMorris.com). I encourage students to visit my Web site often during the weeks. You are welcome to send your students to my Web site also. Please remember, this handout explains how I set up ALEKS for Math 208 and Math 209. You are welcome to set up ALEKS in any manner you choose. If you have questions about the rationale or process described in this handout, do not hesitate to contact me. Jolene
