a Microvideo Planning Document that will help you
advertisement

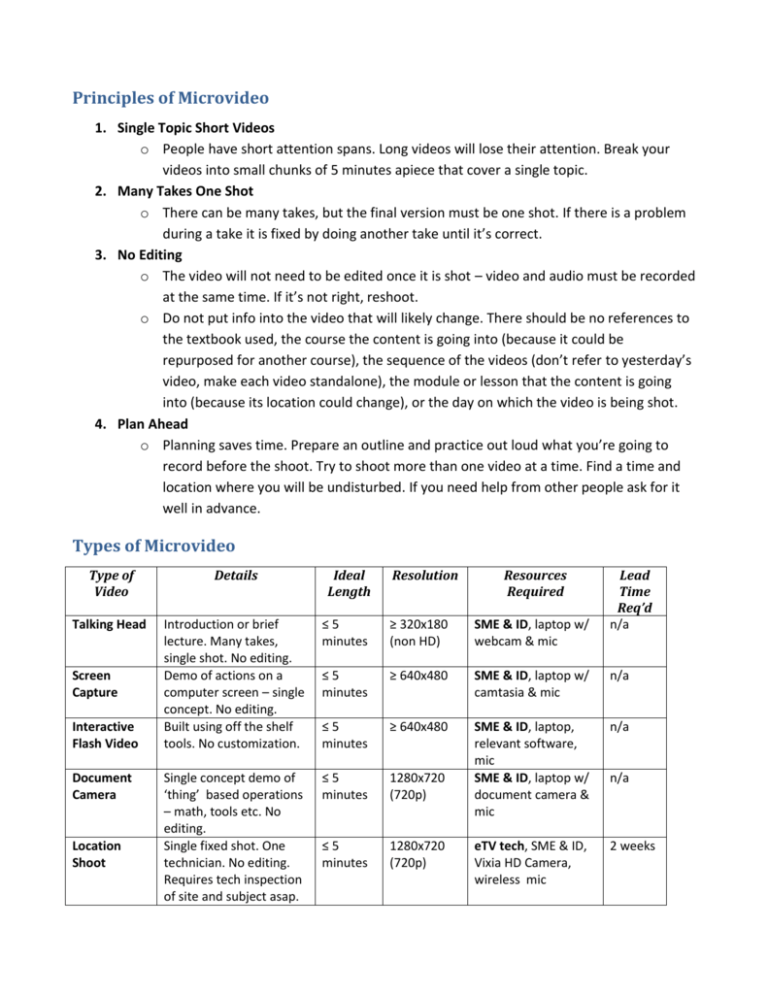
Principles of Microvideo 1. Single Topic Short Videos o People have short attention spans. Long videos will lose their attention. Break your videos into small chunks of 5 minutes apiece that cover a single topic. 2. Many Takes One Shot o There can be many takes, but the final version must be one shot. If there is a problem during a take it is fixed by doing another take until it’s correct. 3. No Editing o The video will not need to be edited once it is shot – video and audio must be recorded at the same time. If it’s not right, reshoot. o Do not put info into the video that will likely change. There should be no references to the textbook used, the course the content is going into (because it could be repurposed for another course), the sequence of the videos (don’t refer to yesterday’s video, make each video standalone), the module or lesson that the content is going into (because its location could change), or the day on which the video is being shot. 4. Plan Ahead o Planning saves time. Prepare an outline and practice out loud what you’re going to record before the shoot. Try to shoot more than one video at a time. Find a time and location where you will be undisturbed. If you need help from other people ask for it well in advance. Types of Microvideo Type of Video Details Talking Head Introduction or brief lecture. Many takes, single shot. No editing. Demo of actions on a computer screen – single concept. No editing. Built using off the shelf tools. No customization. ≤5 minutes ≥ 320x180 (non HD) SME & ID, laptop w/ webcam & mic ≤5 minutes ≥ 640x480 SME & ID, laptop w/ camtasia & mic n/a ≤5 minutes ≥ 640x480 n/a Single concept demo of ‘thing’ based operations – math, tools etc. No editing. Single fixed shot. One technician. No editing. Requires tech inspection of site and subject asap. ≤5 minutes 1280x720 (720p) SME & ID, laptop, relevant software, mic SME & ID, laptop w/ document camera & mic ≤5 minutes 1280x720 (720p) eTV tech, SME & ID, Vixia HD Camera, wireless mic 2 weeks Screen Capture Interactive Flash Video Document Camera Location Shoot Ideal Length Resolution Resources Required Lead Time Req’d n/a n/a Microvideo Planning Worksheet Video 1 What title should appear in the video? Filename (coursename_ module#_lesson#_title) What is the video about? What are its learning outcomes? What kind of video production will best achieve the learning outcomes? Talking Head Screen Capture Flash Presentation Document Camera Location Shoot What needs to be in the shot? What needs to be emphasized? Can the topic be captured in a single unedited shot? If not, how can the video be simplified? Are there other videos that could be shot in the same session? Microvideo Checklist Complete the Microvideo Planning Worksheet If a technician is required for the shoot, complete the Shot List Template If a technician is required for the shoot, contact Matt Miles (mmiles@rrc.mb.ca) with a copy of the shot list template to schedule a tech at least 2 weeks in advance. Arrange with Matt Miles for the techs to review the location and subject matter before the shoot so that they know the environment in which they will be shooting. If equipment is required for the shoot like a document camera or a webcam, contact Matt Miles (mmiles@rrc.mb.ca) to ensure its availability. Write an outline and make sure both the SME and ID have reviewed it. Try at least one practice run of the video before shooting. If techs are involved, practice before they get there. If equipment is part of what is being shot, set it up before the shoot. Secure a location for the shoot that is quiet and well lit. Determine if other videos can be shot at the same time and schedule enough time for this to occur. If techs are involved, consult with them on the length of time required. Shot List Template (Microvideo Version) Shot 0 Single concept for the Shot Things that are in the shot? Fill the view but don’t lose context. What does the shot need to show? What angle should the shot be from? e.g. Shooting downwards at a table with equipment on it. Focus on hands working with equipment. Micrometer needs to be readable. Approximately 4 minutes long. 1 2 3 4 5 6 7 8 Title for Production Clip “How to Open a Widget Garmer” Course Name, Module #, Lesson # Example: PL1_M2_L3-Widget_Garmer


