Advanced Engineering Design
and Presentation
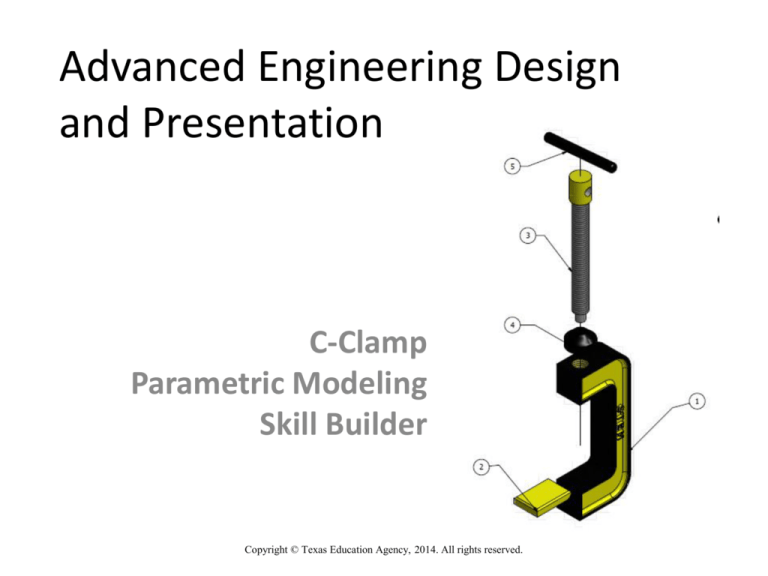
C-Clamp
Parametric Modeling
Skill Builder
Copyright © Texas Education Agency, 2014. All rights reserved.
Creating a C-Clamp
•
•
•
•
Create it to the specifications given.
Change colors to match your school’s colors.
Change “STEM” to your name or initials.
Change “2014” to your graduation year.
Copyright © Texas Education Agency, 2014. All rights reserved.
2
Layout Page 1
Copyright © Texas Education Agency, 2014. All rights reserved.
3
Layout Page 2
Copyright © Texas Education Agency, 2014. All rights reserved.
4
Layout Page 3
Copyright © Texas Education Agency, 2014. All rights reserved.
5
How to Create the Parts
• Create a folder on your drive for all of the C-Clamp
parts and assemblies.
• Make sure you save to this folder only!
• The following slides will help you figure out how to
create the parts.
• Part #1 – C-Clamp Base
• Part #2 – Protection Pad
• Part #3 – Shaft Screw
• Part #4 – Screw Swivel
• Part #5 – Tension Bar
Copyright © Texas Education Agency, 2014. All rights reserved.
6
Part #1 - C-Clamp Base
Copyright © Texas Education Agency, 2014. All rights reserved.
7
Part #1 - C-Clamp Base
Draw this and extrude it.
Copyright © Texas Education Agency, 2014. All rights reserved.
8
Part #1 - C-Clamp Base
Draw this and then extrude/cut it.
Copyright © Texas Education Agency, 2014. All rights reserved.
9
Part #1 - C-Clamp Base
Add screw threads to the hole.
Copyright © Texas Education Agency, 2014. All rights reserved.
10
Part #1 - C-Clamp Base
Draw this and then extrude/cut it.
Copyright © Texas Education Agency, 2014. All rights reserved.
11
Part #1 - C-Clamp Base
Fillet the edges; mirror this using the YZ
plane.
Copyright © Texas Education Agency, 2014. All rights reserved.
12
Part #1 - C-Clamp Base
Create your initials or name. (Hint: Use the
Text tool and then trace over the letters.)
Copyright © Texas Education Agency, 2014. All rights reserved.
13
Part #1 - C-Clamp Base
Repeat on the other side to add your graduation
year. (Hint: Use the Text tool and then trace over
the letters.)
Copyright © Texas Education Agency, 2014. All rights reserved.
14
Part #2 - Protection Pad
Copyright © Texas Education Agency, 2014. All rights reserved.
15
Part #2 - Protection Pad
Draw and then extrude this.
Copyright © Texas Education Agency, 2014. All rights reserved.
16
Part #2 - Protection Pad
Chamfer the four sides.
Copyright © Texas Education Agency, 2014. All rights reserved.
17
Part #2 - Protection Pad
Fillet the one bottom edge.
Copyright © Texas Education Agency, 2014. All rights reserved.
18
Part #3 - Shaft Screw
Copyright © Texas Education Agency, 2014. All rights reserved.
19
Part #3 - Shaft Screw
Draw and extrude this.
Copyright © Texas Education Agency, 2014. All rights reserved.
20
Part #3 - Shaft Screw
Draw and extrude.
Copyright © Texas Education Agency, 2014. All rights reserved.
21
Part #3 - Shaft Screw
Draw and extrude/cut this.
Copyright © Texas Education Agency, 2014. All rights reserved.
22
Part #3 - Shaft Screw
Add threads.
Copyright © Texas Education Agency, 2014. All rights reserved.
23
Part #4 - Screw Swivel
Copyright © Texas Education Agency, 2014. All rights reserved.
24
Part #4 - Screw Swivel
Draw and extrude.
Copyright © Texas Education Agency, 2014. All rights reserved.
25
Part #4 - Screw Swivel
Draw and extrude.
Copyright © Texas Education Agency, 2014. All rights reserved.
26
Part #4 - Screw Swivel
Add chamfer.
Copyright © Texas Education Agency, 2014. All rights reserved.
27
Part #4 - Screw Swivel
Create hole through it.
Copyright © Texas Education Agency, 2014. All rights reserved.
28
Part #5 - Tension Bar
Copyright © Texas Education Agency, 2014. All rights reserved.
29
Part #5 - Tension Bar
Draw and extrude.
Copyright © Texas Education Agency, 2014. All rights reserved.
30
Part #5 - Tension Bar
Add fillet to both ends.
Copyright © Texas Education Agency, 2014. All rights reserved.
31
Assembly
Place parts and constrain them to look like
this.
Copyright © Texas Education Agency, 2014. All rights reserved.
32
Make an Exploded View
Make an exploded view by tweaking, moving,
and rotating to look like this.
Copyright © Texas Education Agency, 2014. All rights reserved.
33
Place the exploded and assembled views onto
layout page #1; add the parts list and balloon
annotations.
Copyright © Texas Education Agency, 2014. All rights reserved.
34
Place the C-Clamp base and protection pad
onto layout page #2; add annotations.
Copyright © Texas Education Agency, 2014. All rights reserved.
35
Place the screw swivel, shaft screw, and
tension bar onto layout page #3; add
annotations.
Copyright © Texas Education Agency, 2014. All rights reserved.
36
Follow the example and rubric given.
Copyright © Texas Education Agency, 2014. All rights reserved.
37

