Jump into gym
Stage 3 – Year A
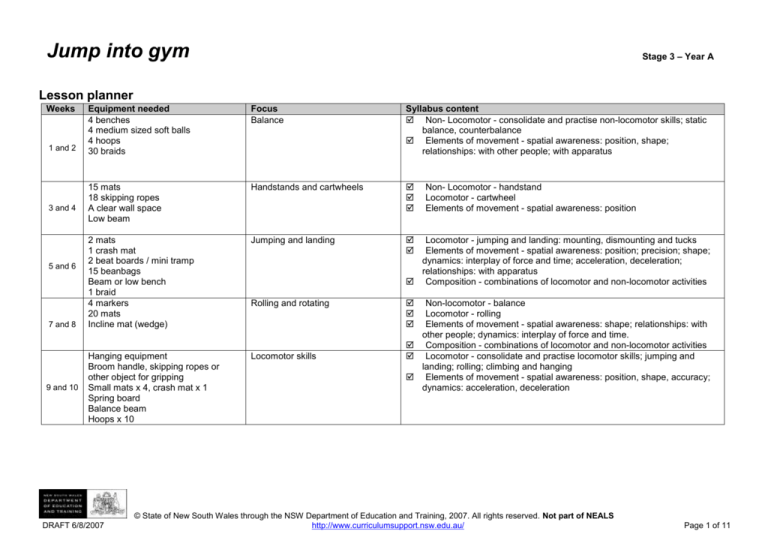
Lesson planner
Weeks
1 and 2
3 and 4
5 and 6
7 and 8
9 and 10
Equipment needed
4 benches
4 medium sized soft balls
4 hoops
30 braids
Focus
Balance
Syllabus content
Non- Locomotor - consolidate and practise non-locomotor skills; static
balance, counterbalance
Elements of movement - spatial awareness: position, shape;
relationships: with other people; with apparatus
15 mats
18 skipping ropes
A clear wall space
Low beam
Handstands and cartwheels
2 mats
1 crash mat
2 beat boards / mini tramp
15 beanbags
Beam or low bench
1 braid
4 markers
20 mats
Incline mat (wedge)
Jumping and landing
Rolling and rotating
Hanging equipment
Broom handle, skipping ropes or
other object for gripping
Small mats x 4, crash mat x 1
Spring board
Balance beam
Hoops x 10
Locomotor skills
DRAFT 6/8/2007
Non- Locomotor - handstand
Locomotor - cartwheel
Elements of movement - spatial awareness: position
Locomotor - jumping and landing: mounting, dismounting and tucks
Elements of movement - spatial awareness: position; precision; shape;
dynamics: interplay of force and time; acceleration, deceleration;
relationships: with apparatus
Composition - combinations of locomotor and non-locomotor activities
Non-locomotor - balance
Locomotor - rolling
Elements of movement - spatial awareness: shape; relationships: with
other people; dynamics: interplay of force and time.
Composition - combinations of locomotor and non-locomotor activities
Locomotor - consolidate and practise locomotor skills; jumping and
landing; rolling; climbing and hanging
Elements of movement - spatial awareness: position, shape, accuracy;
dynamics: acceleration, deceleration
© State of New South Wales through the NSW Department of Education and Training, 2007. All rights reserved. Not part of NEALS
http://www.curriculumsupport.nsw.edu.au/
Page 1 of 11
Outcomes
GYS3.10 Demonstrates coordinated
actions of the body when performing
gymnastic sequences
performs gymnastics skills
using correct techniques
performs variations of basic
movements
MOS3.4 Refines and applies movement
skills creatively to a variety of
challenging situations
transfers sequence of nonlocomotor movements from
the floor to apparatus
INS3.1 Acts in ways that enhance the
contribution of self and others in a
range of cooperative situations
works cooperatively in a
group to achieve goal or
complete a task
Learning experience
Weeks 1 and 2
Getting started
Play the game Tail grab. All players tuck a braid (tail) into the back of their shorts or in their
pocket. Students move around the playing area attempting to take other players tails, while
trying to keep their own. Players cannot protect their own tail by holding it.
Following the activity, spread students out in their own space in front of the teacher.
Perform stretches with the class. Safe stretches can be found at:
http://www.curriculumsupport.education.nsw.gov.au/primary/pdhpe/assets/pdf/csarticles/saf
estretch.pdf
Developing balance - revising and practising balance.
Question students on what they have learnt about balance and support from previous years
of gymnastics.
Ask questions like:
What are some ways to help maintain balance? (wider base of support )
Name some games and sports where balance is used? (netball, tennis serves,
dance, gymnastics, diving etc).
Teaching notes and planned
assessment
The getting started activity is generally
sufficient in preparing students in Stage 3 to
be warmed up ready for the lesson. It should
involve ‘huff and puff’ activities (activities which
raise the heart rate).
Specific stretching is introduced in Stage 3 so
students gain a good understanding of a full
warm up activity.
Stretching should only occur after a warm-up
activity, when the muscles are warm. Ensure
that the stretches performed work the specific
muscles that will be used during the lesson.
Balance is an essential prerequisite of almost
all movement skills. The ability to perform a
stationary balance for a specific time has been
linked to a reduced risk of suffering from falls.
Activity 1- Creative balances
Divide the class into groups of five. Each group creates a group balance using the number
of body parts specified by the teacher. (e.g. 4 legs, 2 hands and 1 bottom). Demonstrate
creative team balances to the rest of the class. The combination of body parts can be
written on cards so groups can work at their own pace.
Activity 2 - Moving windmill
In the same groups of five, students attempt to create a moving windmill while all positioned
in the front support position. Students evenly spread themselves out in a circle with their
feet meeting in the middle. The team needs to keep the even spaces as they rotate in the
same direction like a windmill.
Activity 3 - Hoop header
Create teams of seven or eight students. Each team stands up in a line along the bench.
The first student starts with a hoop around their neck and shoulders. Without using their
hands, students pass the hoop from neck to neck along their team until it gets to the other
end. If any team mate overbalances off the bench before the hoop reaches the end then the
team must start again.
Activity 4 - Off balance
In the same groups as activity 3, students remain standing in a line along the bench. The
first student from each team is selected as a ball thrower. This student stands on the floor
© State of New South Wales through the NSW Department of Education and Training, 2007. All rights reserved. Not part of NEALS
Physical education S3
DRAFT 6/8/2007
http://www.curriculumsupport.nsw.edu.au/
Pa
Outcomes
Learning experience
Teaching notes and planned
assessment
parallel to the bench about two metres out. While the rest of the team is performing a static
balance, the thrower passes a soft ball to each of their team mates who pass it back while
still in a static balance position. If anyone overbalances before the ball has been thrown to
every team member, then the thrower has to start again. Once the ball is thrown to the last
team member, that student becomes the thrower, everyone shuffles down the bench and
changes the leg on which they are balancing.
Finishing off
Play the game Ship-shark-shore. Call the terms ship, shark, and shore in various orders.
Students have to run to the designated area when it is called. Change the calling order of
ship, shark and shore so students have to change direction. Change the locomotor
movement from running to other skills like hopping, side-galloping, skipping etc.
Mark three lines parallel to each other for this
activity. One line is the ship, one the shore and
the other the shark. Students all begin on the
same line. The space between each line can
vary.
Where possible, the finishing off activity should
revise the skills learnt in the lesson.
This is not possible in all lessons because it is
important for lessons to involve elements of
vigorous activity so heart rate is sufficiently
raised for health benefits.
Therefore, finishing off activities need to raise
the students heart rate (incorporate ‘huff and
puff’ activity) if it was not sustained through the
lesson.
GYS3.10 Demonstrates coordinated
actions of the body when performing
gymnastic sequences
performs gymnastics skills
using correct techniques
performs variations of basic
movements
INS3.1 Acts in ways that enhance the
contribution of self and others in a
range of cooperative situations
demonstrates actions that
support the rights and
feelings of others e.g.
consideration,
encouragement
Weeks 3 and 4
Getting started
Play the game Random moving. Get students to move around an area making sure not to
touch anyone, like they are keeping a bubble around them from bursting. Slowly decrease
the space they are moving in. Get students to move in different ways e.g. on tip toes, down
low, mimicking machines like lawn mowers, crab walking etc.
Pair students up and allocate one mat to each pair. Students perform the upper body,
middle body and lower body stretches.
Developing techniques for cartwheels and handstands
Explain to the students the activities in this lesson are important for balance, coordination,
strength and control. The following relay activities are a revision of lead up activities for the
cartwheel and handstand.
Divide students into five relay teams. Line the teams up in front of five rows of mats. Ask
questions like:
Why are bunny hops and the lame dog taught before the cartwheel and the handstand?
How does the lame dog help you with the handstand?
How do bunny hops help with the cartwheel?
For each row of mats, place 3 floor mats
together.
Bunny hops and lame dog are taught as they
are the basic components of the cartwheel.
Relay 1
© State of New South Wales through the NSW Department of Education and Training, 2007. All rights reserved. Not part of NEALS
Physical education S3
DRAFT 6/8/2007
http://www.curriculumsupport.nsw.edu.au/
Pa
Outcomes
Learning experience
Teaching notes and planned
assessment
Lame dog (hand stand lead up)
Students move along the mats kicking one leg up behind them as they move forward.
Students should move forward supporting their weight using straight arms. Once the first
student gets to the other end of the mats then the next student can go. Emphasise the need
to place their hands in a butterfly shape.
Relay 2
Bunny hops - on a low beam or along a rope or a line of masking tape on the floor
Get students to place their hands on top of the beam in a butterfly shape.
Jump legs over either side of the beam/ rope/line, moving body forward with straight arms.
Group activity – Cartwheel activities
In the same groups organised for the relays, ask students to practise cartwheels in a circle
format and then along mats. Provide each group with 3 skipping ropes to place on the floor
in a circle. Place a marker in the middle of the circle for students to keep their eyes focused
on.
One student at a time practises a cartwheel around the circle concentrating on the following
teaching points.
- Stand up tall and look into the middle of the circle.
- Use the cartwheel combination: hand, hand, foot, foot, moving around the circle trying
to make continuous cart wheel actions.
- Arms straight, elbows locked.
- Legs remain extended straight as the rotate over.
Variation: Allow students who are not confident with the cartwheel to perform mini
cartwheels with legs bent.
To make the butterfly shape with their hands,
students put their thumbs together and spread
their fingers out to the side.
The butterfly shape with the hands is important
so students have a greater and safer support
area for their upper body to direct their jump
over the beam.
Once students have had a few practises of the cartwheel around the circle, have them
practise along the straight mats.
Handstand activities
Nominate a wall that students can work against and place mats along the entire length.
Divide students into pairs or threes, depending how long the wall area is. One student at a
time from each group has a go at the following activity.
Do not let students flip their body over making
a bridge with their back. This is not a safe
exercise.
Activity - Walk up the wall
Students begin by crouching down facing away from a wall.
They use the tips of the toes or shoes to walk up the wall. Flat
feet will mean the feet will slip down. Keep a tight straight body
when in position to hold. Arms should be straight. Do not allow
students to go higher than 60 degrees. Hold for 3 seconds.
Ensure there is a mat underneath the students.
Teachers are the only people who should spot
students if they need help. To spot for a hand
stand, stand with your body open towards the
student about to perform a handstand. Get
your arms ready as if you were prepared for a
rugby tackle. As the student kicks up their
legs, grab the students by the ankles to help
them with stability.
© State of New South Wales through the NSW Department of Education and Training, 2007. All rights reserved. Not part of NEALS
Physical education S3
DRAFT 6/8/2007
http://www.curriculumsupport.nsw.edu.au/
Pa
Outcomes
Learning experience
Teaching notes and planned
assessment
Once all students have had a go at walking up a wall, move the pairs into their own space
with their own mat. Students will now have the opportunity to practise a handstand on the
mats.
Before students practise a handstand, outline the following teaching points and get a
student to demonstrate.
- Remind students that the lame dog is a lead up to the handstand.
- Keeping arms straight, swing them up
- Lunge forwards
- Place hands flat on floor, shoulder width apart, kick one leg up followed by the other.
- Hold a tight straight body so that there is minimal back arch.
- Head remains in line with body and shoulders.
- Controlled return to starting position.
Before students practise the handstand, demonstrate the safety fall if over rotating. A half
turn is performed with the hands so that you land on the feet with their body to the side.
Allow one student at a time to practise a handstand on the mat. Get their partner to provide
feedback on their technique.
Finishing off
Play the game Rats and rabbits. Divide the class into two even teams - rats and rabbits.
Each team lines up back to back on a halfway line facing the direction they have to run for
safety. On the call of ‘rats’ or ‘rabbits’, the team called has to run to the base line on their
side of the halfway line before the opposing team tags them. If a student is caught, they
then become a member of the opposing team. After each call, teams reform along the
halfway line. Continue.
GYS3.10 Demonstrates coordinated
actions of the body when performing
gymnastic sequences
performs gymnastics skills
using correct techniques
performs variations of basic
movements
creates a sequence of
movements with a clear
beginning, middle and end
MOS3.4 Refines and applies movement
skills creatively to a variety of
challenging situations
transfers sequence of
locomotor and non-locomotor
Weeks 5 and 6
Getting started
Play the game Wasps. Give each pair one bean bag. Students pass the beanbag to each
other using an underarm throw as they move around the floor area. When the teacher calls
‘sting’, whoever has the possession of the beanbag has to try and sting their partner by
throwing the beanbag and hitting their partner below the knees. If hit, the other person tries
to sting their partner. The beanbag has to be thrown underarm to sting their partner.
Students need to be mindful of the space and other students around them.
Allocate one mat to each pair. Students perform the upper body, middle body and lower
body stretches that were performed in previous lessons.
Developing ways to jump and land
Tell the students that the lesson involves jumping and landing activities.
© State of New South Wales through the NSW Department of Education and Training, 2007. All rights reserved. Not part of NEALS
Physical education S3
DRAFT 6/8/2007
http://www.curriculumsupport.nsw.edu.au/
Pa
Outcomes
movements from the floor to
apparatus
Learning experience
Teaching notes and planned
assessment
Ask questions like:
- Why is it important to land in a motorbike position? (to absorb force and maintain a
controlled landing).
Ask students to outline some of the key teaching points for the motorbike landing, they
should include:
- Pretend to sit on a motorbike
- Arms should be out straight as if holding onto handle bars
- Legs should be bent, back straight
- Land with feet shoulder width apart
- Landings should be controlled and held for three seconds.
Get all students to practise the motorbike landing on the spot.
The following stations allow students to explore various jumping and landing techniques.
Demonstrate each activity station before dividing the class into groups of approximately five.
Remind students that every time they land they should be landing using the motorbike
technique. Discuss the difference when jumping from a mini tramp and a beat board (the
spinning capabilities are different).
Stations
1. Jumping Jacks
From a short run up which is identified by a marker, students take off from one foot but land
on the beat board or mini tramp with two feet to perform any jump in the air they want,
ensuring they land on a mat in the motorbike position. Encourage students to be creative
with their jumps e.g. ‘oh what a feeling’ jump. A partner could give them a score (for fun).
No somersaults allowed.
2. Vertical jump near a wall
Students perform a vertical jump alongside a wall so they can reach up and mark the wall
with chalk at the highest point of their jump. Explicitly show the students how to perform a
vertical jump. Use the cues:
- Look up
- Focus your eyes where you want to go
- Get ready to explode up high, get ready to take off
- Swing your arms back and up
- Straighten your legs when in the air
- Bend your knees on landing
- Control your body and balance when landing
- Land with feet the width of your shoulders apart.
3. Rotating jump
© State of New South Wales through the NSW Department of Education and Training, 2007. All rights reserved. Not part of NEALS
Physical education S3
DRAFT 6/8/2007
If using a mini tramp at station one and four,
get the students to walk up to it and bounce
three times before jumping off and performing
the landing. This is to ensure students have a
feeling for the springing sensation and they are
landing safely.
The spring in a trampoline can put students off
balance if they are not aware of the control
needed to jump.
A beat board gives students more of their
natural springing height because it is their
body weight that determines the spring (not
springs like a mini tramp). Ensure mats are in
the correct position before each student
completes a jump.
Refer to Get skilled: Get active for further
information about the vertical jump.
Assessment strategy
The teacher:
observes students jumping and
landing technique at various
stations in the springing and
landing circuit
observes students body shape
in flight
Assessment criteria
The student:
performs jumps using the
http://www.curriculumsupport.nsw.edu.au/
Pa
Outcomes
Learning experience
Teaching notes and planned
assessment
On a beam or low bench, get students to walk along to the end and when jumping off, try
and do a:
- quarter turn (90 degrees)
- half turn (180 degrees)
- three quarter turn (270 degrees) if proficient at the others.
correct jumping and landing
technique
manipulates body shape during
flight
varies body shape, maintaining
awareness of where limbs and
trunk are positioned in flight
varies body shape while
maintaining control of start and
finishing position
These criteria relate to outcome GYS3.10
4. Mini Tramp or beat board challenge
Jumping from a mini tramp or beat board from a small run up landing on a mat. Get the
students to move through a varying sequence of
actions like:
- jumping for height
- straight jumps
- clapping above the head
- star jumps
- tuck jump.
5. Standing long jump
This jump is for horizontal distance.
- Start in a standing position
- Feet should be shoulder width apart
- Bend your knees
- Swing your arms back and jump forwards.
Use a braid to mark where a student lands. See which student in the group can jump the
furthest while still landing in a controlled motorbike position.
6. Floor Sequence
On a floor mat, students create a jumping sequence of five different jumps. They may wish
to include different locomotive movements. The body should be balanced and controlled
throughout the sequence.
Finishing off
Play the game Twizzle. On the signal ‘go’, students are to walk, jog or skip in the direction
they are facing. On the other signals, students have to perform the correct action:
- Stop - stop moving and freeze
- Turn - make a half turn (180 degrees) and freeze
- Jump - jump and make a three quarter turn (270 degrees) and freeze
- Twizzle - jump and make a turn of their choice and freeze.
Students can not move until the teacher calls ‘go’ after each action.
© State of New South Wales through the NSW Department of Education and Training, 2007. All rights reserved. Not part of NEALS
Physical education S3
DRAFT 6/8/2007
http://www.curriculumsupport.nsw.edu.au/
Pa
Outcomes
Learning experience
GYS3.10 Demonstrates coordinated
actions of the body when performing
gymnastic sequences
performs gymnastics skills
using correct techniques
performs variations of basic
movements
creates a sequence of
movements with a clear
beginning, middle and end
Weeks 7 and 8
Getting started
Play the game Ship wreck. Set markers out in the shape of a ship’s deck. Teacher calls one
of the following commands and students need to perform the action quickly.
- Bow - students run to the front of the boat
- Starboard - students run to the right side of the boat
- Captain’s coming - students stand up straight and salute
- Hit the deck - students lie on the floor
- Scrub the deck - on knees scrubbing
- Stern - run to the back of the boat
- Port - run to the left side of the boat.
MOS3.4 Refines and applies movement
skills creatively to a variety of
challenging situations
combines known movements
to create a sequence with a
small group
INS3.1 Acts in ways that enhance the
contribution of self and others in a
range of cooperative situations
demonstrates actions that
support the rights and
feelings of others e.g.
consideration,
encouragement
Teaching notes and planned
assessment
On completion of the warm up activity spread students out in their own space so that they
can perform the following stretches:
- Upper body, neck and shoulder stretches
- Back stretches.
Developmental activities for rolling
The following activities allow students to explore, revise and practise rotation and rolling
skills.
Before starting any of the rolling activities find out what students know about rolling.
Ask students questions like:
- Why learn to roll? (It helps develop a sense of body control an spatial awareness)
- What sports and activities require rolling? (any activity where falling may occur, such as
tackling, falling off a skateboard)
Relay challenge
Divide the class into two teams. Within each team get students to partner up for the partner
log roll race. The teams line up in pairs behind the mats which have been placed in two long
wide rows.
The first pair of students from each team lies on a mat. In a log roll position (lie on back,
body straight, arms above head and legs out-stretched), partners need to hold hands above
their heads, so they make one log. Students roll together so that they turn as one along the
entire length of the mat. When the first pair reaches the end of the mat, the next pair goes.
The first team to all reach the other end are the winners.
Forward roll activity
In teams of five, get students to practise a forward roll along floor mats which have been
placed together. Provide students who have yet to master the forward roll with the
opportunity to use a wedge mat or create an incline mat with a spare floor mat.
© State of New South Wales through the NSW Department of Education and Training, 2007. All rights reserved. Not part of NEALS
Physical education S3
DRAFT 6/8/2007
To make an incline, fold one mat underneath
another mat. Always have other mats attached
to the end of an incline for safety.
http://www.curriculumsupport.nsw.edu.au/
Pa
Outcomes
Learning experience
Before students practise the forward roll, outline the following teaching points.
- start with feet shoulder width apart, knees bent and in a crouched position
- place hands flat on the floor with fingers pointing forward
- neck and back should be rounded
- look back through your legs
- tuck chin into neck
- maintain a tight tuck position throughout the roll
- push off with your legs
- land on your feet.
Teaching notes and planned
assessment
Safety consideration:
When rolling forward, the first point of contact
the body should make on the mat is the lower
neck/upper shoulders. This means there
should not be pressure placed on the neck.
Extension activity: Students competent in the forward roll can add one of the following skills
to the end of the forward roll: straddle, straight jump, ½ turn, and balance.
Backward roll
In the same teams of five, get students to practise a backward roll along the floor mats.
Provide students who have yet to master the backward roll with the opportunity to use a
wedge mat.
Before students practise the backward roll, outline the following teaching points.
-
-
From a standing position, bend knees and get into a squat position. Place hands in the
ready position on the back of the head.
Push the feet off the floor to propel the body backwards.
As you roll backwards onto your shoulders, tuck knees to chest, place hands flat on the
mat so they are in line with ears, fingers pointing in the starting direction, elbows bent
pointing to the ceiling.
Tuck chin into neck.
Push off mat with hands to land in a squat position on toes, not on knees.
Make sure your weight is taken equally on both hands and not on the head.
Those students using a wedge mat start by sitting on the highest part of the incline mat. The
legs should be touching the floor ready to help with the push off.
Extension activity: Those students who are competent in the backward roll can add one of
the following skills to the end: straddle, straight jump, ½ turn, and balance.
Sequence activity
In the same groups of 5, students work together to devise a floor routine that includes 5
different rotations and 1 balance. An example of a sequence may include: Arabesque –
forward roll – ½ turn – backward roll – ¼ turn – log roll. Each group performs their sequence
to the rest of the class.
© State of New South Wales through the NSW Department of Education and Training, 2007. All rights reserved. Not part of NEALS
Physical education S3
DRAFT 6/8/2007
Assessment strategy
The teacher:
observes students’ contribution
to group composition
observes students’ performance
of gymnastic skills
observes how students work
with other group members
Assessment criteria
The student:
contributes positively to
compositional ideas
confidently performs
combinations of non-locomotor
and locomotor skills
performs gymnastic skills using
correct technique
works effectively with others to
compose movement sequences
These criteria relate to outcome
GYS3.10, MOS3.4 and INS3.3
http://www.curriculumsupport.nsw.edu.au/
Pa
Outcomes
Learning experience
Teaching notes and planned
assessment
Finishing off
Play the game Out the gate. Mark out a square playing area. Make two gates at each end.
Choose one or more taggers. If a player is tagged by a tagger, they need to run out of the
closest gate, perform a rock or roll, then run back through the other gates to re-enter the
game. Change taggers frequently.
GYS3.10 Demonstrates coordinated
actions of the body when performing
gymnastic sequences
performs gymnastics skills
using correct techniques
performs variations of basic
movements
MOS3.4 Refines and applies movement
skills creatively to a variety of
challenging situations
transfers sequence of
locomotor and non-locomotor
movements from the floor to
apparatus
INS3.1 Acts in ways that enhance the
contribution of self and others in a
range of cooperative situations
demonstrates actions that
support the rights and
feelings of others e.g.
consideration,
encouragement
Weeks 9 and 10
Getting started
Play the game Ship Ahoy. In a designated playing space, students listen for the following
calls and perform the action.
Bow – students run to the front or one end of playing area
Stern - students run to the back or one end of playing area
Captain’s coming – students stop on the spot and salute
Port – students move to the left of the playing space
Starboard – students move to the right of the playing space
Periscope – students lie on back and lift one leg
Crew overboard – students grab someone’s arm and hold on
Crow’s nest – students pretend to climb a ladder
Radar – students run with hands up and make beeping noises
Sharks – students link a body part with another player until everyone is joined together
Divide students into pairs and allocate one mat to each pair. Students perform the upper
body, middle body and lower body stretches.
Locomotor skills – Climbing and hanging
Discuss situations where learning how to climb is important. Ask questions such as:
- When would you need to use the skills of climbing and hanging?
Demonstrate the various grips that can be used. In pairs, ask students to demonstrate the
various grips using the equipment provided.
Demonstrate the grip and hanging on the bar or playground equipment. Ask students to
demonstrate the following:
- Long hang. Jump up to grasp the bar with the over grip, hang as straight as possible and
look ahead.
- Stand facing the bar. Jump forward to hang on the bar. Use the over grip; use the under
grip. Swing back and forth.
Dismount by dropping straight down to the floor to a safe motorbike landing.
Circuit activities
Organise the class into groups of five or six. Allow students three to five minutes at each
activity station.
© State of New South Wales through the NSW Department of Education and Training, 2007. All rights reserved. Not part of NEALS
Physical education S3
DRAFT 6/8/2007
Ensure safety mats are placed under the bars
or playing equipment.
Grips
Over Grip: Thumb underneath and fingers on
top
Under Grip: Fingers underneath and thumb
on top.
Mixed grip: One hand with over grip and the
other hand with under grip
Swings
Swings in Hang: Arms and legs straight, head
focused forward.
Swing in Support: Shoulders slightly forward,
maintain rigid body and extended body.
Elbows bend slightly during the swing forward.
Students need to stand back from the
equipment when waiting for their turn.
http://www.curriculumsupport.nsw.edu.au/
Pa
Outcomes
Learning experience
Station 1
Hang ten. Students hang and curl their knees. On their next turn students curl, twist or
make shapes of their own.
Station 2
Mini-cartwheels. Draw a large circle on the floor with chalk. Students use the circle as a
guide to practise mini cartwheels. Students who are confident can perform full cartwheels.
Teaching notes and planned
assessment
Mini-cartwheels involve students transferring
their weight from arms and kicking up slightly.
Remind students “hand-hand-foot-foot”.
Students should face the centre of the circle
and turn in the direction they feel most
comfortable.
Station 3
Tuck jump. Students take slight run up, jump onto springboard, demonstrating a tuck jump,
landing on a mat.
Station 4
Balance, jump and land. Students walk along the balance beam, straight jump off the beam
onto the crash mat and land using the motorbike landing.
Station 5
Rolling choice. Students demonstrate a roll of their choice along a row of mats.
Finishing off
Play the game Sharks and islands. Place 10 hoops randomly around the playing space. The
hoops are the islands. Select two students to be the sharks. Sharks attempt to tag students
who are not on an island. Only one player is allowed on an island at a time for a count of
five seconds. Students caught while off the island become sharks.
© State of New South Wales through the NSW Department of Education and Training, 2007. All rights reserved. Not part of NEALS
Physical education S3
DRAFT 6/8/2007
http://www.curriculumsupport.nsw.edu.au/
Pa

