Chapter Four user's defined setting
防水仪表英文说明书
第一页 封面
FROG SERIES WEIGHING INDICATOR
USER’S MANUAL
(LED, LCD BATTERY VRSION)
第二页
Please read the manual carefully before operation!
第三页 目录
第四页 型号定义
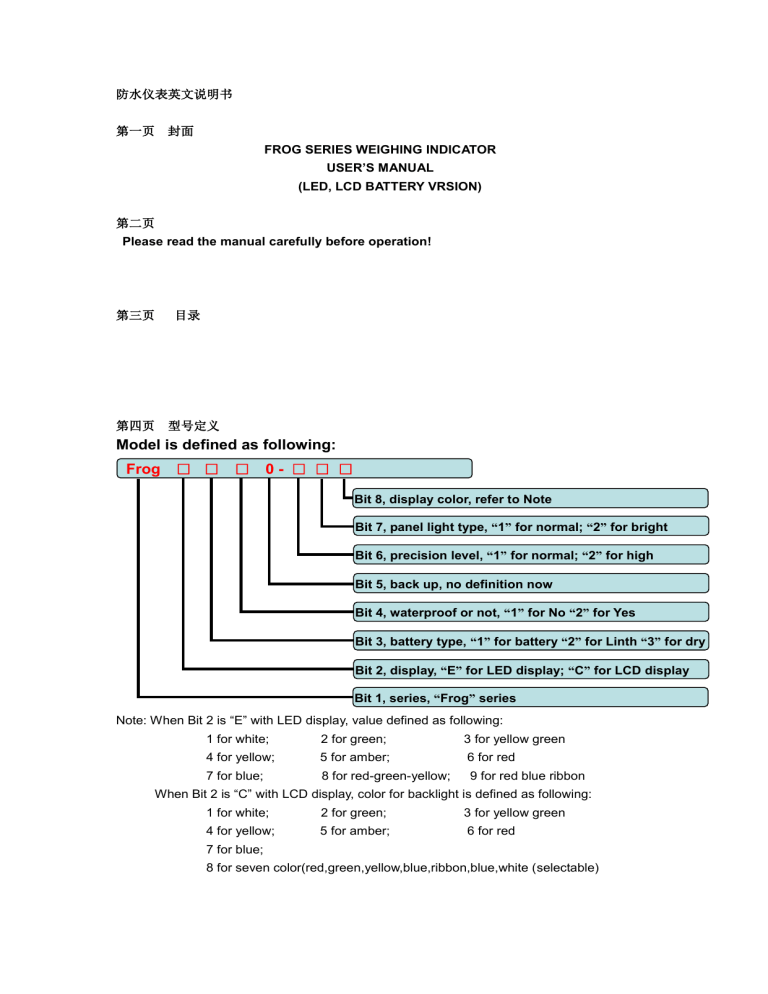
Model is defined as following:
Frog □ □ □ 0 - □ □ □
Bit 8, display color, refer to Note
Bit 7, panel light type, “ 1 ” for normal; “ 2 ” for bright
Bit 6, precision level, “ 1 ” for normal; “ 2 ” for high
Bit 5, back up, no definition now
Bit 4, waterproof or not, “ 1 ” for No “ 2 ” for Yes
Bit 3, battery type, “ 1 ” for battery “ 2 ” for Linth “ 3 ” for dry
Bit 2, display, “ E ” for LED display; “ C ” for LCD display
Bit 1, series, “ Frog ” series
Note: When Bit 2 is “E” with LED display, value defined as following:
1 for white; 2 for green; 3 for yellow green
4 for yellow; 5 for amber; 6 for red
7 for blue; 8 for red-green-yellow; 9 for red blue ribbon
When Bit 2 is “C” with LCD display, color for backlight is defined as following:
1 for white; 2 for green; 3 for yellow green
4 for yellow; 5 for amber; 6 for red
7 for blue;
8 for seven color(red,green,yellow,blue,ribbon,blue,white (selectable)
Example 1: Model FrogE120-117 stands for Frog series, Led display, with rechargeable battery, water proof, normal precision, with normal panel brightness, display color blue
Example 2: Model FrogC120-118 stands for Frog series, Lcd display, with rechargeable battery, water proof, normal precision, with normal panel brightness, backlight color is seven-color
第五页 主要参数
Chapter One Specification
1, Verified counts N=3000;
2, Sampling speed: 10 times/sec
3, Load cell sensitivity range: 1.5~3mV/V
4, Load cell connection number: 1~4 at 350 ohm
5, Division: 1/2/5/10/20/50
6, Display: 6 bits LED, 9 status indications(LED version)
6 bits LCD, 13 status indications(LCD version)
7 Communication interface(optional): RS232, serial sending, able to connect to scoreboard or
PC
8 Power supply: AC 100~240V/50~60Hz adatper
DC 6V/4AH(when voltage is below 5.4V, it will indicate)
9, Charge currency: 1A
10, Working temperature range: -10~40 ℃
11 , Transportation temperature range: -25~55 ℃
第六页 ( 显示与键盘 )
一、 Chapter Two Front View
Front View: LED version
Indication and key definition:
[Kg]: To indicate the current weight unit is Kg;
[g]: To indicate the current weight unit is g;
[lb]: To indicate the current weight unit is lb;
[+-]: To indicate low battery
[Zero]: To indicate the weighing data is at zero point;
[Stable]: To indicator the weighing data is stable;
[Net]: To indicate the current weight is net;
[Accum]: To indicate in accumulation weight mode;
[Keep]: To indicate the current weight is peak value;
[AC]: To indicate current power supply is Ac;
[Count.]: To indicate it ’s under counting function (the last decimal point)
Front View LCD version
Indication and key definition:
[Kg]: To indicate the current weight unit is Kg;
[g]: To indicate the current weight unit is g;
[lb]: To indicate the current weight unit is lb;
[Pcs]: To indicate it ’s under counting function;
[Battery]: To indicate it ’s low battery;
[HIGH]: To indicate current weight reaches the high value;
[OK]: To indicate the current weight is between high and low value;
[LOW]: To indicate current weight reaches the low value;
[Zero]: To indicate the weighing data is at zero point;
[Stable]: To indicator the weighing data is stable;
[Net]: To indicate the current weight is net;
[Accum]: To indicate in accumulation weight mode;
[Keep]: To indicate the current weight is peak value;
[AC]: To indicate current power supply is Ac;
Keyboards
[Zero] key: To zero within the manual zero range, and current weight will be zero;
[Tare] key: To tare and net indication will be on, and it will display net weight;
[Accum] key: To accumulate and get accumulation times/accumulation value;
[Count] key: To enter into counting function;
[Keep] key: To get peak hold function;
[Enter] key: To confirm and set up for function;
[ON/OFF] key: To turn on when it if off and to turn off when it is on;
二、 Chapter Three Interface( 传感器连接 , 加图 )
Load cell interface
1, The load cell connector is 7-pin, round, each pin is defined as following:
2, If 4-wire cable is adopted, then short connect +E and +S, -E and –S;
3, Pin definition is as following:
Pin 1: -IN
Pin 2: +IN
Pin 3: +E
Pin 4: +S
Pin 5:-S
Pin 6: -E
Pin 7: Shield
三、 Chapter Five Operation( 操作说明 )
1, On/Off
Press [on/off] key to turn on or turn off the weighing indicator. (Power supply is DC). Press
[on/off] key to show charge status if indicator is in charge. Press again, then back to weighing status.
Note: If AC is connected, indicator will auto turn on and gets into charge and weighing status.
2, Zero operation
Auto zero: If the weighing data is out of auto zero range, it will display Err-3 to indicate it can ’t find zero point. Then unload the commodity on the weighing platform, it can enter into normal weighing status.
Manual zero: It ’s valid at gross weighing status. Press [zero] key to back to gross zero point.
3, Tare operation
Press [tare] key to regard the current weighing data as tare value, the net indication will be on.
Unload the current weighing, it will display the negative tare value. Press [tare] again to back to gross zero point.
4, Accumulation operation
When the weighing data is not zero, press [accum] key, the current weighing data will be accumulated. And it will display ADD-xx to show the accumulation times (the max. times is 99) then it goes back to weighing status. The accumulation indication will be on. When the weighing data is zero, press [accum] key, it will display the accumulation times, press [accum] key again, it will display accumulation value, press [accum] key again, it goes back to weighing status. While displaying accumulation times or accumulation value, press [enter] key to clear the accumulation times or accumulation value, the accumulation indication will be off and indicator goes back to weighing status.
5, Counting function
Press [count] key after putting some samples at weighing status, it will display n=0000, press
[ →][←][↑ ] key to input the quantity of the samples, then press [enter] key, it gets the unit weight of the sample and the unit weight will be saved in the memory size. Then it enters into counting function. If there is something wrong during sampling, it will display Err-04 and loads to indicate the failure of the current sampling. Indicator will get the unit weight of last sampling
from the memory size. Press [Count] key again, it will quit counting status and back to weighing status. (When the display is LED, the last decimal point is on to indicate that it ’s at counting function. When the display is LCD, the pcs is on to indicate that it ’s at counting function.)
6, Peak holding function
Press [keep] key at weighing status(make ensured that in user ’s defined setting, parameter
FNCf X=2), the keep indication will be on, and it will enter into peak holding function. Press
[keep] key again to quit peak holding function, the keep indication will be off and back to weighing status.
四、 Chapter Four user’s defined setting( 用户功能设置 )
1.LED, single color display version
Press [enter] key for 2 seconds at weighing status, then indicator will enter into user’s defined setting mode. Press [enter] key to switch parameter from FNC1-x FNC2-x
FNC3x …END and press [↑] to select the value for each parameter. Press [enter] key again for 2 seconds, then it will return back to the weighing status. Following is the definition for each parameter:
Press [↑] key to switch the value for each parameter;
Press [enter] key to confirm the value and go to next parameter;
FNC1 To keep the factory default setting or not
X=1 No,
X=2 Yes.If the selection is X=2, press [tare] key to view the default setting for each parameter. Please refer to Note for default setting for each parameter.
FNC2 Power-saving mode setting
X=1 No power-saving
X=2 Power-saving mode 1. When the weighing data is stable for some time, indicator directly enters into power-saving model and indicator goes back to weighing mode when weighing data is unstable
X=3 Power-saving mode 2. When the weighing data is stable for some time, the brightness of display will goes down and then indicator goes into power-saving mode.
Indicator goes back to weighing mode when weighing data is unstable
Note: Power-saving mode is only available when power supply is DC.
FNC3 Set up for time when it enters into power-saving mode
X=1 After 30 seconds no change of weighing data, it enters into power-saving mode
X=2 After 60 seconds no change of weighing data, it enters into power-saving mode
X=3 After 120 seconds no change of weighing data, it enters into power-saving mode
This parameter is only available when FNC2 X=2/3 and power supply is DC.
FNC4 Set up for time when it is auto power off
X=1 No auto power off
X=2 Indicator will be auto power off after 10 minutes no weighing data change
X=3 Indicator will be auto power off after 20 minutes no weighing data change
X=4 Indicator will be auto power off after 30 minutes no weighing data change
This is only valid when power supply is DC.
FNC5 Backup
FNC6 Set up for display brightness
X=1 Low brightness
X=2 Middle brightness
X=3 High brightness
FNC7 Backup/FNC8 Backup/FNC9 Backup/FNCa Backup/FNCb Backup
FNCc Set up for decimal point shape
X=1 “ ﹒ ” signal
X=2 “ , ”signal
FNCd Set up for digital filter intensity
X=1 No digital filter
X=2 Low digital filter intensity
X=3 Middle digital filter intensity
X=4 Strong digital filter intensity
Please select the intensity according to the vibration of weighing environment;
FNCe Backup
FNCf Set up for peak holding function
X=1 No peak hold fucntion
X=2 Peak hold function
FNCg Set up for baud rate
X=1 9600
X=2 4800
X=3 2400
FNCh Set up for RS232 data format
X=1 No set up for RS232 data format
X=2 Able to set up for RS232 data format
FNCi Backup
FNCj Set up for high/low time
X=1 Indicate high/low after stablility
X=2 Indicae high/low before stability
LO Set up for low value
Press [ ← ] [ → ] [ ↑ ] to input value of the low target
UP set up for high value
Press [ ← ] [ → ] [ ↑ ] to input value of the high target
END1
Note: Factory default setting
FNC1-1/FNC2-1/FNC3-1/FNC4/FNC6-3/FNCc-1/FNCd-1/FNCf-1/NCg-1/FNCh-1/FNCj-1
LO ( 0/ UP ( 0 )
FNC5/ FNC7/ FNC8/ FNC9/ FNCa/ FNCb/ FNCe/ FNCi BACK UP
2.LED, three- color display version
Press [enter] key for 2 seconds at weighin g status, then indicator will enter into user’s defined setting mode. Press [enter] key to switch parameter from FNC1-x FNC2-x
FNC3x …END and press [↑] to select the value for each parameter. Press [enter] key
again for 2 seconds, then it will return back to the weighing status. Following is the definition for each parameter:
Press [↑] key to switch the value for each parameter;
Press [enter] key to confirm the value and go to next parameter;
FNC1 To keep the factory default setting or not
X=1 No
X=2 Yes
If the selection is X=2, press [tare] key to view the default setting for each parameter.
Please refer to Note for default setting for each parameter.
FNC2 Power-saving mode setting
X=1 No power-saving
X=2 Power-saving mode 1. When the weighing data is stable for some time, indicator directly enters into power-saving model and indicator goes back to weighing mode when weighing data is unstable
X=3 Power-saving mode 2. When the weighing data is stable for some time, the brightness of display will goes down and then indicator goes into power-saving mode.
Indicator goes back to weighing mode when weighing data is unstable
Note: Power-saving mode is only available when power supply is DC.
FNC3 Set up for time when it enters into power-saving mode
X=1 After 30 seconds no change of weighing data, it enters into power-saving mode
X=2 After 60 seconds no change of weighing data, it enters into power-saving mode
X=3 After 120 seconds no change of weighing data, it enters into power-saving mode
This parameter is only available when FNC2 X=2/3 and power supply is DC.
FNC4 Set up for time when it is auto power off
X=1 No auto power off
X=2 Indicator will be auto power off after 10 minutes no weighing data change
X=3 Indicator will be auto power off after 20 minutes no weighing data change
X=4 Indicator will be auto power off after 30 minutes no weighing data change
FNC5 Backup
FNC6 Set up for display brightness
X=1 Low brightness
X=2 Middle brightness
X=3 High brightness
FNC7 Set up for color of diplsay
X=1 Red/X=2 Green/X=3 Yellow or
X=1 Red/X=2 Blue/X=3 purple
FCN8 Set up for color of decimal point
X=1 Red/X=2 Green/X=3 Yellow or
X=1 Red/X=2 Blue/X=3 purple
FNC9 Set up for color of cursor
X=1 Red/X=2 Green/X=3 Yellow or
X=1 Red/X=2 Blue/X=3 purple
FNCa Set up for combined color
X=1 Red/X=2 Green/X=3 Yellow or
X=1 Red/X=2 Blue/X=3 purple
FNCb Set up for auto color change
X=1 No change
X=2 Change the color every 10 minutes
If HIGH/LOW value is saved, this function is invalid
FNCc Set up for decimal point shape
X=1 “ ﹒ ” signal
X=2 “ , ”signal
FNCd Set up for digital filter intensity
X=1 No digital filter
X=2 Low digital filter intensity
X=3 Middle digital filter intensity
X=4 Strong digital filter intensity
Please select the intensity according to the vibration of weighing environment;
FNCe Backup
FNCf Set up for peak holding function
X=1 No peak hold fucntion
X=2 Peak hold function
FNCg Set up for baud rate
X=1 9600
X=2 4800
X=3 2400
FNCh Set up for RS232 data format
X=1 No set up for RS232 data format
X=2 Able to set up for RS232 data format
FNCi Backup
FNCj Set up for high/low time
X=1 Indicate high/low after stablility
X=2 Indicae high/low before stability
LO Set up for low value
Press [ ← ] [ → ] [ ↑ ] to input value of the low target
UP set up for high value
Press [ ← ] [ → ] [ ↑ ] to input value of the high target
END1
Note: Factory default setting
FNC1-1/FNC2-1/FNC3-1/FNC4-1/FNC6-3/FNC7-1/FNC8-1/FNC9-1/FNCa-1/FNCb-1/FNCc-1/
FNCd-1/FNCf-1/FNCg-1/FNCh-1//FNCj-1
LO ( 0 )
UP ( 0 )
FNC5/FNCe/ FNCi BACK UP
3.
LCD, single color backlight version
Press [enter] key for 2 seconds at weighing status, then indicator will enter into user’s defined setting mode. Press [enter] key to switch parameter from FNC1-x FNC2-x
FNC3x …END and press [↑] to select the value for each parameter. Press [enter] key
again for 2 seconds, then it will return back to the weighing status. Following is the definition for each parameter:
Press [↑] key to switch the value for each parameter;
Press [enter] key to confirm the value and go to next parameter;
FNC1 To keep the factory default setting or not
X=1 No
X=2 Yes
If the selection is X=2, press [tare] key to view the default setting for each parameter.
Please refer to Note for default setting for each parameter.
FNC2 Set up for backlight
X=1 Backlight always on
X-2 Backlight auto on, when weighing data is stable for some time, backlight is auto off.
When weighing data is unstable, backlight is auto on.
X=3 No backlight
When power supply is AC, backlight is always on
FNC3 Set up for time when backlight is auto off
X=1 After 30 seconds no change of weighing data, backlight is auto off
X=2 After 60 seconds no change of weighing data, backlight is auto off
X=3 After 120 seconds no change of weighing data, backlight is auto off
This parameter is only available when FNC2 X=2 and power supply is DC
FNC4 Set up for time when it is auto power off
X=1 No auto power off
X=2 Indicator will be auto power off after 10 minutes no weighing data change
X=3 Indicator will be auto power off after 20 minutes no weighing data change
X=4 Indicator will be auto power off after 30 minutes no weighing data change
This parameter is only available when the power supply is DC
FNC5 /FNC6/FNC7/FNC8 /FNC9/FNCa/FNCb Backup
FNCc Set up for decimal point shape
X=1 “ ﹒ ” signal
X=2 “ , ”signal
FNCd Set up for digital filter intensity
X=1 No digital filter
X=2 Low digital filter intensity
X=3 Middle digital filter intensity
X=4 Strong digital filter intensity
Please select the intensity according to the vibration of weighing environment;
FNCe Backup
FNCf Set up for peak holding function
X=1 No peak hold fucntion
X=2 Peak hold function
FNCg Set up for baud rate
X=1 9600
X=2 4800
X=3 2400
FNCh Set up for RS232 data format
X=1 No set up for RS232 data format
X=2 Able to set up for RS232 data format
FNCi Backup
FNCj Set up for high/low time
X=1 Indicate high/low after stablility
X=2 Indicae high/low before stability
LO Set up for low value
Press [ ← ] [ → ] [ ↑ ] to input value of the low target
UP set up for high value
Press [ ← ] [ → ] [ ↑ ] to input value of the high target
END1
Note: Factory default setting
FNC1-1/FNC2-1/FNC3-1/FNC4-1/FNCc-1/FNCd-1/FNCf-1/NCg-1/FNCh-1/FNCj-1
LO ( 0 )
UP ( 0 )
FNC5/ FNC6/FNC7/ FNC8/ FNC9/ FNCa/ FNCb/ FNCe/ FNCi BACK UP
4.LCD, seven-color backlight version
Press [enter] key for 2 seconds at weighing status, then indicator will enter into user’s defined setting mode. Press [enter] key to switch parameter from FNC1-x FNC2-x
FNC3x …END and press [↑] to select the value for each parameter. Press [enter] key again for 2 seconds, then it will return back to the weighing status. Following is the definition for each parameter:
Press [↑] key to switch the value for each parameter;
Press [enter] key to confirm the value and go to next parameter;
FNC1 To keep the factory default setting or not
X=1 No
X=2 Yes
If the selection is X=2, press [tare] key to view the default setting for each parameter.
Please refer to Note for default setting for each parameter.
FNC2 Set up for backlight
X=1 Backlight always on
X-2 Backlight auto on, when weighing data is stable for some time, backlight is auto off.
When weighing data is unstable, backlight is auto on.
X=3 No backlight
FNC3 Set up for time when backlight is auto off
X=1 After 30 seconds no change of weighing data, backlight is auto off
X=2 After 60 seconds no change of weighing data, backlight is auto off
X=3 After 120 seconds no change of weighing data, backlight is auto off
This parameter is only available when FNC2 X=2 and power supply is DC
FNC4 Set up for time when it is auto power off
X=1 No auto power off
X=2 Indicator will be auto power off after 10 minutes no weighing data change
X=3 Indicator will be auto power off after 20 minutes no weighing data change
X=4 Indicator will be auto power off after 30 minutes no weighing data change
This parameter is only available when the power supply is DC
FNC7 Set up for color of backlight
X=1 Red/X=2 Green/X=3 Yellow/X=4 Blue/X=5 Purple/X=6 Sky-blue/X=7 White
FNC5 /FNC6/FNC8 /FNC9/FNCa Backup
FNCb Set up for auto backlight color change
X=1 No change
X=2 Change the color every 10 minutes
If HIGH/LOW value is saved, this function is invalid
FNCc Set up for decimal point shape
X=1 “ ﹒ ” signal
X=2 “ , ”signal
FNCd Set up for digital filter intensity
X=1 No digital filter
X=2 Low digital filter intensity
X=3 Middle digital filter intensity
X=4 Strong digital filter intensity
Please select the intensity according to the vibration of weighing environment;
FNCe Backup
FNCf Set up for peak holding function
X=1 No peak hold fucntion
X=2 Peak hold function
FNCg Set up for baud rate
X=1 9600
X=2 4800
X=3 2400
FNCh Set up for RS232 data format
X=1 No set up for RS232 data format
X=2 Able to set up for RS232 data format
FNCi Backup
FNCj Set up for high/low time
X=1 Indicate high/low after stablility
X=2 Indicae high/low before stability
LO Set up for low value
Press [ ← ] [ → ] [ ↑ ] to input value of the low target
UP set up for high value
Press [ ← ] [ → ] [ ↑ ] to input value of the high target
END1
Note: Factory default setting
FNC1-1/FNC2-1/FNC3-1/FNC4-1/FNC7-3/FNCb-1/FNCc-1/FNCd-1/FNCf-/FNCg-1/FNCh-1/F
NCj-1
LO ( 0 )
UP ( 0 )
FNC5/FNC6/ FNC8/ FNC9/ FNCa/ FNCe/ FNCi BACKUP
Calibration( 标定设置 )
Press [on/off] key to turn on the indicator, then press [span] button which is at the back of indicator until it displays the software version, it will display [SET-CL]. There are four types of parameters, they are [SET-CL][SET-FU][SET-GR][SET-SP], you could press [hold] key to switch among the four types of parameter. The definition and operation for each type of parameter is defined as following:
[SET-CL]
When indicator displays [SET-CL], press [tare] key, it will initialize the parameter as following:
A: Default metrology parameter:
FU1-1(KG);FU2-1(2%); FU3-1(10%); FU4-1(0.5d); FU5-1(FAST);FU6-1(0.5d);FU7-1(0.25s)
B: Default gravity setup parameter:
The default gravity for both calibration place and use place is 908035;
C: Default calibration data clear (needs to re-calibrate);
D: Default user ’s setting for different version:
LED, single display version
FNC1-1(No); FNC2-1(No);FNC3-1(No);FNC4(); FNC5-3(Bright);FNC6();FNC7();FNC8();
FNC9(); FNCa-1(. For decimal point);FNCb-1();FNCc();FNCd-1();
FNCe-1(9600);FNCf-1();FNCg(); FNCh-1(indicate after stable); LO(0); UP(0);
LED, three-color display
FNC1-1(No); FNC2-1(No);FNC3-1(No);FNC4();
FNC5-3(Bright);FNC6-1(Red);FNC7-1(Red);FNC8-1(Red); FNC9-1(Red); FNCa-1(. For decimal point);FNCb-1();FNCc();FNCd-1(); FNCe-1(9600);FNCf-1();FNCg();
FNCh-1(indicate after stable); LO(0); UP(0);
[SET-FU]
When indicator displays [SET-FU], press [enter] key to enter into setup, press [enter] key for setup parameter one by one, from FU1-X FU2-X …END2 SET-FU. Press [hold] key to change the value.
FU1 for unit weight(1:kg; 2:lb; 3: g)
FU2 for manual zero range ( 1:2%; 2:10%; 3:20% )
FU3 for auto zero range( 1:10%; 2:20%; 3:50%; 4:100%)
FU4 for zero tracking range(1:0.5d: 2:1d; 3:1.5d; 4:2d; 5:2.5d)
FU5 for zero tracking speed(1: fast; 2: middle; 3: slow)
FU6 for stable range setup (1:0.5d; 2: 1d; 3:2d)
FU7 for stable speed(1:0.25s; 2: 0.5s; 3:1s)
END2, pres [enter] key, it will display [SET-FU], press [hold] key to select other parameters, press [span] button to back to weighing status.
[SET-GR]
When indicator displays [SET-GR], press [enter] key to enter into setup for gravity, press [enter] key one time by another, it will display Gr-P Px.xxxx (calibration place gravity setup), and Gr-u ux.xxxx(use place gravity setup), press [
→][←][↑
] to modify the parameter, it will display
END3, press [enter] key, it will display [SET-GR], press [hold] key to select other parameters, press [span] button to back to weighing status.(Appendix is the global gravity table)
[SET-SP]
When indicator displays [SET-SP], press [enter] key to enter into calibration.
Note: Before calibration, make sure that the weight unit, division, decimal point, max. capacity are already setup, then it can come into calibration.
E=x for division set up Press [hold] key to select, press [enter] key for next;
Px.xxx for decimal point set up Press [hold] key to select, press [enter] key for next;
FSCALE for full capacity set up Press [enter] key to set up for full capacity, it displays xxxxxx, press[ →][←][↑ ] to modify the value, press [enter] key for next;
ZERO for zero point calibration Press [zero] key, it will display from 5 to 1 to calibrate zero point;
LOAD for full capacity calibration Load some weights according to the full capacity, press
[enter] key for confirm, it displays xxxxxx, press [ →][←][↑ ] key to input the value that is in accordance with the weight value, after stable, press [tare] key, it displays from 5 to 1 to calibrate full capacity point;
END4, pres [enter] key, it will display [SET-SP], press [hold] key to select other parameters, press [span] button to back to weighing status.
Inner code display
Press [on/off] key to turn on the indicator, press [zero] key before it displays 999999, it will display inner code, press [enter] key to back to weighing status.
封底
