Event Reservation System
Event Reservation System
Welcome to the Event Reservation System. This document will help set up the system for your needs. Please contact your system administrator for additional questions.
A.
Create Category Type, Main Category and Sub Category
1. Login to the system by pressing the Login Button and using your NetID and password
NOTE : Administrative privleges are based on Active Directory groups and settings. Please make sure the user has the appropriate permissions.
2. After logging in, select the Admin link from the top menu
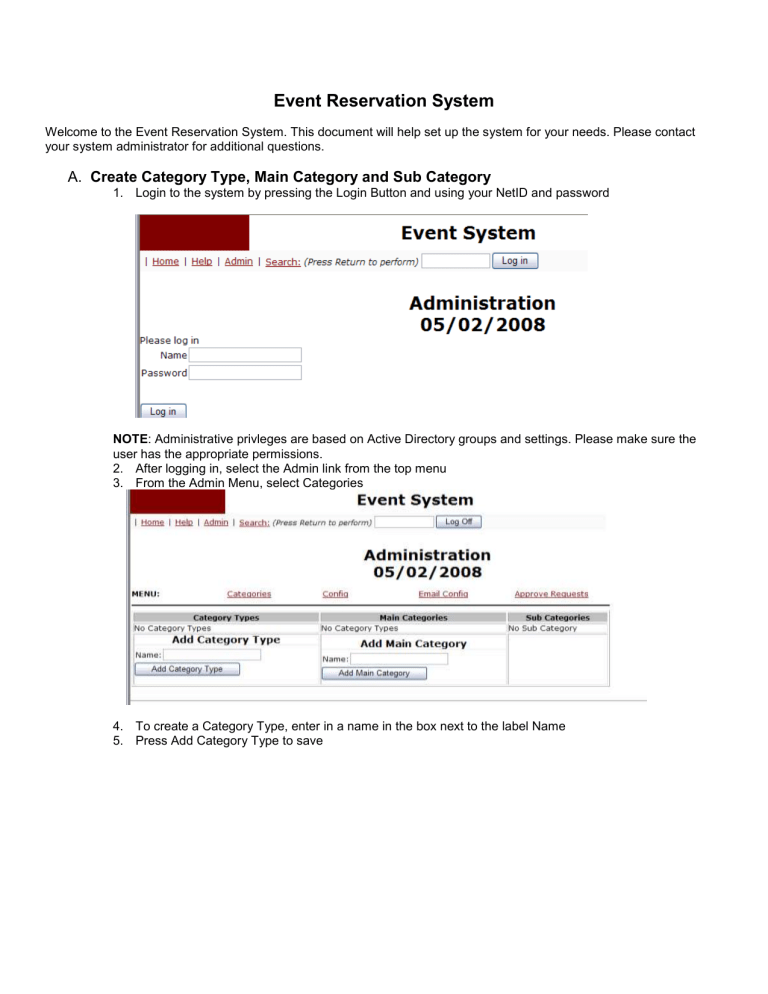
3. From the Admin Menu, select Categories
4. To create a Category Type, enter in a name in the box next to the label Name
5. Press Add Category Type to save
6. To create a Main Category, select the Category Type by clicking on the name. Then, enter in a name in the box next to the label Name
7. Press Add Main Category to save
8. To create a Sub Category, select the Main Category by clicking on the name. Then, enter in a name in the box next to the label Name
9. Press Add Sub Category to save
B.
Manage Category Properties
Now that the names have been created, the appropriate properties need to be defined so that the categories will function as expected
1. Click the Edit link next to the Category Type you want to manage
Definitions :
Category Type: The name that was originally created but can be edited here
Edit Include File: Each category type will have its own edit screen when a user creates an event for it.
Please contact your system administrator as to what this include file value should be
View Include File: Each category type will have its own view screen when a user views the details of the event. Please contact your system administrator as to what this include file value should be
Use Periods: Whether or not the category time value is displayed in periods or in hours. If the value is
True, Period Setting will need to be populated
Period Settings: If the category is displaying time as periods, the period names need to be entered
2. Enter in all the appropriate information for the category properties
3. Press Save Changes and a pop up will appear when the save is complete.
4. Press Back to Admin button to return to the main category admin screen
5. Click the Edit link next to the Main Category you want to manage
Definitions:
Name: The name that was originally created but can be edited here
Requests need approval: If the created event for the Main Category needs to be approved before applying it to the calendar, check this box. When checked, each new event will be queued to an approval list to either be approved or denied by the admin of the category
Admin Email: The email address of the person who will be notified when an event is either requested or scheduled
Category Link Color: This is the color that the event font will display on the calendars for the entire category. Please be conscious of style sheet when selecting colors. Click the link for samples to see a visual of each color in the drop down list
6. Enter in all the appropriate information for the category properties
7. Press Save Changes and a pop up will appear when the save is complete.
8. Press Back to Admin button to return to the main category admin screen
9. Click the Edit link next to the Sub Category you want to manage
Definitions
Name: The name that was originally created but can be edited here
Description: Any further detail about the room
Room Content: To assist users in selecting this room, please describe pertinent information about what the room contains. For example, for computer labs enter in software on the computers, Mac vs PC information, projectors, etc.
Capacity: The amount of people the room will hold
Room admin email: Manager of this room
10. Enter in all the appropriate information for the category properties
11. Press Save Changes and a pop up will appear when the save is complete.
12. Press Back to Admin button to return to the main category admin screen
C.
Config Administration
1. In order to give the site a custom look and feel, select Config from the Admin Menu
Definitions
Site Title: This title will appear as the application name on the top of every page
Resolution: The setting of resolution for the page. Use 1800 for the default
Morning Starts: The hour of the day that the morning will start and reservations can be made, i.e. 7
Evening ends: The hour of the day in which the day will end and reservations cannot be made past, i.e. 19 which is 7:00 PM
Morning start minutes: The minute of the day that the morning will start and reservations can be made, i.e. 15
Evening ends minutes: The minute of the day in which the day will end and reservations cannot be made past, i.e.
30
Week Starts: Day the week starts where 0 is Sunday, 1 is Monday, etc.
Date Format: If there is a special format to display dates. Default is 0
Use twenty four hour format: Display times in military time
Max Repeat Entries: The maximum number of times an event can be repeated. Default is 366
Default Report Days: How many days to display in reports
Display categories as list not select: Display categories as linked list or select box
View week number: Show the calendar week number in week view
Default view: The view of the home page month, week, day
Page Appearance Settings: Color and font selections for the system
Page Font : Font name for all text in the system i.e. Arial, Verdana
Page Font Color : Font color for all text in the system
Page Font Size
Hyperlink Color
: Font size for all text in the system
: Link color for all links in the system
Hyperlink text decoration : Should the link be bold, have an underline or no decoration. Default is underline
Hyperlink Hover Color : The color the link will change to when the user puts the cursor over it.
Hyperlink Hover text decoration : Should the link be bold, have an underline or no decoration when the user puts the cursor over the link. Default is none
Title Block color: The color of the block in the upper left corner
Period/Hour background color: In order to set apart the row for the time, change the background color here
Reserved Cell background color: When an event has been put on the calendar, the cell can have a different background color. Select that color here
Reserved font color: If the background colors will conflict with the category color, you can change the reserved cell font color here. Default is black
Month Reserved font color: If the background colors will conflict with the category color, you can change the monthly reserved cell font color here. Default is black
Available cell background color: The cells that are available to reserve can have a different color from the page background.
Time Cell Color: The color of the font for the time row
Room Column Color on Day View: The background color of the room column in day view
2. Make the appropriate changes to the values
3. Press the Save button
D.
Email Config
1. Email notifications can be sent on different tasks with different messages. Click the Email Config menu options from the Admin menu
Definitions
Email Admin on Bookings: Set to True if the Admin of the entire application wants a notification on an event booking
Email Main Category Admin on Bookings: Set to True if the Admin of the Main Category wants a notification on an event booking
Email Sub Category Admin on Bookings: Set to True if the Admin of Sub Category wants a notification on an event booking
Email Admin on Delete: Set to True if the Admin of the entire application wants a notification on an event deletion
Email Admin on Everything: Set to True if the Admin of the entire application wants a notification on any action
Include Details in email: Set to True if the email should contain the details of the event in the message
Email User on Bookings: Set to True if the requesting user of the event wants a notification on an event booking
Email From Address: The email address the notification should be coming from
Email Additional Recipients: Any other user that should be notified
Email CC: Any user who should be automatically copied
Email Message Settings: These setting pertain to the actual message that is being sent
Subject: The subject of each email sent on event bookings
Delete Subject: The subject of each email sent on event deletions
New Event: New event message body text, not the details
Changed Event: Changed event message body text
Deleted Event: Delete event message body text
2. Make the appropriate changes to the values
3. Press the Save button
E.
Approve Requests
1. If the Category Type is set up to have an event requested approved, the admin of that category type needs to manage the requests. From the Admin Menu, click on Approve Requests
Definitions:
Name: This is the name of the event that the user has entered
Start Time: The Date and Time that the event starts
End Time:
Room:
Approve:
Deny:
The Date and Time that the event ends
The Room/Sub Category that the event takes place in
Requestor: The user who entered in the event request
Check this if the event will be accepted and put on the Calendar
Check this to remove the request and notify the user it cannot be accepted
2. Make the appropriate changes to the values
3. Press the Approve Requests button
