Cisco CME SIP Trunk Configuration
advertisement
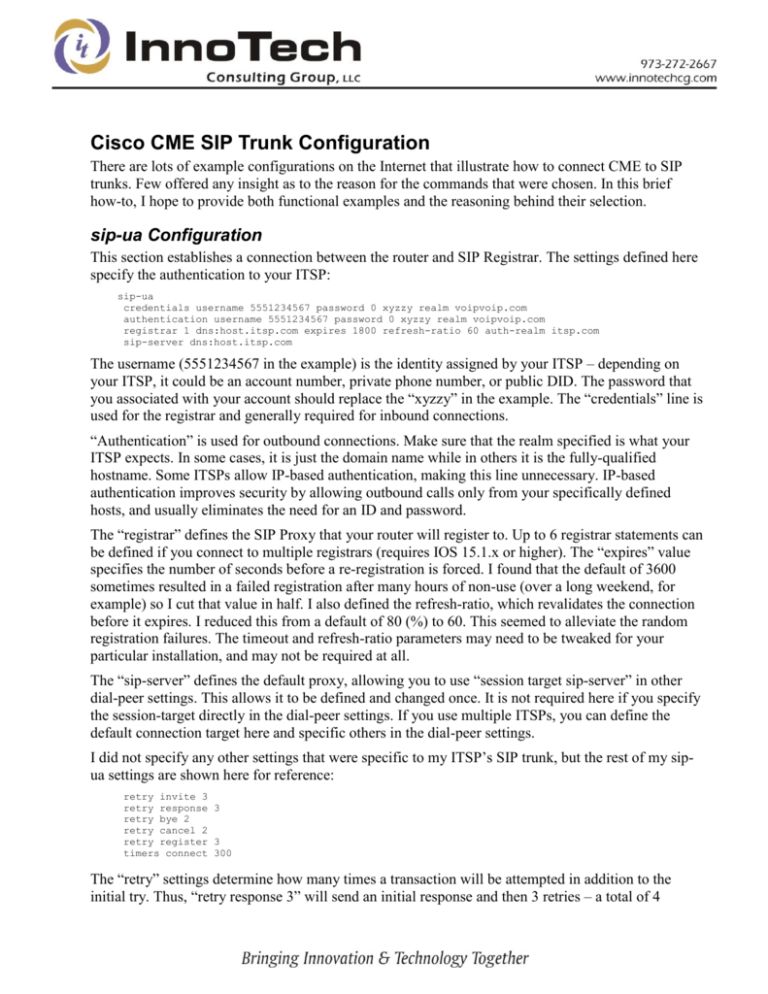
Cisco CME SIP Trunk Configuration There are lots of example configurations on the Internet that illustrate how to connect CME to SIP trunks. Few offered any insight as to the reason for the commands that were chosen. In this brief how-to, I hope to provide both functional examples and the reasoning behind their selection. sip-ua Configuration This section establishes a connection between the router and SIP Registrar. The settings defined here specify the authentication to your ITSP: sip-ua credentials username 5551234567 password 0 xyzzy realm voipvoip.com authentication username 5551234567 password 0 xyzzy realm voipvoip.com registrar 1 dns:host.itsp.com expires 1800 refresh-ratio 60 auth-realm itsp.com sip-server dns:host.itsp.com The username (5551234567 in the example) is the identity assigned by your ITSP – depending on your ITSP, it could be an account number, private phone number, or public DID. The password that you associated with your account should replace the “xyzzy” in the example. The “credentials” line is used for the registrar and generally required for inbound connections. “Authentication” is used for outbound connections. Make sure that the realm specified is what your ITSP expects. In some cases, it is just the domain name while in others it is the fully-qualified hostname. Some ITSPs allow IP-based authentication, making this line unnecessary. IP-based authentication improves security by allowing outbound calls only from your specifically defined hosts, and usually eliminates the need for an ID and password. The “registrar” defines the SIP Proxy that your router will register to. Up to 6 registrar statements can be defined if you connect to multiple registrars (requires IOS 15.1.x or higher). The “expires” value specifies the number of seconds before a re-registration is forced. I found that the default of 3600 sometimes resulted in a failed registration after many hours of non-use (over a long weekend, for example) so I cut that value in half. I also defined the refresh-ratio, which revalidates the connection before it expires. I reduced this from a default of 80 (%) to 60. This seemed to alleviate the random registration failures. The timeout and refresh-ratio parameters may need to be tweaked for your particular installation, and may not be required at all. The “sip-server” defines the default proxy, allowing you to use “session target sip-server” in other dial-peer settings. This allows it to be defined and changed once. It is not required here if you specify the session-target directly in the dial-peer settings. If you use multiple ITSPs, you can define the default connection target here and specific others in the dial-peer settings. I did not specify any other settings that were specific to my ITSP’s SIP trunk, but the rest of my sipua settings are shown here for reference: retry invite 3 retry response 3 retry bye 2 retry cancel 2 retry register 3 timers connect 300 The “retry” settings determine how many times a transaction will be attempted in addition to the initial try. Thus, “retry response 3” will send an initial response and then 3 retries – a total of 4 attempts. There are “timers” values as well, which define how long to wait for a response. The timer value doubles with each retry. I initially set the timers value to 100 and was getting consistent connections. I found that replies were arriving between 80 and 110ms, and those that exceeded 100ms completed after 1 retry (200ms window). Some temporary changes to the Internet service resulted in longer response times that caused the calls to abort when answered. Setting this value to 300 helped significantly and calls were completed without retries. This value should be large enough to cover most worst-case transit times between your location and your ITSP, but small enough that, when combined with the retry value, does not result in an unusually long connection time. With 3 retries and a 300ms timer, a total of 4.5 seconds would elapse before the call was terminated if a session was unable to be completed. Dial Peer Configuration Dial-peers define an association between a voice endpoint (POTS or VOIP) and an identifier such as an incoming or dialed number. I created several dial-peer settings to associate one incoming and several outgoing configurations for my (USA) dialing pattern. These adjust the called/calling numbers accordingly for 3-digit service dialing, 10-digit (with and without “1”), and international service. Your requirements may be different, but this should give a good idea of what’s necessary. Comments are shown in red in the right column. ! SIP/VoIP Dial Peers for 10 and 11-digit dialing ! set Preference value above or below POTS as appropriate ! 700 - Incoming calls (any # - routing handled by Hunt Groups or Ephone-DNs) ! 7x1 - services (x11) ! 7x2 - US 10-digit dialing ! 7x3 - US 10-digit dialing w/o 1 prefix ! 7x9 - International (011) ! ! dial-peer 700 for incoming voip calls (DID-1) dial-peer voice 700 voip Define a dial-peer for all incoming calls description SIP Trunk (incoming) session target dns:host.itsp.com Example for a specific target session protocol sipv2 incoming called-number .% Match any incoming number voice-class sip dtmf-relay force rtp-nte voice class codec 1 Specify the codec type (G729) for SIP ! ! Dial-peer 701 for 3-digit service calls (DID-1) Dial-peer voice 701 voip description SIP Trunk (10-digit dial) translation-profile outgoing SIP_1 destination-pattern 9[2-8]11 Outgoing – 411 / 611 type calls preference 1 Prefer this peer over others voice-class codec 1 voice-class sip dtmf-relay force rtp-nte dtmf-relay rtp-nte Needed to send digits after call connects session protocol sipv2 session target sip-server Specify the default target voice-class sip dtmf-relay force rtp-nte ! ! Dial-peer 702 for normal 10-digit calls (DID-1) Dial-peer voice 702 voip description SIP Trunk (10-digit dial) translation-profile outgoing SIP_1 destination-pattern 91[2-9]......... Outgoing – match dial 9-1-npa-nxx-extn preference 1 session protocol sipv2 session target sip-server voice-class sip dtmf-relay force rtp-nte voice-class sip reset timer expires 183 Accept 183 status ! ! Dial-peer 703 for normal 10-digit calls dialed without "1" (DID-1) Dial-peer voice 703 voip description SIP Trunk (10-digit dial) translation-profile outgoing SIP_1 destination-pattern 9[2-9]......... Outgoing – match dial 9-npa-nxx-extn preference 1 voice-class codec 1 voice-class sip dtmf-relay force rtp-nte session protocol sipv2 session target sip-server dtmf-relay rtp-nte no vad ! ! Dial-peer 709 for International service (DID-1) Dial-peer voice 709 voip description SIP Trunk (Intl LD) translation-profile outgoing SIP_1 destination-pattern 9011T preference 1 voice-class codec 1 voice-class sip dtmf-relay force rtp-nte session protocol sipv2 session target sip-server dtmf-relay rtp-nte no vad Note that the “session target” lines can all be defined as “session target sip-server” if the sip-server was defined in the sip-ua section. The examples show both formats. I have two DIDs on a single SIP trunk, so each of the 70x series of outbound dial-peers was duplicated into a 71x series so the proper translation profile would be applied. The translation-profile for these was changed to “SIP_2” so the number being sent would reflect the second DID number. The destination-pattern was also modified to begin with “7” instead of “9” so that the secondary outbound number could be selected by dialing “7”. Note that secondary dial tone is not provided when dialing “7”. Here is the example for 10-digit dialing from the second number: ! Dial-peer 712 for national service (DID-2) Dial-peer voice 712 voip description SIP Trunk (10-digit dial) translation-profile outgoing SIP_2 destination-pattern 71[2-9]......... preference 2 voice-class codec 1 voice-class sip dtmf-relay force rtp-nte session protocol sipv2 session target sip-server dtmf-relay rtp-nte no vad Second translation profile Note “7” prefix to select alt # Seven-digit dialing isn’t supported in our area so was not defined. If it’s needed, you can add dialpeer definitions to support it and any others that you require. Translation Rules Translation rules are used only by outgoing dial-peers in this configuration. Without a translation rule, the CME router will send the extension number of the caller’s phone in the SIP header. The ITSP will not understand this and reject the call because it is looking for the assigned ID or telephone number. Translation rules also re-format the dialed number to conform with local requirements. If you use a standard (Non-DID) POTS line in addition to your SIP trunk, you will most likely use a translation rule to replace the empty called number ID with the local phone number. This is not necessary for a SIP trunk, which provides both called and caller number identification. Voice translation rules specify unique individual or combinations of translations. Translation Profiles combine one or more rules and apply these rule sets against the called or calling number. Let’s examine the rules in this configuration. Voice translation rule 3 translates the 3-digit extension number (beginning with 1) to the outgoing phone number. You may need to adjust this rule based on your range of extensions, extension length, or other parameters. There are two examples below – my 3-digit (1xx) translation and a 4-digit form with a larger range (1000-2999). Only one should be used in most cases, unless you have noncontiguous blocks of extensions. Rule 4 does the same thing but defines a different calling number for the second DID. This is not required unless you have multiple DIDs. voice rule rule ! voice rule translation-rule 3 1 /^1../ /5551234567/ 1 /^[1-2].../ /5551234567 format for 3-digit extension (100-199) format for 4-digit extension (1000-2999) translation-rule 4 1 /^1../ /5557654321/ replace extension with second DID Next, we have translation rules for SIP outgoing dialed numbers. Rule group 10 is necessary, and rule group 11 is defined specifically for dial-peer 705, which allows selecting the SIP trunk by dialing “7” instead of “9”. Both provide for all common US dialing formats, and not all will be required in every location. These will need to be adjusted outside of the US, but this should clarify the concept. voice translation-rule 10 rule 1 /^9\(1..........\)/ /\1/ Strip the “9”, pass 10 digits rule 2 /^9973\(.......\)/ /\1/ Strip the local NPA for 7-digit dialing rule 3 /^9\(011.*\)/ /\1/ Strip the “9”, pass all digits rule 4 /^9\([2-9]11\)/ /\1/ Strip the “9” from 3 digit service calls ! ! strip 7 prefix (select SIP trunk 2 or alternate DID) voice translation-rule 12 rule 1 /^7\(1..........\)/ /\1/ Same as above, but removes “7” instead rule 2 /^7973\(.......\)/ /\1/ of “9” from the dial string. rule 3 /^7\(011.*\)/ /\1/ rule 4 /^7\([2-9]11\)/ /\1/ From these rules and rule groups, we can define translation profiles that apply them to either calling or called numbers. Rule group 3 is applied to calling numbers to translate the user’s extension into the desired calling number. Rule group 10 (or 11) reformats the called number, removing the dial prefix of “9” or “7”. Again, the rule groups and profiles for “dial-7” are not required and used primarily for testing in mixed POTS/SIP configurations or where multiple DIDs exist. voice translation-profile SIP_1 translate calling 3 translate called 10 ! ! strip SIP trunk select digit "7" voice translation-profile SIP_2 translate calling 4 translate called 11 Applies to 701-709 dial-peers converts calling number extension reformats the dialed number (strip “9”) Applies to 711-719 dial-peers same as above, but strips “7” instead At this point, the outbound configuration is complete and outbound dialing can be tested. E911 Service Dialing Two additional dial-peers should be defined for dialing e911 services. One should define the destination-pattern as “911” so it is not necessary to “dial 9” first. The second dial-peer uses a “9911” destination-pattern so the service can be reached whether the caller dials 9 first or not. I created dialpeers 911 and 921 for these, based on dial-peer 701 in the example above. Incoming Call Routing The incoming call must be routed to a directory number (ephone-dn) so it can be answered. There are several ways to accomplish this, and I will illustrate two that I tested. Method 1 – Associate with DN This is the simplest method and is an ideal way to test the incoming call functionality. The incoming number is simply associated with an ephone-dn definition, and that DN is then associated with one or more ephones. Note the “no-reg” parameter on the number definition for both the DID and the extension – this prevents these DNs from attempting to register with the SIP proxy. ephone-dn 81 number 5551234567 no-reg label SIP-1 description SIP Trunk 1 ! ephone-dn 82 number 5557654321 no-reg label SIP-2 description SIP Trunk 2 This is your primary DID This is your voipvoip public DID number When a call comes in, it will be matched to one of these two DNs, and the phones associated with these DNs will ring and be able to answer the call. Here’s an example ephone configuration: ephone-dn 1 dual-line number 111 no-reg both label Suzy description 111 name Susan Smith mwi-type both ! Forward to voicemail if busy or no-answer call-forward busy 399 call-forward noan 399 timeout 15 ! ephone 1 device-security-mode none description Suzy's desk mac-address 0012.3456.ABCD username "Suzy" type 7970 keep-conference button 1:1 4o81,82 This defines the extension DN define extension 111, no SIP register 399 is our voicemail pilot number This defines the phone and assigns DNs to the buttons Both DIDs will ring on button 4 The example above uses an overlay to put both SIP DNs on the same button. You can place each on a separate button if you desire. In this example, 1:1 assigns button 1 to DN 1, which is the 3 digit extension number assigned to this phone. Note that you can assign the same SIP DNs to multiple phones, and all will ring on an incoming call. The call will forward to the AA if the extension does not answer. To place each DID on a separate button, you can make the following change to the button definition: button 1:1 4:81 5:82 DID 1 on button 4, DID 2 on button 5 Often, it is desired to ring only certain phones, or a group of phones in sequence. You might also want to forward to an auto-attendant or voicemail after a set time. This can be accomplished with hunt groups. Method 2 – Hunt Groups Just as there are several methods to manage incoming calls, there are several ways to configure hunt groups. They are all quite similar except for the keyword that is used to define the hunt group and resulting call distribution pattern. In our office, we want all incoming SIP calls to ring simultaneously on one group of phones, then roll over to the auto-attendant after 20 seconds. I could choose to define each extension in the hunt group, or associate a DN with multiple phone buttons. I chose the latter method, but either will yield the same result. Here is the configuration I use for incoming calls: If you wish to use this method, define an ephone-dn as a dummy extension and a second ephone-dn for the SIP trunk. If you specify extensions directly in the hunt group, these DNs will not be required. ! ephone-dn 80 – Dummy ! ephone-dn 81 – Ring Group ! ephone-dn 80 number 1000 no-reg label Dummy ! ephone-dn 81 number 1011 no-reg label SIP-1 name SIP Trunk 1 ! ephone-dn 82 number 1012 no-reg label SIP-1 name SIP Trunk 1 DN not registered to any phone DN registered to button on ringing phones Define the hunt groups – each one requires a pilot number (the incoming SIP DID number), andn a list of parameters. Each hunt group requires a unique tag number and needs a hunt type. I chose “parallel” to ring all extensions at the same time, but other choices are “longest-idle”, “peer”, and “sequential”. The “pilot” value represents each of the DID numbers – one hunt group for each incoming number. “list” is the list of extensions to ring. In this sample, DN 1000 is not assigned anywhere and 1011 is assigned to the phones we want to ring. I chose this because I did not want to configure both the hunt group and the ephone settings to define the phones that ring. In this method, I just associate DN 81 to the phones I want to ring. If you choose any other hunt method, you must specify all of the extension numbers here. The “final” value is the auto-attendant extension number. It will be rung after the timeout expires. The “timeout” defines the number of seconds between each transfer in the list. In this configuration, all extensions ring for 20 seconds before transferring to the AA number. ! Hunt group 1 (SIP 1) voice hunt-group 1 parallel pilot 55512345567 list 1000, 1011 final 390 timeout 20 ! ! Hunt group 2 (SIP 2) voice hunt-group 2 parallel pilot 5557654321 list 1000, 1012 final 390 timeout 20 ring all extensions simultaneously dummy extn and SIP DN auto-attendant extension transfer to AA after 20 seconds If you choose to list the extensions in these hunt groups with a sequential type of hunt, realize that the timeout represents the time ringing at each extension. If you have just 3 extensions with a 20-second timeout, it will take a full minute before the Auto-Attendant extension is tried. With these example hunt groups defined, simply assign the corresponding SIP DN to the phone(s) that you want to ring, as shown here. This is similar to the earlier ephone-dn configuration. Note that you can configure a receptionist phone with DN 80 since it rings on all DIDs, although it would be better to associate both DNs 81 and 82 as shown here to clearly identify the number being called. ephone 1 mac-address 0012.3456.ABCD username "Suzy" type 7970 keep-conference button 1:1 4:81 5:82 Conclusion There are many configurations that will work, but getting it to work the first time is usually the biggest hurdle. It’s hard to tell if the problem is your configuration, firewall, or the service itself. Having a configuration that works will help you narrow down the source of any problems. The configurations presented here may not be right for every situation, but will, along with the explanations, provide a solid foundation for your ideal design.

