How to Conduct a Fire Hydrant Flow Test
advertisement
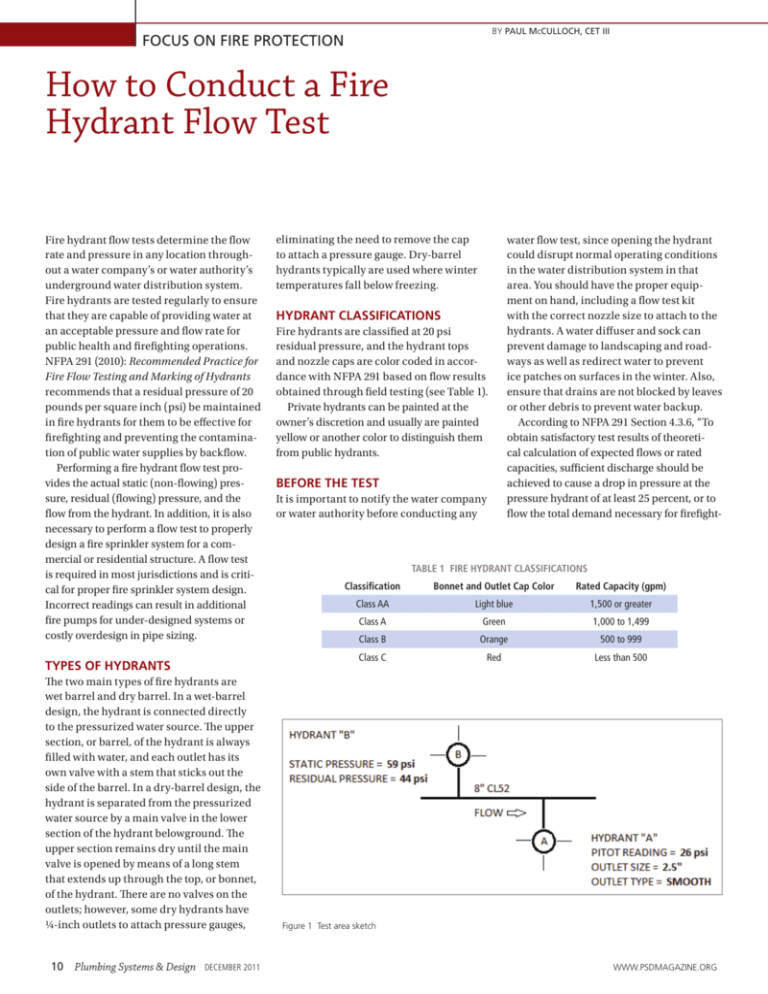
BY PAUL MCCULLOCH, CET III FOCUS ON FIRE PROTECTION How to Conduct a Fire Hydrant Flow Test Fire hydrant flow tests determine the flow rate and pressure in any location throughout a water company’s or water authority’s underground water distribution system. Fire hydrants are tested regularly to ensure that they are capable of providing water at an acceptable pressure and flow rate for public health and firefighting operations. NFPA 291 (2010): Recommended Practice for Fire Flow Testing and Marking of Hydrants recommends that a residual pressure of 20 pounds per square inch (psi) be maintained in fire hydrants for them to be effective for firefighting and preventing the contamination of public water supplies by backflow. Performing a fire hydrant flow test provides the actual static (non-flowing) pressure, residual (flowing) pressure, and the flow from the hydrant. In addition, it is also necessary to perform a flow test to properly design a fire sprinkler system for a commercial or residential structure. A flow test is required in most jurisdictions and is critical for proper fire sprinkler system design. Incorrect readings can result in additional fire pumps for under-designed systems or costly overdesign in pipe sizing. TYPES OF HYDRANTS The two main types of fire hydrants are wet barrel and dry barrel. In a wet-barrel design, the hydrant is connected directly to the pressurized water source. The upper section, or barrel, of the hydrant is always filled with water, and each outlet has its own valve with a stem that sticks out the side of the barrel. In a dry-barrel design, the hydrant is separated from the pressurized water source by a main valve in the lower section of the hydrant belowground. The upper section remains dry until the main valve is opened by means of a long stem that extends up through the top, or bonnet, of the hydrant. There are no valves on the outlets; however, some dry hydrants have ¼-inch outlets to attach pressure gauges, eliminating the need to remove the cap to attach a pressure gauge. Dry-barrel hydrants typically are used where winter temperatures fall below freezing. HYDRANT CLASSIFICATIONS Fire hydrants are classified at 20 psi residual pressure, and the hydrant tops and nozzle caps are color coded in accordance with NFPA 291 based on flow results obtained through field testing (see Table 1). Private hydrants can be painted at the owner’s discretion and usually are painted yellow or another color to distinguish them from public hydrants. BEFORE THE TEST It is important to notify the water company or water authority before conducting any water flow test, since opening the hydrant could disrupt normal operating conditions in the water distribution system in that area. You should have the proper equipment on hand, including a flow test kit with the correct nozzle size to attach to the hydrants. A water diffuser and sock can prevent damage to landscaping and roadways as well as redirect water to prevent ice patches on surfaces in the winter. Also, ensure that drains are not blocked by leaves or other debris to prevent water backup. According to NFPA 291 Section 4.3.6, “To obtain satisfactory test results of theoretical calculation of expected flows or rated capacities, sufficient discharge should be achieved to cause a drop in pressure at the pressure hydrant of at least 25 percent, or to flow the total demand necessary for firefight- TABLE 1 FIRE HYDRANT CLASSIFICATIONS Classification Bonnet and Outlet Cap Color Rated Capacity (gpm) Class AA Light blue 1,500 or greater Class A Green 1,000 to 1,499 Class B Orange 500 to 999 Class C Red Less than 500 Figure 1 Test area sketch While some flow tests can involve many hydrants flowing at the same the following example will reflect only one flowing hydrant. Be sure t 10 Plumbing Systems & Design DECEMBER 2011 the following information during the flow test. WWW.PSDMAGAZINE.ORG ing purposes.” Note that performing this test may require more than two people to open multiple hydrants, and two-way radios are often handy for communication between hydrants. PERFORMING A HYDRANT FLOW TEST While some flow tests can involve many hydrants flowing at the same time, the following example uses only one flowing hydrant. It is best to conduct a flow test during peak hours in the morning to reflect the worstcase scenario. Street pressures can fluctuate as much as 10 psi in the morning compared to the afternoon or night when demand is low. Having a sketch of the site is also a good idea (see Figure 1). During the flow test, be sure to collect the following information: t t t t t t t t t Date of hydrant test Hydrant location (street name) Time of day the hydrant was tested Static reading at pressure hydrant B (pressure in the system with no flow) Residual reading at pressure hydrant B (pressure during full flow) Flow reading (using pitot gauge) at hydrant A Water main diameter (in inches) Hydrant outlet size and type (coefficient of discharge) Hydrant elevation Follow the steps below to perform a single-hydrant flow test. 1. Locate the test area by choosing the closest hydrant downstream of the building supply line. This will be used to gather pressure readings. Next, select the subsequent downstream hydrant as the secondary flowing hydrant to obtain your pitot reading. 2. Remove the nozzle cap on the pressure hydrant and attach a pressure gauge to the outlet. Note: If the hydrant has a ¼-inch outlet to attach pressure gauges (only found on dry-barrel hydrants), remove the plug and install the gauge in the ¼-inch outlet. Then completely open the valve and take the static pressure reading. No water should be flowing. 3. Note any elevation changes from the pressure hydrant to the structure and the flowing hydrant. Figure 2 Pitot tube position Source: NFPA Standard 291 Figure 3 Three general types of hydrant outlet and their coefficients of discharge Source: NFPA Standard 291 4. Completely open the valve on the flowing hydrant, making sure the path of flow to the drain or pathway is safe and clear of debris and obstacles. Note that it may be necessary to use a diffuser. 5. Record the residual pressure from the pressure hydrant gauge after the pressure needle stabilizes. This could take several seconds of flow from the secondary flowing hydrant. 6. Record your pitot reading by inserting the orifice of the pitot tube into the center of the flow of water and away from the opening at half the diameter of the opening (see Figure 2). The centerline of the orifice should be at a right angle to the plane of the face of the hydrant outlet. 7. Close the hydrant slowly to avoid undue surges and damage to the underground system and equipment. 8. Insert your hand into the back of the hydrant outlet to verify whether the outlet is smooth and rounded, square and sharp, or square and projecting into the barrel (see Figure 3). Record the outlet size and type and include that information with the rest of the data from the flow test. 9. After closing all valves, verify that they are free of leaks, and ensure that the hydrant is returned to service condition. DECEMBER 2011 Plumbing Systems & Design 11 FOCUS ON FIRE PROTECTION CALCULATING THE RATE OF DISCHARGE t Outlet type = smooth and rounded = 0.90 coefficient of discharge After successfully completing the flow test and recording the information, enter the test data into the following formula to determine the rate of gallons per minute (gpm) discharged from the outlet of the hydrant. QF = 29.84(c)(d2)√p where: QF = Total residual flow during the test, gpm c = Coefficient of discharge (see Figure 3) d = Diameter of the outlet, inches p = Pitot pressure (velocity head), psi For Example Calculate the total residual flow using the following data: t t t t Static pressure = 59 psi Residual pressure = 44 psi Pitot pressure = 26 psi Outlet size = 2.5 inches Kusel NSF Half Page Ad v1.pdf 1 5/19/11 QF = 29.84 x 0.90 x 2.52 x √26 QF = 29.84 x 0.90 x 6.25 x 5.09 QF = 854 gpm CALCULATING THE HYDRANT FLOW Fire hydrant flow is measured at 20 psi. Use the following equation to obtain the fi re hydrant flow in gallons per minute at 20 psi. QR = QF x (hr ÷ hf)0.54 where: QR = Flow predicted at the desired residual pressure, gpm QF = Total flow measured during the test, gpm hr = Pressure drop to the desired residual pressure, psi hf = Pressure drop measured during the test, psi Continuing the Example Using the previous example, calculate the total flow at 20 psi. QR = 854 x [(59 – 20) ÷ (59 – 44)]0.54 QR = 854 x (2.6)0.54 QR = 1,430.68 gpm at 20 psi After successfully conducting the flow test and calculating the flow to 20 psi, enter the hydraulic information into a design software program and begin the sprinkler system design process. Be sure to contact the water department if the hydrant markings do not match the flow rate for the hydrant. It is also important to use current flow test data that is less than three years old. (Some jurisdictions may require more current data.) Always verify this requirement with the local authority having jurisdiction. Paul McCulloch is the technical sales representative for Fire Safety at Uponor North America. He has more than 15 years of professional experience in fire sprinkler design and extensive knowledge in U.S. and Canadian building and fire codes. He is NICET Level III certified for fire sprinkler design and is a professional member of ASPE and NFPA. For more information or to comment on this article, e-mail articles@ psdmagazine.org. 9:39 AM C M Y CM MY CY CMY K 12 Plumbing Systems & Design DECEMBER 2011 WWW.PSDMAGAZINE.ORG
