Using the Guest Access Feature in SmartSite
Typically, a SmartSite is restricted to members of the campus community through the use of UC Davis Kerberos
login IDs and passphrases. However, often there is a need to include non-UC Davis participants outside the
campus community in a site. The Guest Access process provides such an ability. This document details the steps
necessary to add one or more guests as participants to a SmartSite. Once an individual is added as a guest to
one site, they can easily be added to other sites.
Navigating the Site Editor tool
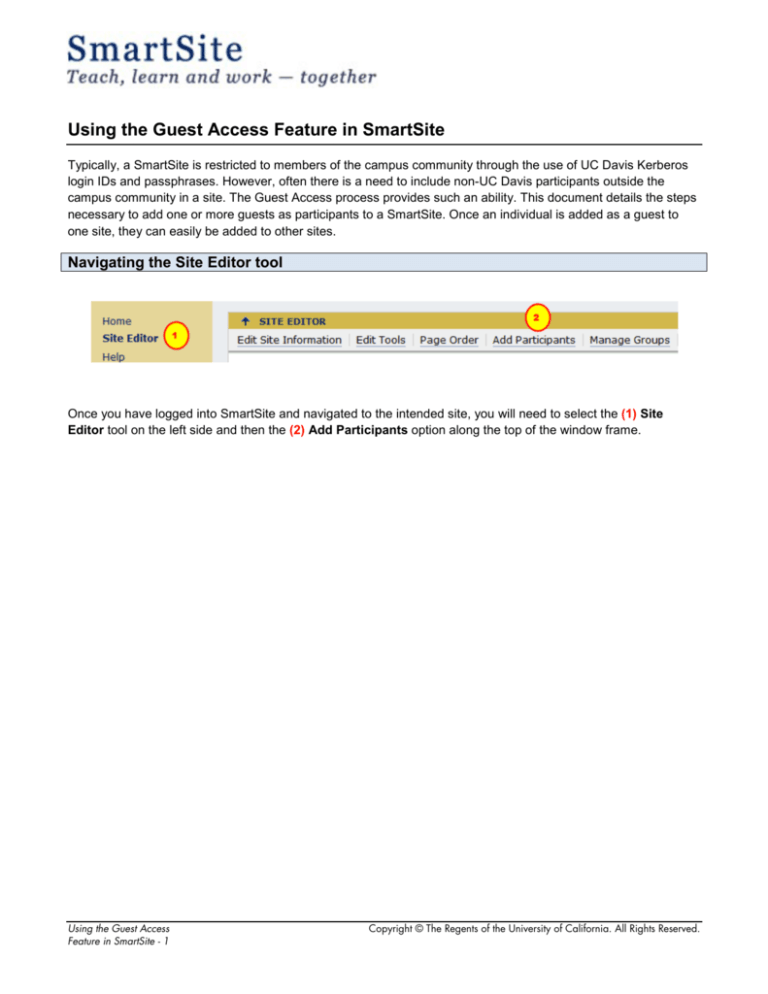
Once you have logged into SmartSite and navigated to the intended site, you will need to select the (1) Site
Editor tool on the left side and then the (2) Add Participants option along the top of the window frame.
Using the Guest Access
Feature in SmartSite - 1
Copyright © The Regents of the University of California. All Rights Reserved.
Enter the Prospective Guest's Email Address
(1) Add one or more Non-UC Davis participants using any valid email address. Each email address should be
listed in a separate line. Click the (2) Continue button at the bottom of the window when you are done entering
addresses.
Note: While the format of the email address will be checked by SmartSite, it will not check as to whether it is a
valid email address. Double check the address(es) that you are entering before proceeding to the next step.
Using the Guest Access
Feature in SmartSite - 2
Copyright © The Regents of the University of California. All Rights Reserved.
Choose a Role for the Guest
If you are adding a guest to a Course Site, it is advisable to give your guest the (1) auditor or the student role
instead of the instructor, lead ta or teaching assistant role. Those with the instructor or lead ta role can delete
the entire site and make administrative changes within the site. After making your selection, click the (2)
Continue button.
Using the Guest Access
Feature in SmartSite - 3
Copyright © The Regents of the University of California. All Rights Reserved.
"Don't Send" vs. "Send Now"
First Time Guest Registration: The default for this screen is Don't Send a notification, and this is exactly what
should be chosen. If Send Now is selected, then the prospective guest will receive an email leading them to
believe they are already registered.
Subsequent Site Additions: Once a guest is registered and activated, they can be added to additional sites
without being processed through the Guest Access feature. If the same guest is added to additional SmartSites
after the initial registration and activation procedure outlined in this document, then it may be a good idea to use
Send Now. This will be the only notification that the guest would receive that they have been added to a site.
Using the Guest Access
Feature in SmartSite - 4
Copyright © The Regents of the University of California. All Rights Reserved.
Confirmation Page
If the information looks correct, click the Finish button.
Back at Site Editor
You will be returned to the main screen for the Site Editor tool. Notice that your guest's email address appears
twice in the Name column; this indicates that they are tentative guests, but the process is not yet complete. At this
point, they are identified only by their email address.
Using the Guest Access
Feature in SmartSite - 5
Copyright © The Regents of the University of California. All Rights Reserved.
First Email to Guest
Steven LastName has invited you (example@mailnator.com) to apply for Guest Access to a UC Davis SmartSite called Guest
Access Demo.
Please DO NOT reply to this message. To register for guest access, you must go to the following address:
https://smartsite.ucdavis.edu/x/ihmpH2
NOTE: FROM THE TIME THIS MESSAGE WAS SENT, YOU HAVE A SHORT AMOUNT OF TIME TO REGISTER. IF YOUR
REGISTRATION PERIOD HAS EXPIRED, PLEASE CONTACT Steven LastName SO HE OR SHE CAN EXTEND YOUR
REGISTRATION PERIOD.
For technical assistance, please email smartsite-help@ucdavis.edu.
If you do not wish to be added to SmartSite at this time, then no further action is required.
Sincerely,
IT Express - Computing Services Help Desk
=======================================================================================
Access to the UC Davis SmartSite system requires verification that:
1. Your intended affiliation with UC Davis is valid.
2. Your need to access UC Davis' network computing resources is valid.
3. Your temporary SmartSite Guest account will be used exclusively for campus business.
4. You will comply with all applicable campus policies regarding electronic communications.
During the account creation process, you must agree to the UC Davis Computer Acceptable Use Policy:
http://manuals.ucdavis.edu/PPM/310/310-23a.htm
=======================================================================================
For Technical Support Reference:
Registration Site: https://smartsite.ucdavis.edu/xsl-portal/site/f8482610-2f5b-4cd9-9687564ca6e26b9c/page/41483e8f-08ae-4d89-9145-e50cdbb12fad?toolstate-1ed95b3d-c019-407b-88c60e657264d639=/register
Validation Code:
/9898d84d78903dec/f37893cd205854b73a6d0d004f9018d47c0141bba835d30a740ebc0d087249b8eae5477c8
a5dfc862a79cce418ca5f322d2f4b48aaf18aee8faa5fa72a9fe89a1c773faf96cf64c44c115bbc2d72c30c910751380a
19e93c299e92defed1a51119978fe1a5f147027e1d8d901d673818cc510aba75f508c0e5076b2ac443327f
This email is the crucial message that the prospective guest receives and contains unique and important
information regarding the next step for the guest.
Note: Prospective guests have a short amount of time that this email is sent (not read) to follow the link and
register. If the prospective guest(s) fail to complete the registration within this period, the sponsor (you) will need
to jump to the My Workspace - Guest Activation and Activate a Guest steps outlined below in the document. In
those steps, you will find a link that will allow an extension of the registration period.
Using the Guest Access
Feature in SmartSite - 6
Copyright © The Regents of the University of California. All Rights Reserved.
First Email to Sponsor (you)
===================== THIS IS AN AUTOMATED MESSAGE =====================
========== REPLIES WILL BE SENT TO SMARTSITE-HELP@UCDAVIS.EDU ==========
Steven LastName,
example@mailnator.com was successfully added to your SmartSite site Guest Access Demo. To begin using SmartSite, your
guest must register this account. A link to an online registration form has been sent to your guest via email.
In the process of registering, your guest will be asked to enter information that will help you verify that the person registering
is indeed the person you intended to add to the site.
You will receive another email when your guest has completed registration, asking you to validate the guest data entered
and to activate the guest account.
Until then, the user can be identified by example@mailnator.com in the site. This will change to the name that your guest
uses during registration when this step is complete.
Note: Some non-UC Davis spam filters will put the guest emails into their junk folder. If your guest contacts you saying they
have not received an email or for other technical assistance, please email smartsite-help@ucdavis.edu.
Sincerely,
IT Express - Computing Services Help Desk
This is a confirmation email to you, the sponsor, notifying you that you successfully completed the first step. You
will receive an additional message with further instructions once the guest registers.
Using the Guest Access
Feature in SmartSite - 7
Copyright © The Regents of the University of California. All Rights Reserved.
Guest Registration Process
Using the Guest Access
Feature in SmartSite - 8
Copyright © The Regents of the University of California. All Rights Reserved.
When the prospective guest follows the link in the first email they receive, they will be taken to a registration form.
They must provide (1) First Name, (2) Last Name, (3) Password, and (4) a description of their affiliation and
reason for using SmartSite. After completion, they can read the agreement and click Accept Terms and Register
or Cancel Registration.
Registration Confirmation for Guest
If the guest successfully registers, they will see this message.
Registration Confirmation Email
Please DO NOT reply to this message.
You have completed your application for a SmartSite Guest Account. Please make a note of the password that you created.
It is not possible to retrieve this password from SmartSite, nor can your sponsor tell you what password you created. Also
note that the email you used to register (example@mailnator.com) will be your "user id".
NOTE: YOUR ACCOUNT IS NOT YET ACTIVE.
Your sponsor has received a notification that you have completed this step. Your sponsor will next need to activate your
account, and you will then receive another email when that has occurred.
For technical assistance, please email smartsite-help@ucdavis.edu.
Sincerely,
IT Express - Computing Services Help Desk
The guest will also receive an email similar to the one above indicating that they have successfully completed the
registration form.
Using the Guest Access
Feature in SmartSite - 9
Copyright © The Regents of the University of California. All Rights Reserved.
Guest Activation Email
===================== THIS IS AN AUTOMATED MESSAGE =====================
========== REPLIES WILL BE SENT TO SMARTSITE-HELP@UCDAVIS.EDU ==========
Joe User (example@mailnator.com) has completed a SmartSite Guest Access account registration form.
To activate this guest account and complete the registration process, please complete the following steps.
1. Log into SmartSite. Once you log in, SmartSite will open in your "My Workspace" tab.
2. Find the "Guest Activation" tool displayed on the left margin.
3. Click on the "Guest Activation" tool to begin the activation process.
4. Scroll the horizontal bar to the right to see the "Activate Guest User" link in the column labeled "Status".
5. Click on this link to activate your guest if the "Identifying Affiliation" information is consistent with your expectations.
For technical assistance, please email smartsite-help@ucdavis.edu.
Sincerely,
IT Express - Computing Services Help Desk
As the sponsor, you will receive an email similar to the one above when the guest registers.
My Workspace – Guest Activation
Log into SmartSite. By default, when you are first logged into SmartSite, you are in the My Workspace area.
Click on Guest Activation in the list of My Workspace tools.
Using the Guest Access
Feature in SmartSite - 10
Copyright © The Regents of the University of California. All Rights Reserved.
Activate a Guest
To activate the guest, review the information for accuracy and click the Activate Guest User link.
Once Activate Guest User is clicked, the status will change to Active.
Using the Guest Access
Feature in SmartSite - 11
Copyright © The Regents of the University of California. All Rights Reserved.
Activation Confirmation to Sponsor
===================== THIS IS AN AUTOMATED MESSAGE =====================
========== REPLIES WILL BE SENT TO SMARTSITE-HELP@UCDAVIS.EDU ==========
This email is to confirm that you have added and activated example@mailnator.com in SmartSite.
If you did not activate this Guest Account or for other technical assistance please email smartsite-help@ucdavis.edu.
Sincerely,
IT Express - Computing Services Help Desk
This is the email confirmation the sponsor receives as part of the activation step.
Name Change in Site Editor
Once the guest is activated, they will be listed in the Site Editor tool as Lastname, Firstname
(address@domain.com).
Activation Confirmation to Guest
Please DO NOT reply to this message.
Thank you for creating a SmartSite Guest Access account for the email example@mailnator.com. Your sponsor has activated
your SmartSite account.
To log into SmartSite, go to https://smartsite.ucdavis.edu and click on the "Guest Login" button at the top right of the page.
Remember that when logging in, your "user id" is example@mailnator.com, and your "password" is the one you created on
the registration Web page.
For technical assistance, please email smartsite-help@ucdavis.edu.
Sincerely,
IT Express - Computing Services Help Desk
This is the final email that the Guest receives, letting them know they can now log into SmartSite.
Using the Guest Access
Feature in SmartSite - 12
Copyright © The Regents of the University of California. All Rights Reserved.
Special Login for Registered Guests
On the SmartSite main page, registered and activated guests can click on the Guest Login button.
Login Screen
Next, the guest can enter their email address and the password they chose during the registration process before
clicking the Login button.
Using the Guest Access
Feature in SmartSite - 13
Copyright © The Regents of the University of California. All Rights Reserved.
Site Tabs
After the guest is successfully logged into SmartSite, they will be able to see any site(s) that they are a participant
in listed in the tab bar at the top of the window.
Guest Management Tool
In addition to the Guest Activation tool that is in My Workspace, there is also a Guest Management tool that
will now appear in the list of tools for Sites that have guests. This tool will be visible to site participants that have
sufficient privileges within the Site.
Using the Guest Access
Feature in SmartSite - 14
Copyright © The Regents of the University of California. All Rights Reserved.
Guest Management View
The Guest Management tool indicates, for each guest, the sponsor's name and sponsor's email. Guests can also
be activated in the Guest Management tool in addition to the Guest Activation tool.
Using the Guest Access
Feature in SmartSite - 15
Copyright © The Regents of the University of California. All Rights Reserved.

