Workshop Tool in Moodle
advertisement
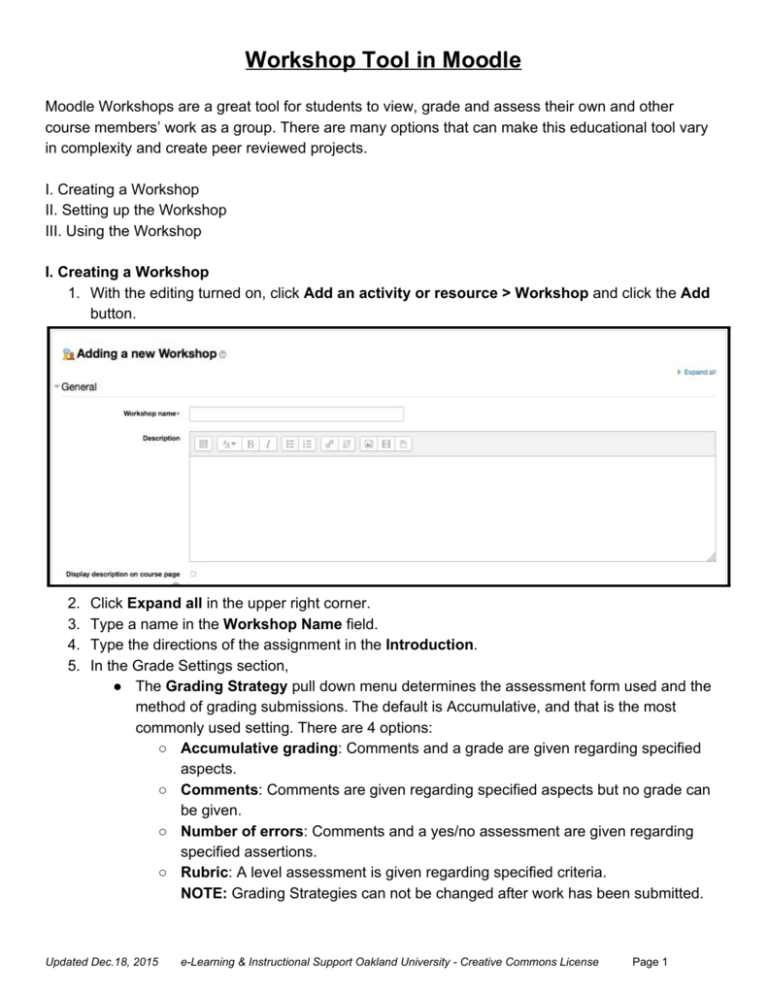
Workshop Tool in Moodle Moodle Workshops are a great tool for students to view, grade and assess their own and other course members’ work as a group. There are many options that can make this educational tool vary in complexity and create peer reviewed projects. I. Creating a Workshop II. Setting up the Workshop III. Using the Workshop I. Creating a Workshop 1. With the editing turned on, click Add an activity or resource > Workshop and click the Add button. 2. 3. 4. 5. Click Expand all in the upper right corner. Type a name in the Workshop Name field. Type the directions of the assignment in the Introduction . In the Grade Settings section, ● The Grading Strategy pull down menu determines the assessment form used and the method of grading submissions. The default is Accumulative, and that is the most commonly used setting. There are 4 options: ○ Accumulative grading : Comments and a grade are given regarding specified aspects. ○ Comments : Comments are given regarding specified aspects but no grade can be given. ○ Number of errors : Comments and a yes/no assessment are given regarding specified assertions. ○ Rubric : A level assessment is given regarding specified criteria. NOTE: Grading Strategies can not be changed after work has been submitted. Updated Dec.18, 2015 e­Learning & Instructional Support Oakland University ­ Creative Commons License Page 1 ● The Grade for Submission dropdown menu sets the maximum amount of points the student may obtain for submitted work. This is the grade they get for doing the assessment. They will get the full points here if they complete the required number of assessments, but instructors may go in and change that if they desire. This is listed as one grade column in the gradebook. ● The Grade for Assessment pull down menu sets the amount of points the students’ assessments of their own work and/or classmates work should be worth. Generally, this is the average grade students give each other (except the instructor also gives a grade here in the accumulative strategy). This is listed as one grade column in the gradebook. 6. In the Submission settings section, fill in any special submission instructions into the Instructions for submission text box. Use the Maximum number of submission attachments pull down menu to set the number of files a student can submit. 7. Assessment settings section ­ Type in any assessment instructions. You may also check a box if you allow students to assess their own work. 8. Feedback section ­ Feedback mode dropdown menu allows you to make feedback disabled, optional, or required. You may also add any conclusion text in the textbox. 9. Example submissions section ­ Check or uncheck Use examples, Use peer assessment, and/or Use self­assessment based on how you want the workshop tool to work. a. If Use examples is enabled, users can try assessing one or more example submissions and compare their assessment with a reference assessment. The grade is not counted in the grade for assessment. You can also set when they are to assess the examples below Mode of examples assessment. You can choose whether examples are optional to assess, must be assessed before submitting one’s own assignment, or must be assessed after submitting but before peer review can take place 10. Availability section ­ Here you can set the desired start and end dates and times for submission(s) and assessment(s). Checking the box for Switch to the next phase after the submissions deadline will automatically transition the workshop into the assessment phase once the submission deadline is met. If you enable this feature, it is recommended to set up the scheduled allocation method, too. If the submissions are not allocated, no assessment can be done even if the workshop itself is in the assessment phase. 11. You may set any common module settings, restricted access, or activity completion settings as needed. 12. Click the Save and Display button at the bottom of the screen. Page 2/7 II. Setting up a Workshop 1. Before the workshop can be used, you’ll need to edit the assessments. You can do this by clicking the Edit assessment form link available on the workshop’s Moodle page. On this page, you will be able to add aspects or criteria for the assignment to be graded on. Enter the description, grade, and weight for each aspect. If more aspects or criteria are required, you can click on the link at the bottom of the page labeled Blanks for 2 more aspects . 2. Once your assessment form is complete, click on Save and close to return to your course outline. Page 3/7 III. Using the Workshop Review the following descriptions and screenshots to better understand Workshop’s Grading Strategies. The default is Accumulative, and that is the most commonly used setting. ● Accumulative assessment : Once a student submits work, the assessors will complete something that may look like this: ● Comments assessment : Once a student submits work, the assessors will complete something that may look like this: Page 4/7 ● Number of Errors assessment : Once a student submits work, the assessors will complete something that may look like this: ● Rubric assessment: Once a student submits work, the assessors will complete something that may look like this: Page 5/7 Workshop Phases 1. Submission phase ­ if you didn’t specify a date when the workshop tool will automatically switch into Submission phase , you’ll need to manually do this by clicking on the lightbulb icon under that heading, which is circled in the screenshot below. a. Once in the Submission phase , the layout of the workshop page will change slightly to show you all work currently submitted to the workshop, as well as whether or not all of the participants have submitted material. In this phase, students will upload their files to be assessed. b. Under the Submission Phase heading, you will notice text saying Allocate submissions ; clicking on this text will take you to a page like the following: c. There are three headings under the Allocate submissions page. i. Manual allocation will allow you to choose by hand which students review which submissions through either the Participant is reviewed by or Participant is reviewer of columns. Note that multiple reviewers can be assigned to individual submissions. When selecting a student to review a submission, you will be taken to a page showing both the reviewer and the student under review; you can return to the list of participants by clicking on the Show all participants button. Reviewers can be de­allocated by clicking the red X icon next to their name in either the Participant is reviewed by or Participant is reviewer of columns. Page 6/7 ii. iii. Random allocation will automate the allocation process by randomizing which student is assigned to review each submission. This page contains a few settings to help automate the process. If groups are available in your course, you can randomize within the groups. You can also set Number of reviews both by per submission (i.e. the number of students to review a single submission) and by per reviewer (i.e. each student must review this many different submissions). Selecting Remove current allocations will override any currently allocated students before reallocating them. Scheduled allocation functions as an automated random allocation; if a Submission deadline is selected under the workshop settings, at the end of the submission period, the scheduled allocation function will assign submissions to students on its own. The settings for the scheduled allocation are identical to those used for the random allocation setting described above. This method works best with the setting that allows the workshop to advance automatically into the assessment phase at the end of the submission period. 2. Assessment phase ­ Once all students have submitted their work and each student has been assigned to review a submission using one of the methods outlined above, you may switch the workshop to the Assessment phase by clicking the lightbulb icon below Assessment phase in the workshop overview page. If you have enabled the settings for it, this will happen automatically once the Submission phase deadline is met. In this phase, students will assess each other’s submissions and assign grades. Instructors may also assess submissions during this phase. 3. Grading phase ­ When the assessment phase has been completed, you may advance the workshop to the Grading evaluation phase , by clicking the lightbulb icon in that column. In this phase, you will review each student’s submission as well as each student’s review of said submission and assign a grade to the submission based upon the assessments. By selecting an option under Comparison of assessments (between the choices of Very lax, Lax, Fair, Strict , and Very strict ), you can click on the Re­calculate grades button to automatically assign grades to each submission, based on how similarly each assessment evaluated the submission. NOTE: You can override these grades and assign your own based on your judgment by clicking on either the link under Submission or the grades received for each assignment. At the bottom of that page, you will see an area where you can set an Override grade , which can be used to set a grade different from the one automatically calculated by Moodle, and a text box where you can leave feedback for the student. 7. Once all assignments have been graded and you have left the amount of feedback you feel is necessary, you can click on the lightbulb icon under Closed in the workshop page to close the workshop. Doing this will allow the students to see their grades in the course gradebook. Page 7/7
