nimsaq howto
advertisement

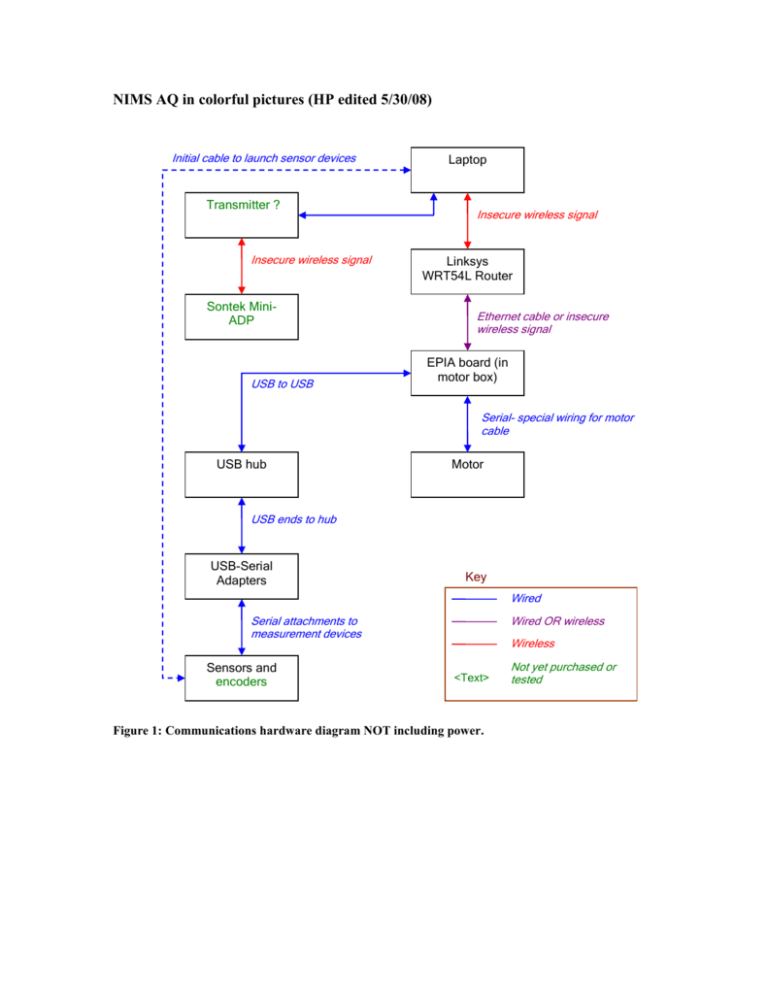
NIMS AQ in colorful pictures (HP edited 5/30/08) Initial cable to launch sensor devices Transmitter ? Insecure wireless signal Sontek MiniADP USB to USB Laptop Insecure wireless signal Linksys WRT54L Router Ethernet cable or insecure wireless signal EPIA board (in motor box) Serial- special wiring for motor cable USB hub Motor USB ends to hub USB-Serial Adapters Key Wired Serial attachments to measurement devices Sensors and encoders Wired OR wireless Wireless <Text> Figure 1: Communications hardware diagram NOT including power. Not yet purchased or tested Battery 2 batteries on pontoons C Batteries Low Power Inverter (12 V) 1000 W Inverter (12 V, 120 A) Sontek MiniADP Laptop on shore (power ?) Power strip (1875 W max) Motor EPIA board Adapter (12 V, 0.5 A) USB hub Linksys WRT54L Router USB-Serial Adapters Adapter (12 V, 5.5 A) Key <Text> Not yet purchased or tested Figure 2: Hardware power diagram. Sontek ADV, (12 V, ~17-42 mA) Hydrolab, (12 V, ? current) Encoders, (12V, 25 mA each) B. (1) Putty, (2) WinSCP Laptop A. Browser interface Router WRT54L Router EPIA board C. serial_sensor.py F. Windows software Sontek ADV and Hydrolab E. nimsfpmenu.py D. nimsaqmenu.py Motor Encoders Key <Text> Not yet purchased or tested Figure 3: Software control. Letters will correspond applications mentioned in manual later on. NIMS AQ Assessment 5/30/08 Table 1: Quick table of Henry’s opinions. The good The bad The unknown 1. ease of setup (haven't done it myself) 1. probably cannot handle high flow 1. do encoders help with calibration?* 2. less hardware - For the unknown, my hypothesis is that there will be displacement of the sensor payload created a sag in the direction of flow instead of gravity. This will render encoder positions incorrect IF we project the measurements back onto the planar cross-section. Code needs to be checked if Michael’s old cold accounting for sag due to gravity will account for displacement due to flow as well. Suggestions - Upgrade in cable. Current thin cable has 270 lbs breaking strength. Upgrade to 480 lbs probably a little safer and can tension it a little. - Test UC Merced’s wireless system. UCLA has gain antennas attached to router and PCMCIA wireless cards. This may be unnecessary because ideally 802.11g should “theoretically” handle ~140 m outdoors, http://en.wikipedia.org/wiki/IEEE_802.11g-2003. EPIA Board Changes 5/30/08 - Using WinSCP, moved nimsaq_v1_0, nimsrd_v2_0, and nims_utilities to EPIA board. Under root or sudo, mounted usb-serial adapter. Reference: http://blog.mypapit.net/2008/05/how-to-use-usb-serial-port-converter-inubuntu.html. # before attaching usb device nims@nimsrd1:~$ lsusb … # plug in usb device nims@nimsrd1:~$ lsusb … Bus 001 Device 002: ID 4348:5523 # new line appears # type nims@nimsrd1:~$ sudo modprobe usbserial vendor=0×4348 product=0×5523 # type nims@nimsrd1:~$ dmesg # last few lines should have something like usbserial_generic 1-1:1.0: generic converter detected usb 1-1: generic converter now attached to ttyUSB0 # port /dev/ttyUSB0 or whatever is named should be in sensor config # files - Under root or sudo, changed static internet settings to dhcp by first changing /etc/network/interfaces file. Then, change wireless settings. References: http://www.cyberciti.biz/tips/howto-ubuntu-linux-convert-dhcp-networkconfiguration-to-static-ip-configuration.html, http://ubuntuforums.org/showthread.php?t=571194. Changing file: # type nims@nimsrd1:~$ cd ../.. nims@nimsrd1:/$ cd etc/network nims@nimsrd1:/etc/network$ sudo vim interfaces Password: <aevena> # some lines in file before … auto eth0 iface eth0 inet static address 192.168.2.224 netmask 255.255.255.0 gateway 192.168.2.1 … auto wlan0 iface wlan0 inet static address 192.168.10.1 netmask 255.255.255.0 pre-up iwconfig wlan0 essid “nimsrd1” mode Ad-Hoc … # hit “i”, and then edit the lines as following … auto eth0 iface eth0 inet dhcp #iface eth0 inet static # address 192.168.2.224 # netmask 255.255.255.0 # gateway 192.168.2.1 … auto wlan0 iface wlan0 inet dhcp #iface wlan0 inet static # address 192.168.10.1 # netmask 255.255.255.0 #pre-up iwconfig wlan0 essid “nimsrd1” mode Ad-Hoc … # hit esc, then :wq # power down and power back up for settings to enable OR to avoid, ssh Changing wireless settings- ssh to the LAN IP # type nims@nimsrd1:~$ sudo Password: <aevena> nims@nimsrd1:~$ sudo nims@nimsrd1:~$ sudo nims@nimsrd1:~$ sudo nims@nimsrd1:~$ sudo nims@nimsrd1:~$ sudo ifconfig wlan down dhclient ifconfig iwconfig iwconfig dhclient –r wlan0 wlan0 up wlan0 “nims aq” wlan0 mode Managed wlan0 # should be done, when router is starting up, takes a little bit to # find LAN or WLAN IP, give it 5 minutes Pictoral User Guide for Figure 3 Table 2: Application and quick reference guide. Letter Application/Script logins/examples note A Web browser user = nims, password = aevena computer IP is set to obtain address automatically B1 Putty host = <EPIA board IP>, login = nims, password = aevena EPIA board IP’s assigned by router B2 WinSCP host name = <EPIA board IP>, user name = nims, password = aevena EPIA board IP’s assigned by router C serial_senor.py python serial_sensor.py sontek.cfg test01.log make sure cfg has right port D nimsaqmenu.py python nimsaqmenu.py which is last stable version without encoders? E nimsaqmenu.py python nimsaqmenu.py victor modified this one Table 3: MAC addresses for EPIA board and NIMSRD2 laptop. Device MAC EPIA board LAN 00:40:63:d5:fc:72 EPIA board WLAN nimsrd2 PC LAN nimsrd2 PC WLAN using ORiNOCO wireless card 00:04:e2:81:ff:31 00:08:02:E2:12:D2 00:02:2D:C0:82:1D Steps 1. Turn on everything and hook up like Figure 1 and 2. 2. Give it a few minutes. 3. Open Firefox or Internet Explorer and type 192.168.1.1 in address bar. Figure 4: Accessing the router. 4. In current browser, or click on Status and the Sys-info tabs, scroll to the bottom to see wireless and DHCP clients. *Login using nims as username and aevena as password if necessary.* Figure 5: Checking out network. Note the IP’s assigned to given devices. Note the EPIA board MAC addresses and associated IP addresses. In this particular case, 192.168.1.106 is the LAN IP and 192.168.1.109 is the WLAN IP 5. To move files over, double click on WinSCP icon on desktop. 6. Assuming wireless connection, (same steps for wireless connection minus physically plugging in Ethernet cable), fill out as shown below, (the password is aevena). Figure 6: WinSCP login screen. 7. Click Login and the following screen should look as follows. Drag and drop files/directories that are needed. *Click Yes whenever prompted.* Figure 7: WinSCP application screenshot. 8. Once you’re done moving files and actually want to operate NIMS, double click the putty.exe icon. 9. Assuming wireless connection again, type 192.168.1.109 in the host name as shown below. Figure 8: Putty login screen. 10. Click Open and login screen in putty command prompt shell will appear. The username is nims and the password is <aevena>. *No actually letters will appear when you type the password, just hit enter after you have entered it in. Figure 9: Putty command line. Notice password entered will not appear. Multiple sessions, (i.e. keep clicking on putty.exe icon to open up more command line prompts to do sensor readouts, etc.). Now the system should be the same as NIMSRD, from Michael’s nimsrdcontrol_doc.doc. Henry’s to-do list: 1. See if Michael’s calibration can handle sag due to flow and not weight (I think so). 2. Order encoder disks and standoffs. 3. Put on encoders. 4. Update Victor’s new config file. 5. Figure out NIMS-AQ physical setup. 6. Order stronger thin cable from McMaster? 7. Find small inverter for laptop?


