1997-2002 General Waterleak Guide
Published on Corvette Action Center.
http://www.corvetteactioncenter.com/kb/questions/360/1997++2002%3A+Service+Bulletin%3A+General+Waterleak+Guide
1997 - 2002: Service Bulletin: General Waterleak Guide
Subject: General Waterleak Guide
Source: Chevrolet Dealer Technical Service Bulletin
Number: 02-08-57-003
Models: 1997-2002 Chevrolet Corvette
Condition 1
Water is dripping on the passenger side transmission tunnel.
Cause
The plentium drain may be plugged or compressed.
Correction
Inspect the drain and unplug, if necessary.
Condition 2
Water is dripping on top of the passenger side carpet.
Cause
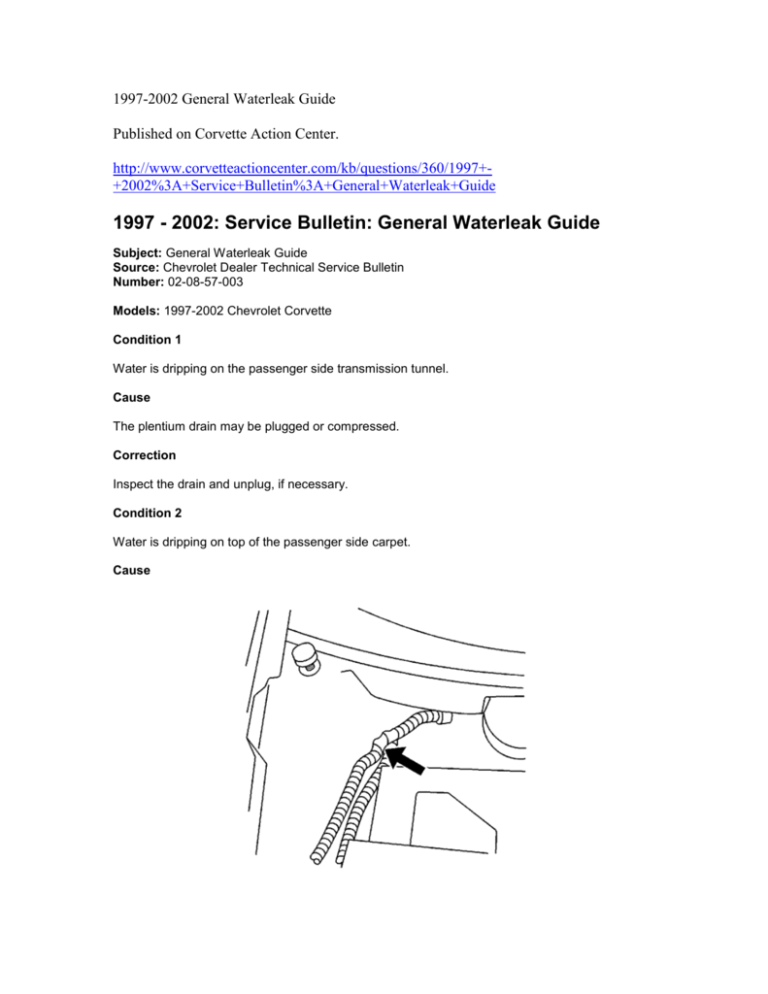
A wire harness leading into the passenger side compartment may be mis-routed (bent upward) at the first
split in the wire harness. This may allow water to enter the harness and into the passenger side
compartment. Refer to the arrow in the illustration.
Correction
Remove the battery and push the harness downward.
Verify the leak by flooding the front of the dash. Refer to the arrow in the illustration.
Condition 3
The carpet is wet under the passenger side floor.
Cause
The dash attaching bolts may not be sealed. Refer to the bolts in the illustration.
The lower hinge pillar may not be sealed. Refer to the arrow in the lower right hand corner in the illustration
above.
Correction
1.
2.
3.
Verify the leak by flooding the hinge area. Refer to the arrow in the illustration.
Clean the area with one of the cleaners listed below.
Reseal the area with the Kent™ sealer listed below.
Condition 4
Water is running down the front edge of the door or water is on top of the sill plate.
Cause
The butyl strip under the seal at the base of the "A" pillar may not be sealing properly or the push-in fastener
may not be seated.
Correction
Clean the area with one of the cleaners listed below.
Reseal the "A" pillar starting at the bottom of the weatherstrip retainer with the GM sealer listed below. Refer
to the dotted line in the illustration for sealing.
Condition 5
Water is running down the front edge of the door or water is on top of the sill plate.
Cause
Water may be leaking around the weatherstrip at the top of the door due to an undesirable nub in the
weatherstrip at the top of the door. Refer to the arrow in the illustration .
Two screws may not be sealed under the "A" pillar garnish molding. Refer to the illustration. During water
test with the "A" pillar molding off, there may be water coming out of either the garnish molding retaining
hole or the wire harness retaining hole. Refer to the arrow in the illustration.
Correction
Replace the weatherstrip.
Seal the two screws with the Kent™ sealer listed below.
Condition 6
The floor is wet behind the seat belts.
Cause
The "B" pillar weatherstrip may not be sealed properly.
Correction
Reseal the weatherstrip with the GM sealer listed below. Refer to the dotted line in the illustration for sealing
area.
Condition 7
There may be a leak around the perimeter of the hard top causing water to drip from the garnish molding
into the rear compartment.
Cause
There may be a void in the sealer between the body and the hard top.
Correction
Clean the area with one of the cleaners listed below and seal the area shown in the illustration with the
Kent™ sealer listed below.
Condition 8
The floor is wet behind the seat belts (Hardtop/ Z06 only).
Cause
The top corner of the weatherstrip may not be sealed properly. Refer to the area shown in the illustration.
Correction
Reseal the weatherstrip with the GM sealer listed below. Refer to the sealer in the illustration.
Condition 9
The floor is wet behind the seat belts or water seems to be entering through the hole in the interior trim
panel where the seat belt feeds through.
Cause
The fit where the front edge of the convertible top stowage compartment lid "protector" contacts the rear
edge "bulb seal" of the "mucket"*. Refer to the illustration above.
* "Mucket" is the term used to refer to each end of the convertible top stowage compartment lid weatherstrip.
The front edge of the stowage lid protector should overhang the stowage lid by approximately 3 mm (0.12
in). That 3 mm (0.12 in) overhang should then firmly contact the bulb seal rear edge of the mucket to
complete the seal between the stowage lid and the lower "B" pillar.
Correction
If moving the lid forward or rearward, a 4 mm (0.16 in) gap between the rear of the stowage lid and the front
of the trunk lid must be maintained.
Adjust the stowage lid cover downward slightly for more contact. Refer to the illustration above.
Cleaners
Kent Acrosol
3M® General Purpose Adhesive Cleaner, P/N 08984
Dominion Sure Seal, Sure Solve BSS
Sealer
Kent Automotive™, Wet/Dry Re-Sealant P/N 10570 11 fl. oz. cartridge (in Canada P/N 10570, 325 ml)
Kent Wet /Dry Re-Sealant can be purchased by calling 1-800-654-6333 (in Canada, 1-800-563-1717)
GM Weather Strip Adhesive Gel-Black 2 fl. oz tube, P/N 12345096
GM bulletins are intended for use by professional technicians, NOT a "do-it-yourselfer". They are written to
inform these technicians of conditions that may occur on some vehicles, or to provide information that could
assist in the proper service of a vehicle. Properly trained technicians have the equipment, tools, safety
instructions, and know-how to do a job properly and safely. If a condition is described, DO NOT assume that
the bulletin applies to your vehicle, or that your vehicle will have that condition. See your GM dealer for
information on whether your vehicle may benefit from the information.
COPYRIGHT 2002 GENERAL MOTORS CORPORATION. ALL RIGHTS RESERVED.

