1 Protecting VBA projects - staff.city.ac.uk
advertisement
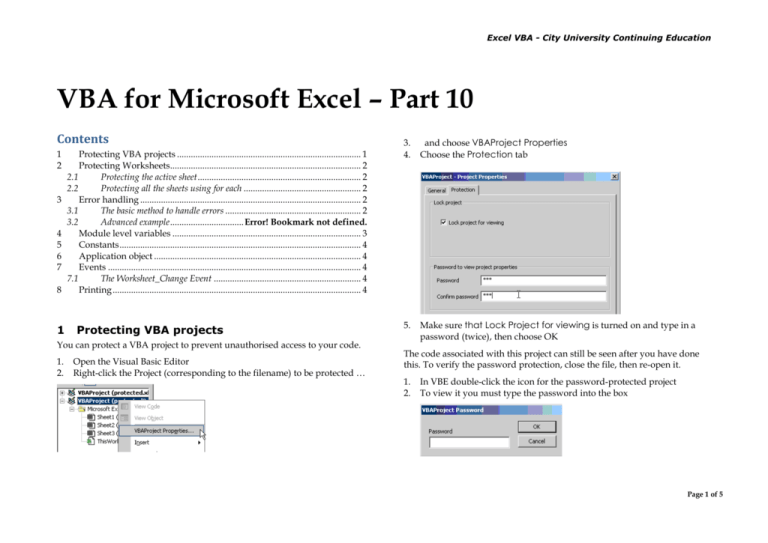
Excel VBA - City University Continuing Education VBA for Microsoft Excel – Part 10 Contents 1 2 3 4 5 6 7 8 1 Protecting VBA projects ................................................................................ 1 Protecting Worksheets................................................................................... 2 2.1 Protecting the active sheet ....................................................................... 2 2.2 Protecting all the sheets using for each ................................................... 2 Error handling ................................................................................................ 2 3.1 The basic method to handle errors ........................................................... 2 3.2 Advanced example ................................ Error! Bookmark not defined. Module level variables .................................................................................. 3 Constants ......................................................................................................... 4 Application object .......................................................................................... 4 Events .............................................................................................................. 4 7.1 The Worksheet_Change Event ................................................................ 4 Printing ............................................................................................................ 4 Protecting VBA projects You can protect a VBA project to prevent unauthorised access to your code. 1. 2. Open the Visual Basic Editor Right-click the Project (corresponding to the filename) to be protected … 3. 4. and choose VBAProject Properties Choose the Protection tab 5. Make sure that Lock Project for viewing is turned on and type in a password (twice), then choose OK The code associated with this project can still be seen after you have done this. To verify the password protection, close the file, then re-open it. 1. 2. In VBE double-click the icon for the password-protected project To view it you must type the password into the box Page 1 of 5 Excel VBA - City University Continuing Education 2 Protecting Worksheets 2.1 Protecting the active sheet The Protect Sheet button is on the Review ribbon. 3 Error handling ActiveSheet.Protect "abcd" True, True, True 3.1 The basic method to handle errors An error situation that arises during the running of a macro is known as a runtime error. The following discussion deliberately contrives an error. The code selects a cell five rows above the current cell and colours it yellow – if there aren’t five rows above the current cell when the macro is run a run-time error occurs. You can probably guess that ActiveSheet is the object and Protect the method; Protect takes various arguments, including Password, followed by what aspects of the worksheet are being protected – the values are True or False. In the example the password is ‘abcd’ (case sensitive) Sub Macro1() ActiveCell.Offset(-5, 0).Select ActiveCell.Interior.Color = vbYellow End Sub The corrsesponding line to UnProtect it is ActiveSheet.UnProtect "abcd" True, True, True It is important to try to anticipate user errors. The most basic way is to add some code that quits the macro. 2.2 Protecting all the sheets using for each Now let us create a macro to protect all the sheets in the workbook. A For Each loop can make the macro work for all sheets, with the following syntax. Sub Macro1() On Error GoTo myErrorHandler A line of code to protect the current sheet might look like this. For Each variable In collection Action(s) required Next variable Sub ProtectSheets() Dim wk As Worksheet For Each wk in Worksheets wk.Protect “abcd” Next wk End Sub ActiveCell.Offset(-5, 0).Select ActiveCell.Interior.Color = vbYellow this line means ‘if an error occurs go to the line specified by the provided label’ – here myErrorHandler is the label myErrorHandler: Exit Sub a label is some text and a colon End Sub Of course this may leave the user none the wiser so you could add a message box; it’s intuitive to think you do this just before the Exit Sub statement myErrorHandler: MsgBox "You must start below Row 5" Exit Sub End Sub but this would cause the message box to appear each time the macro runs. Page 2 of 5 Excel VBA - City University Continuing Education There is nothing special about the label that stops the execution of the statements after it – therefore even if the macro completes successfully, the End Sub statement never happens, the macro terminates with the Exit Sub statement. The answer lies with the keyword Resume. 4 Sub Macro1() On Error GoTo myErrorHandler To declare a module level variable, you declare it in the Declarations section (where the Option statements are), before any subs. ActiveCell.Offset(-5, 0).Select ActiveCell.Interior.Color = vbYellow exit_here: Exit Sub You can use Dim as previously, but it is recommended you use the keywords Private or Public to determine the scope of the variable. Private variables are accessible only to the subs in the same module, Public variables are accessible to all the subs in the workbook. Here is a basic example that uses a global variable: myErrorHandler: MsgBox "You must start below Row 5" Option Explicit Private x As Integer Resume exit_here Sub one() x = 1 MsgBox x End Sub End Sub If you want a message box to return the ‘official’ error number and description, use the Err object as follows: MsgBox Err.Number & " " & Err.Description In case you are interested the above macro could be amended as follows: If ActiveCell.Row > 5 Then ActiveCell.Offset(-5, 0).Select Resume Next You may want a macro to continue in spite of an error. The statement: On Error Resume Next means ‘clear the error and continue with the next line of the macro’. For example you may want to continue calculating down a column even if one calculation fails because of, say, a division by zero error. Another common practice is to ensure that application defaults are restored by the error handler. Module level variables Use module level variables only when two or more subs need access to the same variable; otherwise it’s better practice to use variables local to the procedure they are in. Sub two() x = x + 99 MsgBox x End Sub Sub runthisprog() Call one Call two End Sub Page 3 of 5 Excel VBA - City University Continuing Education 5 Constants You can declare Constants as well as variables, the difference being that a constant cannot change. The distinction between Public and Private applies as for variables. Constants can be of a scientific nature, e.g. Public Const Pi = 3.14159 or you can define your own preferred colours Public Const myred = 5066944 or you can predefine file locations Public Const myPath = “C:\Spreadsheets\” 6 Application object Application has useful properties/methods that can improve various aspects of a macro. The following are Boolean, i.e. set them to True or False. Application.ScreenUpdating switches off the visual display when a macro is running. Note that using Step Into is impossible if ScreenUpdating is set to False. Application.DisplayAlerts can be set to False while a macro is running to stop Excel messages interfering with the smooth running of the macro. It is essential to set it back to True before the End Sub, otherwise this setting will persist. Application.GeSaveAsFilename displays the File Save As window Sub SaveName() Dim fileSaveName As String Workbooks.Add fileSaveName = Application.GetSaveAsFilename _ (fileFilter:="Excel Files (*.xl*), *.xl*") If fileSaveName <> False Then MsgBox "Save as " & fileSaveName End If End Sub 7 Events 7.1 The Worksheet_Change Event This event occurs when the value of a cell on the worksheet changes. You could exploit it if you have volatile data. The code example simulates a worksheet with external links like prices or exchange rates. A change to any value triggers a colour change for every cell on the worksheet. Private Sub Worksheet_Change(ByVal Target As Range) Dim rng As Range For Each rng In Range("prices") If IsNumeric(rng) And Not IsEmpty(rng) Then If rng >= 16 Then rng.Font.Color = vbGreen ElseIf rng < 15 Then rng.Font.Color = vbRed Else rng.Font.Color = vbBlack End If End If Next rng End Sub 8 Page Setup and Printing Every worksheet has its own PageSetup, therefore it follows that the Worksheet object contains the PageSetup object Page orientation, settings for margins etc. are properties of the PageSetup object, e.g., Worksheets("Exams").Activate With ActiveSheet.PageSetup .Orientation = xlLandscape .LeftMargin = Application.InchesToPoints(2.5) .HeaderMargin = Application.InchesToPoints(0.3) Page 4 of 5 Excel VBA - City University Continuing Education .CenterHorizontally = True .Zoom = 150 .LeftFooter = ThisWorkbook.FullName .RightFooter = Application.UserName End With ActiveSheet.PrintPreview ' or ActiveSheet.PrintOut Print Areas By default the whole worksheet is printed. To designate a worksheet area to be printed use the PrintArea property of PageSetup, e.g., ActiveSheet.PageSetup.PrintArea = "$A$1:$C$10" For more flexibility you can use the Address property of Selection ActiveSheet.PageSetup.PrintArea = Selection.Address You can use the comma as the Union operator ActiveSheet.PageSetup.PrintArea = "$A$1:$C$10,$C$2:$C$12" BeforePrint event You can use the BeforePrint event of the workbook make changes to PageSetup every time any worksheet is printed. Private Sub Workbook_BeforePrint(Cancel As Boolean) Dim wk As Worksheet Dim CompanyName As String CompanyName = "City University" For Each wk In Worksheets With wk.PageSetup .LeftFooter = CompanyName .RightFooter = ThisWorkbook.FullName End With Next wk End Sub . To clear a Print Area the code is ActiveSheet.PageSetup.PrintArea = "" Page Breaks To add manual Page Breaks use HPageBreaks or VPageBreaks. For example to add page breaks before the active cell: ActiveSheet.HPageBreaks.Add Before:=ActiveCell ActiveSheet.VPageBreaks.Add Before:=ActiveCell To clear Page Breaks use ActiveSheet.ResetAllPageBreaks There are only objects for manual Page Breaks. To control automatic Page Breaks the only way is to change the page margins Page 5 of 5
