Mediacom Portal User Guide: Login, Voicemail, Call Features
advertisement

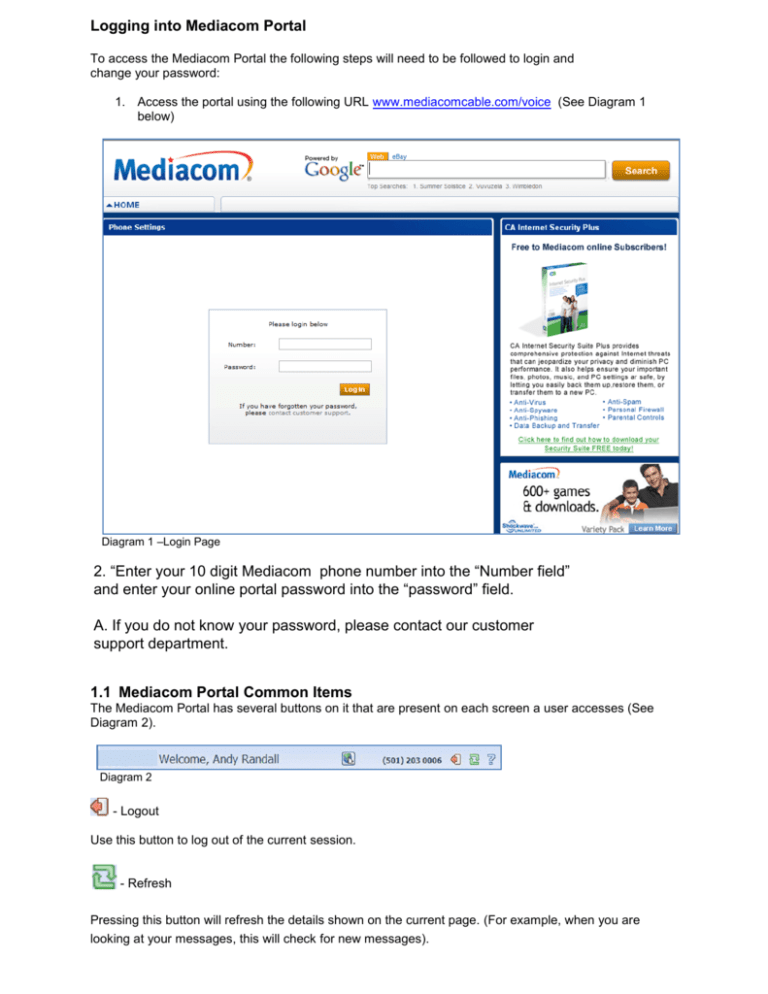
Logging into Mediacom Portal To access the Mediacom Portal the following steps will need to be followed to login and change your password: 1. Access the portal using the following URL www.mediacomcable.com/voice (See Diagram 1 below) Diagram 1 –Login Page 2. “Enter your 10 digit Mediacom phone number into the “Number field” and enter your online portal password into the “password” field. A. If you do not know your password, please contact our customer support department. 1.1 Mediacom Portal Common Items The Mediacom Portal has several buttons on it that are present on each screen a user accesses (See Diagram 2). Diagram 2 - Logout Use this button to log out of the current session. - Refresh Pressing this button will refresh the details shown on the current page. (For example, when you are looking at your messages, this will check for new messages). - Help Pressing this button brings up the help information for the current screen. The Dashboard Tab The Dashboard is the initial screen you will see when you first log in to the portal. The Dashboard provides a quick view of the most common functions (See Diagram 3) Diagram 3 –Dashboard Functions are displayed in their own area of the screen, and the customer can click on the links for more details or to modify settings. The Tabs across the top of the Dashboard provide access to more detailed information and settings. New Messages The Dashboard provides an instant check of whether there are any new (unheard) voicemails. To check voicemails via the dashboard use the following steps: 1. Single click on the „Messages and Calls‟ link (See Diagram 4) Diagram 4 – Dashboard Voice Messages Link 2. This will take you to the Messages and Calls Tab (See Diagram 5 – Messages and Calls Tab) Diagram 5 – Messages and Calls Tab 3. From the Messages and Calls Tab all of your voicemail messages are displayed in a list. 4. To listen to the specific message, click on the entry in the list. 5. You will be able to use the Voicemail Player to play and listen to the voicemail messages. Call Lists Call lists record activity on your telephone line. Whenever you make a call, receive a call, or miss a call, the details of the call are recorded and displayed in the portal (See Diagram 6). Diagram 6 – Sample Missed Call List Contacts Tab The Contacts tab will allow you to create lists to associate the name and details of a caller with one or more telephone numbers (see Diagram 7). Diagram 7 Import and Export You can download your contacts to a comma separated value file (CSV file), for use outside the portal. To download contact lists via the dashboard use the following steps: 1. Access the Contacts Tab 2. Single click on the Export All button (See Diagram 8) Diagram 8 3. You will receive verification message that export has been completed Contact Groups You can also use your Contact Lists to set up groups of contacts. To set up group contacts use the following steps: 1. Access the Contacts Tab 2. Single click on the New Group button at the foot of the Contact Lists screen (See Diagram 9) Diagram 9 – New Group Button 3. You will then be prompted to give the new Group a name. 4. Groups are show in bold type in the Contacts list, identified by the icon. The details and membership of the customer‟s Groups can subsequently be edited or deleted by clicking on the Group entry in the Contact list. Call Manager Tab Using this tab will enable to you to manage your call forwarding and call screening features. (See Diagram 10) When you click on the tab “Call Manager”, you will be directed to a summary page of how your calls will be processed. Diagram 10 To Manage Your Call Forwarding Features: 1. Select the “Forwarding” Tab: 2. Chose the forwarding option you would like to use: 3. 4. 5. Immediately: Use this option when you want any call to forward to another number ( when you are on vacation, at work, etc) Selected callers: Use this option to forward calls immediately from selected callers ( school, relatives, etc) Forwarding destinations: Using this page you can store numbers that you frequently forward calls to, and give them friendly names. Once you have done this you can select from named destinations instead of typing in telephone numbers each time you configure your other services. Check the white box next to “Forward Calls”. Add the phone number in the “Forward Calls To” box Click “Apply”. 6. Follow this process for any of the options you choose from the tab. 7. To add a forwarding destination, enter the telephone number and a friendly name in the panel then press the Add button. To add further destinations, simply repeat the process. When you have finished, press Apply to save your changes. To Manage Your Call Screening Features: (Distinctive Ring) 1. Select the “Screening” tab Customer CommPortal 12/9/2010 2. Select the “Priority Call” sub-option. Mediacom Proprietary and Confidential 13 Customer CommPortal 12/9/2010 3. Check the white box next to “Make calls ring distinctively…..” *Note – You will now see a green check in the box and the status will be ACTIVE Mediacom Proprietary and Confidential 14 Customer CommPortal 12/9/2010 Mediacom Proprietary and Confidential 15 Customer CommPortal 12/9/2010 4. Select the “Edit List” option from the bottom of the section. You will now see a “Priority Call Screening List” which we will add the specific phone numbers to. Mediacom Proprietary and Confidential 16 Customer CommPortal 12/9/2010 5. Follow the steps below to add specific phone numbers to the “Screening List”: a. Type the phone number which you wish to have a distinctive ring. (1) b. Click “add new”. (2) c. Click “ok”. (3) 6. Click “OK” to save your list. Mediacom Proprietary and Confidential 17 Customer CommPortal 12/9/2010 7. Click “Apply” to apply your changes. Mediacom Proprietary and Confidential 18 Customer CommPortal 12/9/2010 *Note – Once a number has been added and the settings have been applied, you will notice the “Apply” button is no longer available to be selected. Mediacom Proprietary and Confidential 19 Customer CommPortal 12/9/2010 “Call Manager” ”Summary” – should now display that a number is set to use a “special ring” To add additional lines to distinctive ring, follow the same procedure. Manage FeaturesTab Using the Manage Features Tab, you can see a list of all the call services offered to which you are and are not currently subscribed. You can then sign up to a new call service simply by clicking on the appropriate option - without time-consuming calls to the CARE group (See Diagram 10 – Manage Features Tab). Mediacom Proprietary and Confidential 20 Customer CommPortal 12/9/2010 Diagram 10 – Manage Features Tab To add or remove services from your account use the following steps: 1. 2. 3. 4. 5. Access the Manage Features Tab from the CommPortal Single click on the Available Features display in the Dashboard Select (or de-select) the features that you want to add or remove Verify that changes are correct Log out of CommPortal Mediacom Proprietary and Confidential 21 Customer CommPortal 12/9/2010 Settings Tab The Settings Tab provides access to various pages, giving details of Call Service settings. These could include security options (password and PIN), forwarding preferences etc. along with other changes to your account. Messaging If you have the Voicemail services, you can use various Tabs below the Messaging page to access the settings for these messages (See Diagram 11). Diagram 11 Mediacom Proprietary and Confidential 22 Customer CommPortal 12/9/2010 You can use the Settings Tab to change your Mediacom Portal password and Voicemail Personal Identification Number(s) PIN‟s: To change your Mediacom Portal password and your Voice Mail PIN: a. Access the Settings Tab (See Diagram 12) b. Click on the Security Tab within the Settings Tab (See Diagram 13) Diagram 12 Mediacom Proprietary and Confidential 23 Customer CommPortal 12/9/2010 Diagram 13 c. d. e. f. g. h. Access the Change Password menu Click in the password field Enter a new password between 4-20 numeric characters Reconfirm password in the Confirm Password field Single click on Change Password This new password will be used to access the Mediacom Portal as well as access your voicemails. Mediacom Proprietary and Confidential 24 Customer CommPortal 12/9/2010 To configure Auto-Forward for all voicemail messages and to specify email addresses: i. Access the Settings Tab j. Click on the Messaging Tab within the Settings Tab k. Single click on the Auto-Forward all voicemail messages box (See Diagram 14) Diagram 14 l. Select the email address from Contact List to forward voicemails to from the drop down menu (or add a new email address if desired address does not appear in drop down). m. Single Click on Apply Mediacom Proprietary and Confidential 25 Customer CommPortal 12/9/2010 Mailbox You can also use the Mailbox Tab to configure mailbox settings, including: Enabling or disabling fast login Allow callers to send numeric pages Message ordering and playback options. Greetings You can use the Greetings Tab to: Select your default greeting Specify when alternative greetings should be used and the behavior when a greeting expires Use the Greeting Recorder to record your spoken name and other voicemail greetings selected from a dropdown box. If at any time you need help with a feature or section of the portal, you can click on the help button at the top of the page and helps will be displayed. If you need further assistance, you may also call Mediacom at 866-936-2008 during our regular business hours. Mediacom Proprietary and Confidential 26


