Seeds - Department of Horticulture
advertisement
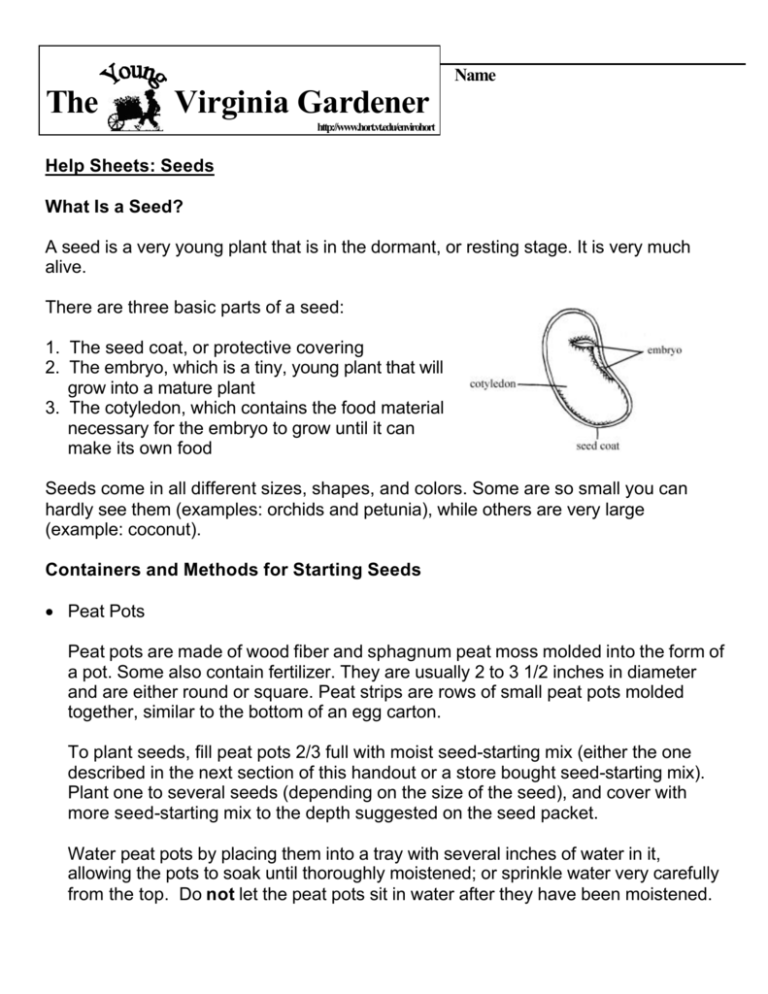
__________________________________________ Name The Virginia Gardener http://www.hort.vt.edu/envirohort Help Sheets: Seeds What Is a Seed? A seed is a very young plant that is in the dormant, or resting stage. It is very much alive. There are three basic parts of a seed: 1. The seed coat, or protective covering 2. The embryo, which is a tiny, young plant that will grow into a mature plant 3. The cotyledon, which contains the food material necessary for the embryo to grow until it can make its own food Seeds come in all different sizes, shapes, and colors. Some are so small you can hardly see them (examples: orchids and petunia), while others are very large (example: coconut). Containers and Methods for Starting Seeds • Peat Pots Peat pots are made of wood fiber and sphagnum peat moss molded into the form of a pot. Some also contain fertilizer. They are usually 2 to 3 1/2 inches in diameter and are either round or square. Peat strips are rows of small peat pots molded together, similar to the bottom of an egg carton. To plant seeds, fill peat pots 2/3 full with moist seed-starting mix (either the one described in the next section of this handout or a store bought seed-starting mix). Plant one to several seeds (depending on the size of the seed), and cover with more seed-starting mix to the depth suggested on the seed packet. Water peat pots by placing them into a tray with several inches of water in it, allowing the pots to soak until thoroughly moistened; or sprinkle water very carefully from the top. Do not let the peat pots sit in water after they have been moistened. Peat pots may become too moist, and fungi will develop on the walls of the pots. This is normal, but you can keep it from getting worse by reducing the amount of water and moving the pots to allow more air between the pots. Plant roots will grow right through the walls of peat pots, and you can put the whole plant and pot into the soil when you are transplanting. It helps to remove the top rim of peat pots when transplanting--to keep the pot from drying out--but do not disturb the part where roots are growing through. Peat strips should be carefully cut apart into individual pots before planting. • Peat Pellets Peat pellets are neat little packages of peat moss with a net-like material around the soil to hold it in. You buy them as pellets about the size of a thick silver dollar. When moistened, they expand like bread rising. Soak in water for about 20 minutes to moisten. Dry Peat Pellet Expanded Peat Pellet Top of Peat Pellet with Seeds To plant seeds, make a hole in the soil in the top of the peat pellet, put the seed(s) in, and cover them with the soil. Usually, only one or two seeds are planted in each pellet unless the seeds are very small. Put the peat pellets in a tray in which you have poked drainage holes (aluminum or plastic trays are good, or use a mini-greenhouse), and keep them moist, but not soaking wet, until the seeds germinate. Make sure you put a water catcher under the tray. After the plants are growing well, their roots will grow through the net covering. Peat pellets are an inexpensive way to start a small number of plants indoors. Since these are made of peat moss, they dry out slowly, especially when plants are small. Be careful not to overwater! When the weather is right for planting, the whole peat pellet can be set into the ground. • Flats You can purchase flats, which are long, low plastic trays with drainage holes, to use for seed starting. You can make your own smaller flats from the bottoms of milk cartons. Fill the flat with 1 1/2" of seed-starting mix. Make long rows with a pencil about 1/4" deep (depending upon the size of the seed and the directions on the seed packet). The rows should be 1 1/2" to 2" apart. Plant your seeds in the row and gently cover with seed-starting mix. Very carefully sprinkle water over the rows until the soil is moist. You can use a spray bottle to spray the soil until moist. • Containers Traditional plastic and clay pots, or recycled yogurt containers with holes punched in the bottom, can also be used to start your seeds (4" pots work the best). Follow the directions for filling peat pots. Be sure to check that the surface of the soil is constantly moist with a deep pot. The bottom usually stays wet, but the top surface-where the seeds are--often dries out quickly. Special Soilless Mix for Starting Seeds Indoors Seeds started indoors need a light soilless mix that does not get waterlogged, since too much water can cause the seeds to rot. A good seed-starting mix is: 1 part peat moss 1 part perlite or vermiculite Mix these together and moisten with water so the seed-starting mix is damp. It should be moist all the way through, but not soaking wet. If you can squeeze water out of a ball of the mix in your hand, it is too wet. This mix can be used in peat pots, flats, paper cups, containers, and mini-greenhouses. REMEMBER: Plants will need to be fertilized soon after they germinate because the food that was stored in the seed will be used up very quickly. This special soilless mix has no nutrients so the young plant will need additional fertilizer (see Fertilizing HELP! Sheet). When the Seeds Grow... The first leaves you will see on your plants are the cotyledon leaves or seed leaves. These are special leaves that were part of the seed embryo. They contain stored food to help the tiny plant get off to a good start. After the seed leaves grow, the next leaves you will see are the true leaves. Once your seedling has about four true leaves, you can transplant them to the garden or larger containers. (see the Transplanting Help Sheet) Planting Seeds in an Outdoor Garden You can plant seeds directly into your garden after you have prepared your garden soil for planting. Soil preparation includes soil testing (see Fertilizing HELP! Sheet), loosening or tilling the soil, and removing weeds. Once your garden is ready, follow the directions on the back of the seed packet to find out when the seeds can be planted, how far apart they should be placed, and how deep they should be planted. Saving Seed People often ask if they can save seed from one year to the next. 1. Seeds that you bought from the store can be saved if you have been careful to keep the package and the extra seeds dry while you were planting in the garden. To save these seeds: • Put the seeds in an airtight jar or zip-lock plastic bag. • If you have the original package, include this in the jar or bag. If not, make a new label using a waterproof marker that tells the plant name, date saved, and the company who made the seed. This way, if you like the seed, you can purchase it again later. 2. Seeds from a plant you grew can be saved to grow another plant next year. Some examples are: • To save seed from beans and peas let the pods turn brown on the plant. Pick them and let them dry for one to two weeks. Remove the b eans from the pod and store in a paper bag. • To save tomato seeds, pick a ripe, healthy fruit from the vine. Cut the tomato open and squeeze the pulp (juicy part with seeds) into a container. Add some water and let it sit out for a few days, stirring occasionally. When the seeds settle out, pour off the pulp and water and spread the seeds in a thin layer on paper towel to dry. Store in an envelope or glass jar. • To save marigold seeds wait until the flowers have turned brown and are completely dry. You will know they are dry when the flower feels papery and almost crumbles in your palm if you roll it around. Hold the base of the flower and pull off the dried petals. You will see long, slender, brown pieces that don't look like much of anything. These are the seeds. Clean off all the old flower and leaf parts and store in a paper bag. 3. For all saved seeds: • Be sure to put them in a cool, dry place (between 32 and 50 degrees F) for the winter. • Make sure to clearly label the storage containers using a waterproof marker. Include the name of the plant and the date saved. • In the spring when you want to plant the seeds, test them to make sure they are still alive. To do this, place several seeds from each package between moist paper towels and wait about a week to see if they sprout. Put the paper towels inside a plastic bag and make sure to keep the paper towels moist but not too wet the whole time. If none sprouted, throw the seeds away and use new seeds. If most or all of the seeds sprouted, they are healthy and can be planted. New Words germinate: the sprouting of a seed peat moss: a product of swampy areas that is partly rotted plants. It is used like soil in pots. perlite: white, porous volcanic mineral used to ‘lighten’ soil by creating more air space. transplant: to replant a plant in a different location, such as from a pot into the ground or from one pot into a larger pot. vermiculite: a product used to ‘lighten’ soil or start seeds; it holds moisture and nutrients well, acting as a soil substitute. It is made from heat treated, expanded mica. © This activity sheet is provided by the Department of Horticulture, Virginia Tech 407 Saunders Hall, Blacksburg VA, 24061-0327

