SINGER® FUTURATM – Crayon Pouch
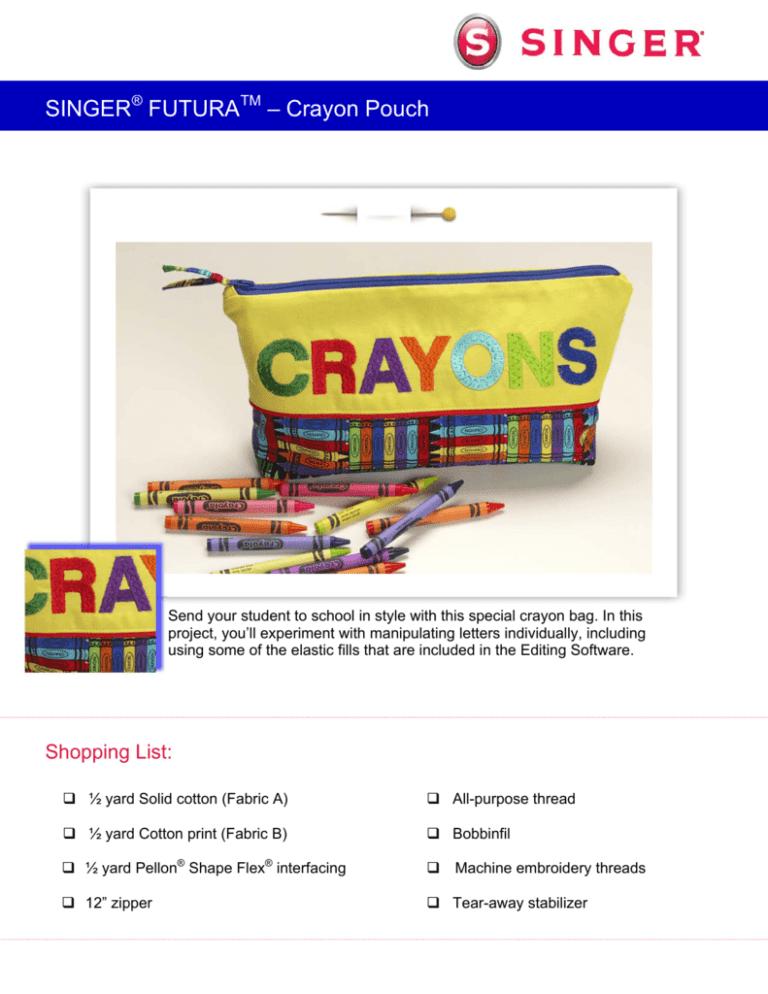
Send your student to school in style with this special crayon bag. In this
project, you’ll experiment with manipulating letters individually, including
using some of the elastic fills that are included in the Editing Software.
Shopping List:
½ yard Solid cotton (Fabric A)
All-purpose thread
½ yard Cotton print (Fabric B)
Bobbinfil
½ yard Pellon® Shape Flex® interfacing
Machine embroidery threads
12” zipper
Tear-away stabilizer
Fabric Preparation:
1. Fabric A – Solid Cotton
Cut one - 11” x 15” (Front)
Cut one – 12” x 4” (Back)
2. Fabric B – Cotton Print
Cut one – 12” x 7½|” (Pouch Bottom)
Cut two – 12” x 7¼” (Lining)
3. Shape Flex®
Cut one – 11” x 15” (Front)
Cut one –12” x 4” (Back)
Cut one – 12” x 7½” (Bottom)
4. Apply the Shape Flex® interfacing to the wrong side of the coordinating front, back and
bottom pieces, following the manufacturer’s recommendations.
5. Thread the top of the machine with machine embroidery thread and bobbinfil in the
bobbin. Place the prepared front along with a piece of tear-away stabilizer in the large
hoop. Attach to the embroidery arm of the machine.
At the Computer:
6. Open the software for the SINGER® FUTURATM sewing & embroidery machine. Select
the Lettering icon from the main tool bar.
Type in CRAYONS in the text box.
Font- Block Large
Height - 1.20
Space - .04
Justify – Left
Frame – Rectangle
Select Stitch it!
2 The lettering will be too large for the hoop. When prompted, switch to the Multiple Hoop
mode. Click on the Lettering icon to shut off the lettering function.
Note: Although this will not be a Multiple
Hoop design when finished, it is easier
to edit lettering as it runs horizontally
across the screen. Because the letters
are too large, every change that is made
to the letters would cause the message
to reappear. Switching to Multiple Hoop
mode keeps this from happening.
Before stitching, the design will be
rotated vertically in the hoop. 7. Switch to Realistic View to see the stitches. The textures of
the letters are going to be changed. The realistic view function
allows the stitches to be seen as they will appear when
stitched out.
Select View from the main tool bar.
Select Realistic View.
8. Editing the Lettering: Select the Editing icon from the main tool bar. Each
individual letter is going to be changed so that to a different color and filled with different
texture. Only one letter will be changed at a time. Start with the letter C.
Click on the letter “C” to highlight it.
Right click, select Embroidery Settings.
Select the Stitch Type tab.
3
Scroll through the list of stitch types, select Elastic Step.
Select Catalog.
Click on a pattern from the catalog, then press the Enter
key on your keyboard. The pattern that you’ve selected will
now appear in the Preview window.
You may wish to make the size of the pattern smaller
because the width of the letter is so narrow. Decrease the
values in the X length, Y length, and Distance boxes. 50
would be a good place to start. Click on Apply to make
the changes to the letter.
9. Continue in this manner to change the fill textures in the remaining letters, using a
different fill type for each letter. Once you’ve finished, click on the Editing icon to turn
off the editing function. 10. Change Color:
Click on the letter C.
Right click, select Change color.
Select a color in the Select color box – click in the rainbow
area of the box to choose a color.
4
Click on OK. The letter C will now appear in the new color. Repeat this process with
every letter.
11. Rotate the Design:
Select Design from the main tool bar.
Select Change Size.
Click on the Rotate Right arrow and type in 90 in the
box below the arrows.
Select OK.
12. Change the hoop back to the Large hoop:
Select Tools from the main toolbar.
Select Hoop.
Select Large.
5 13. Send the design to the machine: The design is ready to
embroider.
Select the Transmit to Machine icon from the machine from
the main tool bar.
Select Send design. Embroider the design.
When the embroidery is finished, remove the fabric from the
hoop. Remove the stabilizer. Press.
Trim the piece to 4” x 12”, centering the lettering.
Sewing Directions:
14. Pin a strip of piping along the bottom edges of the embroidered piece and another on
one long edge of the 4” x 12” back piece, having raw edges even. Using a zipper foot,
stitch the piping to the fabric.
CRAYONS
15. With right sides together, pin one long edge of the 12” x 7½” pouch bottom to the
bottom edge of the embroidered front, enclosing the piping and having raw edges even.
Using a zipper foot, stitch all layers together having the stitching close to the piping. Pin
the back, (piping side) to the other long edge of the pouch bottom piece. Press the
seams towards the front and back pieces. Edge-stitch close to the piping.
CRAYONS
6 16. Zipper: With right sides together, pin the left side of the zipper tape along top the edge
of the embroidered piece. Using a zipper foot, stitch in place. Pin one 12” edge of the
lining to the wrong side of the same zipper tape, enclosing the zipper. Stitch through all
layers over previous first stitching line. Press the fabric and lining away from the zipper.
CRAYONS
17. With right sides together, bring the top edge of the pouch back to the right zipper tape.
Stitch. Pin the remaining lining to the wrong side of the right zipper tape, matching raw
edges and enclosing the right zipper tape. Stitch through all layers over previous
stitching line. Stitch the side seams of pouch, starting at the zipper, stitching down the
side, across the bottom and up the other side ending the stitching at the zipper. Stitch
the lining in the same way, leaving an opening along bottom for turning.
Stitch pouch starting at zipper, stitch down side, across the bottom and up other side, ending at zipper. Wrong Side Wrong Side Stitch lining, leaving an opening across bottom for turning. 7 18. Miter the corners: Fold the sides of the lining and pouch like shown, forming a point at
the bottom. Stitch across bottom, one inch from point.
Wrong Side Wrong Side
1”
1”
19. Turn the pouch right side out, through opening in the lining. Stitch the opening in the
lining closed.
CRAYONS
SINGER is sewing made easy™
Singer, the Cameo “S” Design, Futura and Singer is Sewing Made Easy are exclusive trademarks of The Singer Company Limited S.à r.l. or its Affiliates.
© 2014 The Singer Company Limited S.à r.l. or its Affiliates. All rights reserved.
8

