Bob Nuckolls
6936 Bainbridge Road
Wichita, Kansas 67226-1008
Voice/Fax: 316-685-8617
E-mail: nuckolls@aeroelectric.com
Big Connections . . . . Terminal Installations on Big Wires
. . . originally appeared in Kit Aircraft Builder, Fall 1996
The last time I wrote for these pages, the topic was
solderless terminals for small wires. I'll suggest "small"
wires are those accommodated by ordinary hand crimping
tools; 22 AWG through 10 AWG (AWG = "American
Wire Gage" a measurement system that says big wires shall
be known by their small numbers ? ? ?). Most light
airplane wiring falls in the 22-10 AWG range. However,
starter, hydraulic pump, alternator, ground power, and
power distribution circuits are exceptions which require
much larger wires in the 8 AWG to 2 AWG sizes.
Battery wiring carries starter current so both battery and
starter circuitry are at least 4AWG and in most cases
2AWG wire. Alternator feeds are proportioned to the
alternator's output rating. 40-amp or smaller can use 8
AWG, 50 to 75 amp machines are wired with 4AWG, 90 to
125-amp alternators are wired with 2AWG wire. Of
course, the airplane's limits on consumption of energy are
tightly tied to alternator capacity. So, main power distribution paths are wired with the same size wire used to attach
the alternator b-lead to the rest of the system. A handful of
high current, 30-50 amp loads like hydraulic pumps call
for wire in the 8 AWG to 6AWG range.
Solderless, crimp terminals are available for all these sizes
but you won't find them in the normal electronic and
automotive parts outlets. Further, the tools to apply "fat"
terminals are equally robust and expensive. If your heart is
really set upon using top-of-the-line, solderless terminals
throughout your project, by all means, check with local
electrical contractors. Quite often they'll have both tools
and terminals. They would probably install terminals on
wire segments supplied by you and brought to their facility.
Ideally, terminals should be installed right on the airplane
because in some situations, "clocking" of a terminal is
important. "Clocking" refers to orientation of a terminal on
the wire when installation is completed; wires larger than
6AWG are difficult to twist. Proper clocking insures
terminal alignment with its mating stud.
For the less discerning or more frugal builders, there is an
alternative to the high-dollar termination of fat wires in
airplanes. You can solder them on . . . . solder, SOLDER
. . .? Yes, the dreaded "S" word. I don't know how many
articles I've seen in recent years wherein readers are
advised against using solder for wire joining and cite a
variety of pitfalls including heat damaged wire or insulation, and rampant corrosion resulting from poor selection
of materials. I believe most people's aversion come from
lack of understanding of solder's limitations and capabilities. Soldering is an ancient technology for joining metals
and will be the topic of a future article. In the mean time,
please consider the following and trust me - it works!
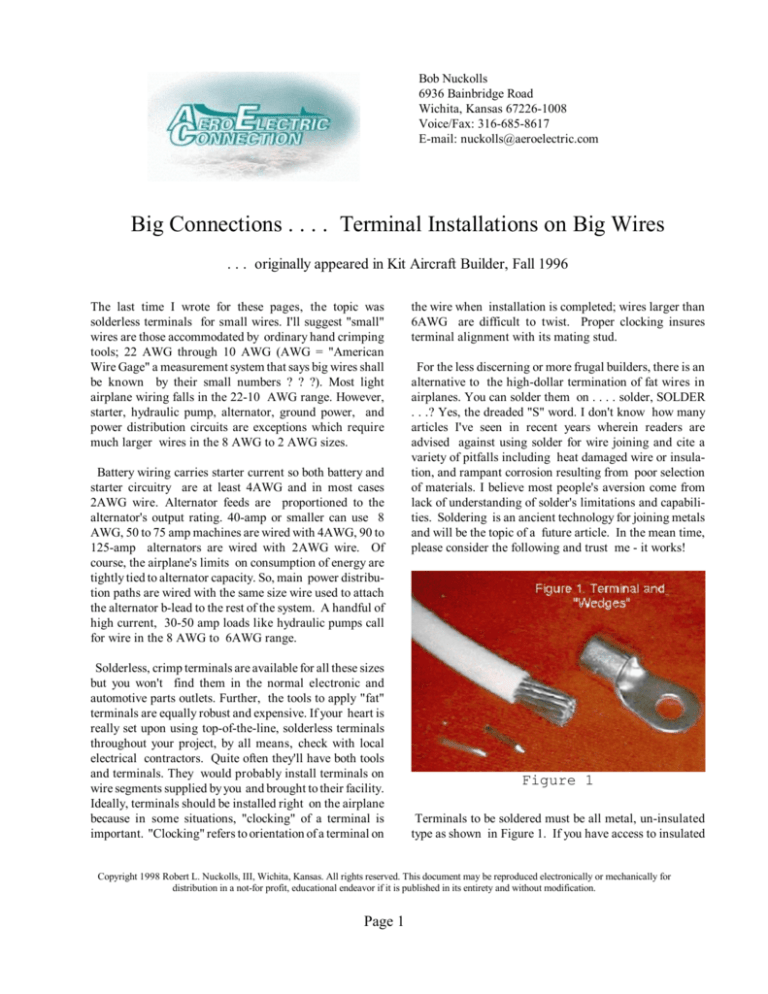
Figure 1
Terminals to be soldered must be all metal, un-insulated
type as shown in Figure 1. If you have access to insulated
Copyright 1998 Robert L. Nuckolls, III, Wichita, Kansas. All rights reserved. This document may be reproduced electronically or mechanically for
distribution in a not-for profit, educational endeavor if it is published in its entirety and without modification.
Page 1
terminals but not the tools to apply them, you can twist the
insulators off with a pair of pliers. The terminal barrel
should be a snug fit over the wire. The best joint will occur
if the strands can be fairly "packed" into the barrel. My
favorite way to tighten a wire in a loose barrel borrows
from the technique of using wedges to secure a hammer
head to a wood handle. In this case, the material needs to
be compatible with the soldering process so how about
copper wedges?
the terminal. This means that the terminal should be
oriented with respect to twist on the wire so that the
terminal will drop onto it's mating stud without twisting
the wire. Oh yeah, you do know that the parts to be
soldered need to be clean? If the terminals have been
laying around in a junk box for 10 years or if the wedge
wire is less than shiny, use Scotchbrite pads or similar to
brighten things up before assembly.
The finished termination is going to get dressed up with
a sleeve of heat shrink over the wire and terminal barrel.
Now's the time to slide the heat shrink over the wire. With
the heatshrink in place, strip back the wire to be terminated so that when the strands are just flush with the wire
barrel, a .10" to .15" gap exists between end of insulation
and the terminal's wire barrel. If the terminal you're about
to apply seems too loose, get a short piece of 14 or 12
AWG house wire and strip off the insulation to get a bare
strand of solid copper wire. Cut a piece of wire about a
half inch long and use a file or sanding disk to sharpen the
end. My favorite tool is a cutoff wheel in a hand- held
hobby motor.
Figure 3
Now comes the fun part. You've got a range of choices for
sources of heat to flow the solder. I've used an ordinary
propane torch adjusted to a very small, inner blue flame of
about 1/4". If your work area is VERY free of drafts
(moving air cools your work rapidly) you can use one of
those little butane torches that run on a throw-away lighter.
You can also use a soldering iron with as few as 50 watts
of heat capacity - IF it's a small 50 watt iron that gets all
the heat out to the tip. My favorite is an Ungar handle (See
Figure 3) with screw-in heating elements . . . we used to
have similar tools for "wood burning" art when I was a
kid. They may still sell these tools in craft shops. The
solder you're going to use will be electronic grade 60/40 or
63/37 alloy with a rosin core. The ideal size is the .062"
diameter stuff.
Figure 2
Push the wedge into the end of stranding - toward the
center clear of the terminal barrel as shown in figure 2. If
it's still too loose, you can try a second wedge, make bigger
wedges from 10AWG or 8 AWG solid wire, or find the
right size terminal! The only caution I'll urge with wedging is that some terminals are not brazed shut at the joint
where the barrel is formed from the flat stamping. Aggressive wedging can spread the barrel open.
Now, you're almost ready to solder. Check the clocking of
Poor torch technique can make it look like you tried to
clone the Mona Lisa with a paint roller so listen up. If you
use a propane torch, heat for this task is always applied on
the back side of the terminal about even with the tongue
end of the wire barrel (Figure 4). Angle of the applied
flame should blow hot gasses away from the wire's insulation (If you're using a soldering iron or tiny butane torch,
you can move the heat source around the barrel so that it's
opposite where the solder is going in). About 10-15
seconds after initial application of heat, feed solder into the
Copyright 1998 Robert L. Nuckolls, III, Wichita, Kansas. All rights reserved. This document may be reproduced electronically or mechanically for
distribution in a not-for profit, educational endeavor if it is published in its entirety and without modification.
Page 2
space between wire strands and the terminal barrel. Start
out immediately opposite the
flame. Molten solder is the conductor of heat from barrel
to strands; after the first inch or so of solder has been fed
into the joint, start around the barrel always pushing it into
the space between wire and barrel until about 6" of solder
have been fed into the joint. Now, you're almost done. Turn
your attention to the other end of the barrel where we left
a "window" between insulation and barrel; keep feeding
solder in and watch for the appearance of solder which will
flow by capillary action to the wire end of the barrel. Don't
be surprised if it takes 10" or more of .062 diameter solder
to finished the joint! Resist the urge to feed solder into the
other wire end
.
commonly stocked by electronic and automotive parts
houses. I prefer double-walled products with an inner-wall
of melting sealant. Terminals should be tin plated solid
copper. Electrical supply houses will have big'uns both
insulated and uninsulated. Irrespective of what the
supplier says the matching wire gage is for any terminal he
offers, you're more interested in how well it fits before
crimping. Take a piece of stripped wire with you when you
Figure 5
shop for terminals. Small quantities of electronic grade
solder are available from Radio Shack, electronic supply
houses will want to sell you a full pound. If you do invest
in a pound spool, I recommend Kester Resin 44 in a 63/37
alloy and .032 diameter. This is a good all around size for
OTHER soldering jobs. For soldering big terminals, take
four, 12" strands of .032" solder and twist them together to
make solder stock. The AeroElectric Connection stocks fat
wire termination kits which include terminal, double wall
heat shrink, wedges and solder.
Figure 4
When solder first appears at the wire end, reduce the heat
and see how the exposed stranding looks at the cut end. If
the stranding matrix isn't filled with solder, you can now
begin to feed solder directly into the stranding wherever
the solder has not already flowed. As soon as the ends
appear "covered" you can take the heat off. Your soldered
on terminal should look something like Figure 5. A little
"toasting" of the insulation may be unavoidable . . trim
away the lumps with a knife and go to the next step.
Let it cool, wipe down with rag or paper towel wet with
acetone or lacquer thinner. The insulation may pull back
from the joint a little bit; put the heat shrink in place over
the barrel and shrink down to finish the joint (Figure
6).Sources for materials and tools: Heat shrink tubing is
Figure 6
A hardware variety propane torch can be used with care.
An electric soldering iron is probably ideal and easier to
control. Check with electronic tools supply stores and
hobby/craft stores. You need the concentrated-heat 45-60
Copyright 1998 Robert L. Nuckolls, III, Wichita, Kansas. All rights reserved. This document may be reproduced electronically or mechanically for
distribution in a not-for profit, educational endeavor if it is published in its entirety and without modification.
Page 3
watt type tools shown in Figure 3. The little butane hand
torch is also a good choice. It's slow but you're not in a
hurry and It's very unlikely to over-heat the joint. This
little guy does need a draft-free workspace to do the job.
Check hobby shops for heat guns used to shrink model
airplane covering. They cost about $20.
Copyright 1998 Robert L. Nuckolls, III, Wichita, Kansas. All rights reserved. This document may be reproduced electronically or mechanically for
distribution in a not-for profit, educational endeavor if it is published in its entirety and without modification.
Page 4


