How to Format a Bibliography or References List in the American
advertisement
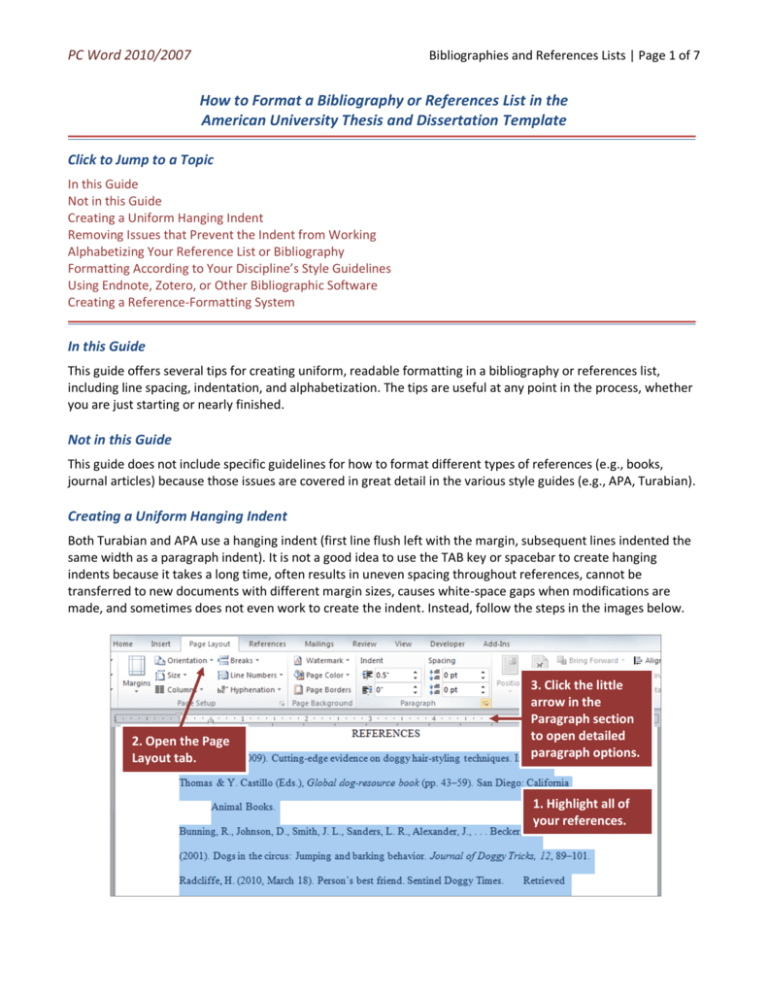
PC Word 2010/2007 Bibliographies and References Lists | Page 1 of 7 How to Format a Bibliography or References List in the American University Thesis and Dissertation Template Click to Jump to a Topic In this Guide Not in this Guide Creating a Uniform Hanging Indent Removing Issues that Prevent the Indent from Working Alphabetizing Your Reference List or Bibliography Formatting According to Your Discipline’s Style Guidelines Using Endnote, Zotero, or Other Bibliographic Software Creating a Reference-Formatting System In this Guide This guide offers several tips for creating uniform, readable formatting in a bibliography or references list, including line spacing, indentation, and alphabetization. The tips are useful at any point in the process, whether you are just starting or nearly finished. Not in this Guide This guide does not include specific guidelines for how to format different types of references (e.g., books, journal articles) because those issues are covered in great detail in the various style guides (e.g., APA, Turabian). Creating a Uniform Hanging Indent Both Turabian and APA use a hanging indent (first line flush left with the margin, subsequent lines indented the same width as a paragraph indent). It is not a good idea to use the TAB key or spacebar to create hanging indents because it takes a long time, often results in uneven spacing throughout references, cannot be transferred to new documents with different margin sizes, causes white-space gaps when modifications are made, and sometimes does not even work to create the indent. Instead, follow the steps in the images below. 2. Open the Page Layout tab. 3. Click the little arrow in the Paragraph section to open detailed paragraph options. 1. Highlight all of your references. PC Word 2010/2007 Bibliographies and References Lists | Page 2 of 7 In the Paragraph-options window that pops up, make the changes as noted below (and even if something is not noted in the red boxes, make sure your other settings match the settings in these windows exactly). These changes will quickly take care of the majority of indentation and line-spacing issues in your references list. 1. Click Indents and Spacing. 6. Click Line and Page Breaks. 2. Set Alignment Left 4. Set Special as Hanging by 0.5”. 7. Uncheck all Pagination boxes except Keep Lines Together. 3. Set left and right Indents at 0”. 5. Set Spacing After at the same size as your font (12 pt in this example) and set Line Spacing to Single. 8. Ensure that all other settings match these pictures as well. Then click OK. (Instructions continue on next page) A common result at this point is something like the list on the following page. If you look at the list below, you will see that there are extra spaces, tabs, and hard returns interfering with the hanging indent and line spacing. PC Word 2010/2007 Bibliographies and References Lists | Page 3 of 7 Even though the ruler shows a correct hanging indent, many references do not actually have the indent. This is caused by extra hard returns in the list. Incorrect hard return (because this is part of the Halloway reference, not a new reference). Hard return interfering with hanging indent. Hard return interfering with hanging indent. Incorrect tab space Hard return interfering with hanging indent. Incorrect tab space Hard return interfering with hanging indent. (Instructions continue on next page) PC Word 2010/2007 Bibliographies and References Lists | Page 4 of 7 Removing Issues that Prevent the Indent from Working STEP 1. Check for and remove tab spaces. You do not need tabs anywhere in your list, and indeed they usually cause formatting issues. Remove them as shown in the image below. 1. In the Home tab, click Replace (or just hit CTRL + H on your keyboard). 2. In the box that pops up, enter ^t in the top bar and nothing in the second bar. (The ^ symbol is above the 6 key.) Click Replace to remove the tabs one at a time. Do not use Replace All or you will probably cause problems to many other parts of your document. STEP 2. After removing the tabs, put the cursor back at the top of the references list, and do another find and replace. This time though, enter 2 spaces with the spacebar key in the top bar (the Find What bar), and 1 space in the bottom bar (the Replace With bar). Again, do not hit Replace All, but go through the list quickly by hitting the Replace button. Repeat until no extra spaces are present in the references list. STEP 3. After removing the extra spaces, now it is time to remove the extra hard returns (a hard return is when you hit the ENTER key on your keyboard). There should only be one hard return (after the end of each reference). You can remove a hard return by using the Find and Replace function you used above, but this time enter ^p in the first line (the Find line) and enter nothing (not even a blank space) in the second line (the Replace line). Remove any hard return in the middle of references, but leave the hard return at the end of each reference. This includes Web addresses (URLs): There should be no hard return before a Web address (you can use soft carriage returns, SHIFT + ENTER, within a URL to break it across lines and avoid gaping white space while still preserving the link). PC Word 2010/2007 Bibliographies and References Lists | Page 5 of 7 This final step helps improve consistency in your list and is also essential if you want to be able to automatically alphabetize it. Remember, the little time you spend on the steps in this document will save you a long time manually alphabetizing your list, will reduce formatting error, and will also allow you to copy and paste your references without error into new documents in the future. 2. Do not hit Replace All. As you go through one at a time, leave the hard returns at the end of each reference (you can skip them by hitting Find Next instead of Replace). 3. But, when you see hard returns in the middle of references, hit Replace to remove them. You will start to see your hanging indents materialize. 1. Do another find and replace, this time entering ^p in the top bar and nothing (not even one space) in the second bar. ^p is the shortcut for a hard carriage return. Now your list should have all hanging indents, single spacing within references, and a double space between each reference per AU Thesis and Dissertation Guidelines. Remember that if you begin adding new references, just hit the ENTER key one time after each reference entry. Do not use the TAB key or spacebar to move material onto a new line or to create indents because you would then have to go through and remove them again and you will not be able to automatically alphabetize the list as shown in the next section of this guide. Alphabetizing Your Reference List or Bibliography Now you can quickly alphabetize your references and find lingering spacing problems by using the automatic sort function (AZ ) in the Home tab. See the image on the next page for instructions. PC Word 2010/2007 2. Open the Home tab. 1. Make sure you have completed all other steps in this document first. Now, highlight your list from start to finish. Bibliographies and References Lists | Page 6 of 7 3. Click the AZ icon in the Paragraph section. 4. Choose Sort by Paragraphs, Type Text, and Ascending order (these are usually the default settings). Click OK. Your list will now be alphabetized. Before you do anything else, you should scan through your references to see if any references got split up in the process. If you followed all of the steps earlier in this document, that will not happen, but if you missed any of the unwanted hard returns in Step 3 on Page 5 of this guide, you will see the references split. If there are just a few, you can go through manually and re-join those references (use your original references list for comparison). One common occurrence is to see Web addresses separated from their references (again this would be caused by an incorrect hard return before the Web address). Formatting According to Your Discipline’s Style Guidelines This guide has provided you with a basic, clean line spacing, indentation, and alphabetization of your references. At this point, you will have to consult your discipline’s preferred style guide (APA, Turabian, AAA, etc.) for details such as when to use italics, which words to capitalize, order of elements in different types of references, and so forth. PC Word 2010/2007 Bibliographies and References Lists | Page 7 of 7 Using Endnote, Zotero, or Other Bibliographic Software Note that even if you use an automatic program, such as EndNote or Zotero, you still have to go through manually and check your references because (a) these programs depend on your entry of the source information to begin with, which could contain errors, and (b) the programs actually do not always fully format all aspects of the major styles correctly. Video tutorials on EndNote are available on the AU Library Web site. Creating a Reference-Formatting System Formatting references can be time consuming, so it is good to create a system for yourself. Some people prefer to take a manageable chunk of references each day. Another strategy is to take one type of reference at a time. So one day you might go through and fix all of the journal articles, highlighting the ones that you fixed. Then another day you might format all of the book entries, again highlighting or otherwise marking your work so that you know what work is left to do. Grouping the work can usually speed things up because the formatting becomes more repetitive and therefore easier to remember. You can use any system that works best for you, but planning ahead and allowing for the time that reference formatting inevitably takes is a good idea.
