Invertebrate dissection
advertisement
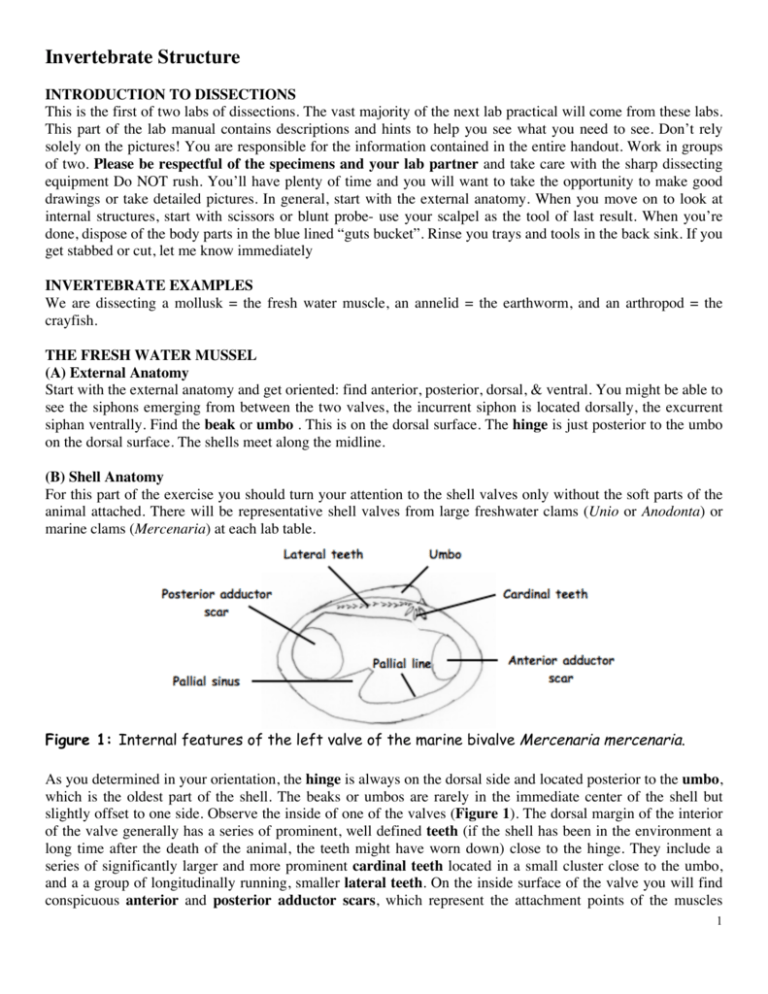
Invertebrate Structure INTRODUCTION TO DISSECTIONS This is the first of two labs of dissections. The vast majority of the next lab practical will come from these labs. This part of the lab manual contains descriptions and hints to help you see what you need to see. Don’t rely solely on the pictures! You are responsible for the information contained in the entire handout. Work in groups of two. Please be respectful of the specimens and your lab partner and take care with the sharp dissecting equipment Do NOT rush. You’ll have plenty of time and you will want to take the opportunity to make good drawings or take detailed pictures. In general, start with the external anatomy. When you move on to look at internal structures, start with scissors or blunt probe- use your scalpel as the tool of last result. When you’re done, dispose of the body parts in the blue lined “guts bucket”. Rinse you trays and tools in the back sink. If you get stabbed or cut, let me know immediately INVERTEBRATE EXAMPLES We are dissecting a mollusk = the fresh water muscle, an annelid = the earthworm, and an arthropod = the crayfish. THE FRESH WATER MUSSEL (A) External Anatomy Start with the external anatomy and get oriented: find anterior, posterior, dorsal, & ventral. You might be able to see the siphons emerging from between the two valves, the incurrent siphon is located dorsally, the excurrent siphan ventrally. Find the beak or umbo . This is on the dorsal surface. The hinge is just posterior to the umbo on the dorsal surface. The shells meet along the midline. (B) Shell Anatomy For this part of the exercise you should turn your attention to the shell valves only without the soft parts of the animal attached. There will be representative shell valves from large freshwater clams (Unio or Anodonta) or marine clams (Mercenaria) at each lab table. Figure 1: Internal features of the left valve of the marine bivalve Mercenaria mercenaria. As you determined in your orientation, the hinge is always on the dorsal side and located posterior to the umbo, which is the oldest part of the shell. The beaks or umbos are rarely in the immediate center of the shell but slightly offset to one side. Observe the inside of one of the valves (Figure 1). The dorsal margin of the interior of the valve generally has a series of prominent, well defined teeth (if the shell has been in the environment a long time after the death of the animal, the teeth might have worn down) close to the hinge. They include a series of significantly larger and more prominent cardinal teeth located in a small cluster close to the umbo, and a a group of longitudinally running, smaller lateral teeth. On the inside surface of the valve you will find conspicuous anterior and posterior adductor scars, which represent the attachment points of the muscles 1 which pull the shells together. These two scars are connected with each other via the pallial line, representing the attachment of the mantle to the shell. If your clam valve is from a marine clam you will notice a conspicuous depression close to the posterior adductor scar, the pallial sinus, which marks the location of the siphons. The depth of the sinus is directly proportional to the length of the siphons. (C) Shell Cross-Section Examine the shell that is cut to expose the different layers of the shell (Figure 2) Figure 2: Shell cross-section. You will right away notice the difference between the inner and outer layer. The inner surface is lined by the iridescent nacreous layer (mother-of-pearl), which is composed of calcium carbonate and protein crystals. The middle or prismatic layer, which makes up the bulk of the shell consists of crystalline fragments (calcite or argonite) arranged in densely packed columns. Each column is surrounded by a thin layer of conchiolin. The outer layer or periostracum is a rough layer constructed of a hornlike protein called chonchiolin. As a clam grows the periostracum and prismatic are deposited only once by cell along the mantle edge while the nacreous is deposited continuously. (D) Soft Anatomy Obtain a preserved specimen. To open the animal up and being able to remove one of the valves you need to first sever the adductor muscles and hinge ligament. Cut the adductor muscles by carefully inserting a scalpel on the anterior and posterior side to cut through the large muscle blocks responsible for opening and closing bivalve shells. The hinge ligament, located directly beneath the umbo, is slightly more challenging. You need to be sure not to insert the scalpel too deep or you will cut through the pericardial cavity, located below the hinge. Once you have successfully severed the adductor muscles and hinge ligament use the shucking knife to open the clam with one swift 90° degree move. Once the clam is open, remove one of the valves and you will find the visceral mass, covered by a thin layer of mantle tissue (you might want to remove the mantle to expose some of the organs). The large space between the mantle tissue on either side is the mantle cavity containing the following visible structures: foot, ctenidia (= or gills), adductor muscles, pericardium and nephridia. The pericardium covering the heart is a relatively thin translucent membrane located slightly offset posterior to the umbo. The heart is 3 chambered with two ventral auricles and 1 ventricle. Interestingly the intestine passes directly through the vesicle of the heart to connect with the anus (Reminder: The way to a clams stomach is through its heart). The heart and two aortas are the only closed parts of the circulatory system of the clam, the rest of the circulation is comprised by an open circulatory system made of sinuses through which the blood cells or hemocytes, propelled in part by the pumping actions of the heart and their own ability to crawl by the use of pseudopodia. The nephrida are characterized by their brown/green color tissue and are located slightly anterior to the bend of the umbo and ventral to the pericardium and are the kidneys of the clam. The very large ctenidia, two lobes of comb-like structures (demibranchs each with ascending and descending lamellae) on each side of the foot are generally attached to the mantle and the upper part of the foot, dividing the mantle cavity into a ventral incurrent and dorsal excurrent chamber. In order to expose some other organs you will now be required to cut open the muscular foot. When animals have been preserved in fixative, the foot generally has a ruffled appearance but in live animals this muscular tissue is use to dig into the sediment (infaunal clams). Take a scalpel and carefully cut length-wise 2 (longitudinal) along the ruffled edge of the foot. This way you will expose digestive and reproductive structures: digestive gland, stomach with a crystalline style, intestine and the gonads (Figure 3). Figure 3: Cross section through a whole clam. The digestive gland is located toward the anterior portion of the foot and is characterized by its spongy appearance and green/brown color. The location of the stomach is very hard to identify and can be most easily determined by finding the crystalline style a translucent rod-like structure.The intestine is demarcated by its channel-like appearance in the foot. Sometimes you may still find food particles trapped in the intestine. The gonads may or may not be easy to recognize depending on the reproductive state of the animal at time of preservation. In animals that are gravid a large portion of the foot will be occupied by the gonads, which are generally constructed of spongy material interspersed between the folds of the intestine. The nervous system is very difficult to observe in preserved specimens. Please be sure to find the cerebropleural ganglia located just posterior to the anterior adductor muscle, the two visceral ganglia located ventral to the posterior adductor muscle and the pedal ganglia embedded in the visceral tissue of the foot on the animal models provided in lab. THE EARTHWORM Again, examine the external anatomy first (Figure 4). Earthworms are annelids, or segmented worms that have bodies made up of a series of ring-like segments. The earthworm has no obvious head and no appendages, but does possess external characteristics to study. (A) External Anatomy Figure 4: External anatomy of an earthworm 3 First, identify the anterior and posterior ends (prostomium and pygidium respectively). The anterior end is somewhat larger than the posterior. Observe each segment closely. Note the tiny bristles on the ventral surface, setae that aid the worm move through soil. Each segment also contains a pair of small excretory pores called nephridiopores. You may need to use a hand lens or stereomicroscope to see these openings. Openings to the oviducts are found at segment 14, counting from the anterior end. These female pores release the eggs. Sperm ducts can be found on segment 15. The clitellum is the enlarged structure that begins at segment 31. The clitellum secretes mucus that holds 2 earthworms together during mating. It also produces a cocoon in which eggs and sperm are deposited. Some of the pores are quite small– you may want to use a dissecting microscope to help you find and see them. Use the segments numbers for reference, however, you won’t be asked to recite them in an exam situation. (B) Internal Anatomy Almost all the internal structures of interest can be found anterior to the clitellum. When you’re ready to examine the internal structures, pin the worm to one side of the tray with its ventral side down. Place the earthworm on its ventral side (the ventral side is more flattened than the dorsal side). Using a scalpel, make a shallow incision anterior to the clitellum and continue the incision toward the mouth. Be careful not to cut too deep or you will slice into the digestive system. Using forceps, spread the incision open and pin the body wall to the dissection pan. You may choose to add some water to the specimen to prevent it from drying. Figure 5: Internal anatomy of the earthworm highlighting organs to be recognized on either dissected animal or animal model. Identify the thin walls between each segment, the septa. The organs of the digestive system beginning at the mouth are the thick-walled pharynx, the esophagus (extending from the pharynx), the crop (next swollen structure, which temporarily stores food), the gizzard (second swollen structure, which is responsible for grinding the food and is therefore considerably harder than all other digestive structure) and finally the intestine which runs the length of the worm to its anus (Figure 5). The earthworm feeds on organic material in soil, pushing this material through its digestive tract and absorbing nutrients. Locate the dorsal blood vessel, which is found along the dorsal surface of the digestive tract and identify the 5 pairs of aortic arches, or hearts, which circle the esophagus. Identify the cerebral ganglia (model), which are found along the dorsal surface of the pharynx and the ventral nerve cord seen beginning at the cerebral ganglia and extending the length of the worm. Locate the excretory organs called nephridia, paired organs are found in each segment. Nephridia remove nitrogenous waste. Earthworms are hermaphroditic, meaning they have both male and female sex organs. Eggs are 4 produced in the ovaries, which can be found in segment 13 and pass through the female genital pores that you located when examining the external anatomy. Sperm are produced in the testes, found in segments 9 to 12 and pass through the male genital pores. Study the segments containing the gonads and try to identify each sex organ (it might be necessary to consult the earthworm model to distinguish male and female reproductive organs). (C) Cross-section Many of the above described structures may also be found on a slide with the cross-section of the body of an eathworm (Figure 6). Figure 6: Cross-section of the body of an earthworm. THE CRAYFISH The accompanying set of figures will help you identify its anatomy. You should consult both the preserved specimen and the available models in the laboratory to get a better mental picture of the structures you are looking for. (A) External Anatomy Obtain a preserved specimen and a dissecting pan. The body consists of two regions, the anterior cephalothorax covered by a continuous exoskeleton, the carapace and the posterior abdomen composed of a number of independently movable segments (Figure 7). The cephalothorax consists of the fused head and thorax distinguished by the cervical groove of the carapace. Posterior to that groove, the sides of the carapace cover the gill chambers to be observed later. The anterior prolongation of the carapace is the rostrum. Projecting from beneath each side of the rostrum is the stalked compound eye. With a sharp scalpel, cut off the tip of the right eye, mount in a drop of water, and examine with the microscope. Note the many facets. Each facet is the external surface of an ommatidium, the visual unit of which arthropod compound eyes are composed. By pressing on the coverglass, the ommatidia can be separated and individual ones observed. You may also observe the structure of the compound eye using prepared slides. The exoskeleton of each segment of the abdomen consists of a dorsal tergum, each side of which is fused a lateral pleuron. The pleura extend ventrally beyond their attachment to the sternum, the ventral plate of the exoskeleton. (B) Appendages The appendages (Figure 7) associated with the head of the crayfish are the antennules, antennae, mandibles and maxillae. The second segment of the crustacean head bears a pair of sensory antennules, and the third segment bears the antennae. Examine the crayfish and locate the antennules, antennae, and the mandibles. The larger, paired, hardened crushing structures, the mandibles, are chewing mouth parts on the ventral side of the cephalothorax. Closely associated with the mandibles are two pairs of accessory feathery feeding appendages, the first and second maxillae. They may be difficult to see without dissection, as they are obstructed by the most anterior thoracic appendages. The thoracic and abdominal limbs of Crustacea, function in locomotion, feeding, and respiration. 5 Identify the first three pairs of thoracic appendages (maxillipeds), the paired chelipeds, and the four pairs of walking legs. The chelipeds and first two pairs of walking legs have their distal joints modified to form chelae for gripping and tearing food. Next, study the abdomen in which segments are not fused and the appendages retain their generalized structure. The abdomen ends with the telson, bearing the anus on its ventral surface. The telson is flanked by a pair of flattened appendages, the uropods, which are attached to the segment immediately anterior to the telson. The uropods and the telson form the tail fan used in making rapid backward swimming movements. Turn the animal so the ventral surface faces you. The ventral side of the abdominal segments bears less specialized appendages, the swimmerets. The exception are the appendages of the abdominal region close to the genital Figure 7: External anatomy and appendages of the crayfish. Note: First and second pleiopods are also referred to as gonopods. openings on the base of the fifth pair of thoracic walking legs. If your specimen is male, or on the base of the third pair of walking legs, if it is female. Notice structural modifications on the first and second pairs of abdominal pleiopods (gonopods) of a male specimen; these are important in copulation. (C) Internal Anatomy Insert scissors under the posterior edge of the carapace, about midway between its dorsal and ventral margins, and carefully cut horizontally through the exoskeleton from that point towards the rostrum. Repeat on the opposite side of the body. Connect those incisions by cutting across the rostrum and through the thin membrane 6 connecting the cephalothorax and abdomen. Then carefully remove the loosened carapace, using the scalpel to separate it from underlying tissues. Remove the left branchiostegite (carapace side cover) by inserting scissors beneath its posterior edge and cutting in an arc to exposes the gills, some of which are attached to the bases of appendages and are removed with them; others are attached to the inner wall of the gill chamber. Continue the incision posterior on each side just above the abdominal pleura with the cuts meeting at the back of the telson. Carefully remove the loosened dorsal abdominal exoskeleton. Beneath it is a pair of longitudinal muscles (Figure 8), the abdominal extensors, which may remain attached so that the intestine is exposed when the piece is removed. The intestine is flanked by abdominal flexor muscles. Which of the two sets of muscles is more massive and more powerful? What is their function? With fine forceps remove any membranous tissue covering internal structures of the cephalothorax. Be careful not to damage the heart which is surrounded by a pericardial sinus. Because of its position, delicacy, and interference with observing other structures, study the circulatory system first. Remove the remaining gills on the left side of the body and carefully to expose the heart. It has one dorsal and two lateral pairs of openings, the ostia. In life, the heart is bathed by blood that fills the sinus, thereby closing the ostia and forcing blood from the heart into the arteries. The anterior end of the cephalothorax is occupied largely by the stomach. Its dorsal surface bears a transverse thickening from which muscles extend anteriorly into the rostrum and posteriorly to attach on the removed carapace. Flanking the posterior ones is a pair of powerful muscles that extend ventrally to insert on the mandibles. To reveal the extent of the stomach, remove the muscles attached to it and separate the lobes of the digestive glands anterior to the heart. Observe the larger, cardiac stomach and the smaller, posterior pyloric stomach joined by the intestine. The cardiac stomach is connected ventrally with the mouth by a short esophagus and contains the gastric mill which grinds ingested food. A pair of large digestive glands join the anterior end of the intestine and evidently not only produce digestive enzymes but also absorb the products of the digestion of food that enters them from the intestine. The green gland (also referred to as the coxal gland) which is part of the excretory system is located at the base (coxa) of the legs or, in some higher crustaceans, of the antennae or maxillae. To examine this structure you will need to lift up the stomach and search at the anterior end below the stomach for the “bladder” part of this gland (greenish, brown in color). To study the reproductive system, it is necessary to remove the heart and distinguish the gonads from the much more conspicuous digestive gland. That is easier in the female because the ovaries are bright orange with visible “blisters” forming the eggs. The posterior ends of the two ovaries are fused so that they form a Yshaped structure mostly between the right and left digestive glands. The testes are generally smaller than the ovaries and yellow in color with an even surface, however, located in the same area of the cephalothorax. Figure 8: Internal anatomy of a crayfish 7
