Parts Included in the Upgrade Kits
advertisement
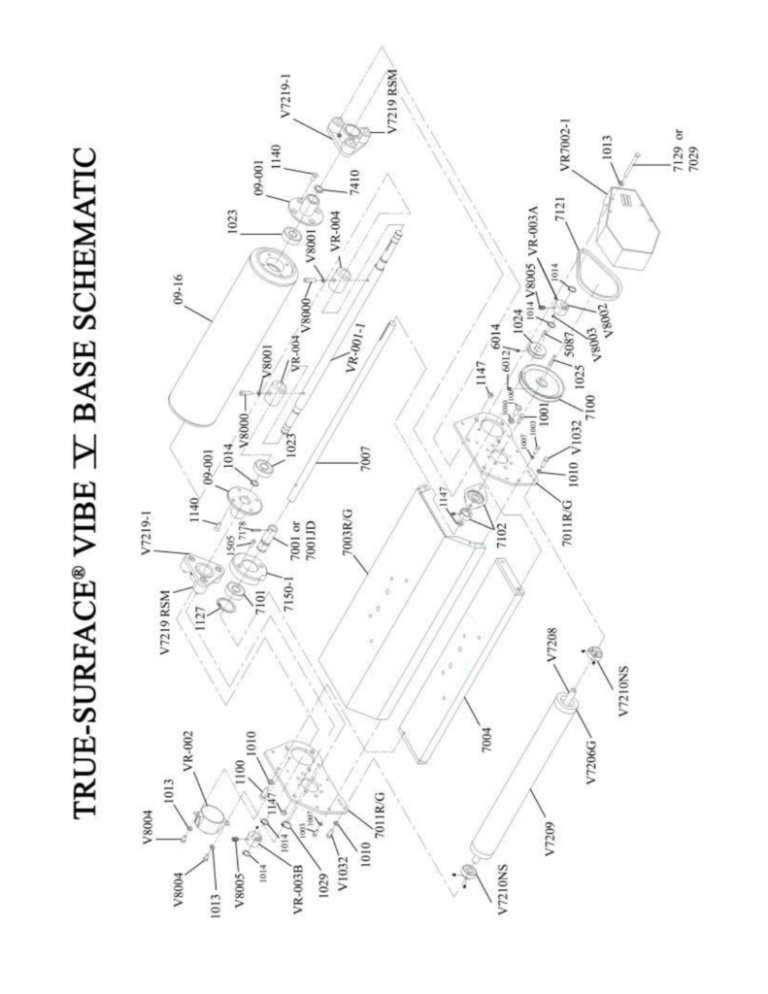
Parts Included in the Upgrade Kits Nylon Composite Flanged Bearings/Large RSM Kit 31A-VibeKit 1 Toro: Vibe Kit 1 to Fit All Toro Models Dept. # 37P H H H H 37P 37P Part # 1127 1183 1402 1505 6110 7101 7150 31A V7219-1 Description Bearing Snap Ring 3/8 - 16 Smooth Flange Nut Toro/Jac Motor Mount Stud 1/4 - 20 x 3/4 Socket Cap Screw 1/4 Hi Collar Lock Washer Bearing with Set Screw Bearing Housing Flanged Bearing Assembly Includes (18) 31A-V7219 RSM Qty 3 6 6 6 6 3 3 6 31A-VibeKit 1 Jac4/Ra: Vibe Kit 1 to Fit Jacobsen 3, 4 & Ransome Models Dept. # 37P H H H H H H 37P 37P Part # 1127 1183 1402 1403 1505 3147 6110 7101 7150 31A V7219-1 Description Bearing Snap Ring 3/8 - 16 Smooth Flange Nut Toro/Jac Motor Mount Stud 5/16 - 18 x 1 1/2 Motor Mount Stud 1/4 - 20 x 3/4 Socket Cap Screw 5/16 - 18 Flange Nut 1/4 Hi Collar Lock Washer Bearing with Set Screw Bearing Housing Flanged Bearing Assembly Includes (18) 31A-V7219 RSM Qty 3 6 6 12 6 12 6 3 3 6 31A-VibeKit 1 JD/Jac5: Vibe Kit 1 to Fit John Deere & Jacobsen 5, 6 Models Dept. # 37P H H 37P 37P Part # 1127 1505 6110 7101 7150 31A V7219-1 Description Bearing Snap Ring 1/4 - 20 x 3/4 Socket Cap Screw 1/4 Hi Collar Lock Waasher Bearing with Set Screw Bearing Housing Flanged Bearing Assembly Includes (18) 31A-V7219 RSM Qty 3 6 6 3 3 6 Solid Stainless Steel Front Roller 31A-VibeKit 2: Vibe Kit 2 to Fit All Models Dept. # H H 31P 31P 31P 31P Part # 1010 V1032 V7206G V7208 V7209 V7210 NS Description 3/8 Split Lock Washer Bolt 3/8-24 x1 Front Roller End Caps with Grease Zerk Solid Front Roller Axle Solid Front Roller Tube Solid Front Roller Bearings w/out Seals Qty 6 6 6 3 3 6 Select-A-VibeTM Dial: Adjust Your Vibration 31A-VibeKit 3 Toro310: Vibe Kit 3 to Fit Toro GM3-3150 Models Dept. # H H 37P 37P 37P 37P H H H H H 37P 37P H H 37P H 31P 31P 31P 31P 31A H H H H H H 31A 31P 31P 31P 31P 31P Part # 1010 1013 1014 1023 1024 1127 1140 1183 1402 1505 6110 7100 7101 7129 7410 7150 V1032 V7206G V7208 V7209 V7210 NS V7219-1 V8000 V8001 V8002 V8003 V8004 V8005 VR-001-1 VR-002 VR-003A VR-003B VR-004 VR7002-1 Description 3/8 Split Lock Washer 5/16 Split Lock Washer Snap Ring for Shaft Shaft Bearing 2" Shaft Pulley - Includes (3) H-6014 & (3) H-5087 Bearing Snap Ring 5/16 - 18 x 3/4 Flat Head Socket Screw 3/8 - 16 Smooth Flange Nut Toro/Jac Motor Mount Stud 1/4 - 20 x 3/4 Socket Cap Screw 1/4 Hi Collar Lock Washer 5" Pulley - Includes (3) H-6012 & (3) H-1025 Bearing with Set Screw 5/16 - 18 x 3 Hex Bolt Hub/Shaft Seal Bearing Housing Bolt 3/8-24 x1 Front Roller End Caps with grease zerk Solid Front Roller Axle Solid Front Roller Tube Solid Front Roller Bearings w/out seals Flanged Bearing Assembly - Includes (18) 31A-V7219 RSM 5/16 - 18 x 3/4 Socket Head Cap Screw 5/16 Hi Collar Lock Washer 3/8 - 16 x 1/4 Flat Point Set Screw 10 - 32 x 3/16 Flat Point Set Screw 5/16 - 18 x 1/2 Hex Bolt Grd 5 Ball Spring Plunger Vibe Shaft Assembly Only Eccentric Shaft cover Variable Outboard Eccentric Weight A Variable Outboard Eccentric Weight B Variable Inboard Eccentric Weight Black Belt Guard Qty 6 18 18 6 3 3 6 6 6 6 6 3 3 12 6 3 6 6 3 3 6 6 6 6 6 6 6 6 3 3 3 3 6 3 31A-VibeKit 3 Toro325: Vibe Kit 3 to Fit Toro 3250 Models Item # H H 37P 37P 37P 37P H H H H H H 37P 37P H 37P H 31P 31P 31P 31P 31A H H H H H H 31A 31P 31P 31P 31P 31P 31P 30S Part # 1010 1013 1014 1023 1024 1127 1140 1183 1402 1505 6110 7029 7100 7101 7410 7150 V1032 V7206G V7208 V7209 V7210 NS V7219-1 V8000 V8001 V8002 V8003 V8004 V8005 VR-001-1 VR-002 VR-003A VR-003B VR-004 VR7002-1 VR7CWB Manual Vibe V Description 3/8 Split Lock Washer 5/16 Split Lock Washer Snap Ring for Shaft Shaft Bearing 2 " Shaft Pulley - Includes (3) H-5087 & (3) 6014 Bearing Snap Ring 5/16 - 18 x 3/4 Flat Head Socket Screw 3/8 - 16 Smooth Flange Nut Toro/Jac Motor Mount Stud 1/4 - 20 x 3/4 Socket Cap Screw 1/4 Hi Collar Lock Washer 5/16 - 18 x 3 1/4 Hex Bolt 5" Pulley - Includes (3) H-1025 & (3) H-6012 Bearing with Set Screw Hub/Shaft Seal Bearing Housing Bolt 3/8-24 x1 Front Roller End Caps with grease zerk Solid Front Roller Axle Solid Front Roller Tube Solid Front Roller Bearings w/out seals Flanged Bearing Assembly - Includes (18) 31A-V7219 RSM 5/16 - 18 x 3/4 Socket Head Cap Screw 5/16 Hi Collar Lock Washer 3/8 - 16 x 1/4 Flat Point Set Screw 10 - 32 x 3/16 Flat Point Set Screw 5/16 - 18 x 1/2 Hex Bolt Grd 5 Ball Spring Plunger Vibe Shaft Assembly Only Eccentric Shaft cover Variable Outboard Eccentric Weight A Variable Outboard Eccentric Weight B Variable Inboard Eccentric Weight Black Belt Guard Black Counter Weight Vibe V Owner/Operator Manual Qty 6 18 18 6 3 3 6 6 6 6 6 12 3 3 6 3 6 6 3 3 6 6 6 6 6 6 6 6 3 3 3 3 6 3 3 1 31A-VibeKit 3 ToroJa4/RA: Vibe Kit 3 to Fit Jacobsen 3, 4 & Ransome Models Dept. # H H 37P 37P 37P 37P H H H H H H H 37P 37P H H 37P H 31P 31P 31P 31P 31A H H H H H H 31A 31P 31P 31P 31P 31P 30S Part # 1010 1013 1014 1023 1024 1127 1140 1183 1402 1403 1505 3147 6110 7100 7101 7129 7410 7150 V1032 V7206G V7208 V7209 V7210 NS V7219-1 V8000 V8001 V8002 V8003 V8004 V8005 VR-001-1 VR-002 VR-003A VR-003B VR-004 VR7002-1 Manual Vibe V Description 3/8 Split Lock Washer 5/16 Split Lock Washer Snap Ring for Shaft Shaft Bearing 2" Shaft Pulley - Includes (3) H-5087 & (3) H-6014 Bearing Snap Ring 5/16 - 18 x 3/4 Flat Head Socket Screw 3/8 - 16 Smooth Flange Nut Toro/Jac Motor Mount Stud 5/16 - 18 x 1 1/2 Motor Mount Stud 1/4 - 20 x 3/4 Socket Cap Screw 5/16 - 18 Flange Nut 1/4 Hi Collar Lock Waasher 5" Pulley - Includes (3) H-1025 & (3) H-6012 Bearing with Set Screw 5/16 - 18 x 3 Hex Bolt Hub/Shaft Seal Bearing Housing Bolt 3/8-24 x1 Front Roller End Caps with grease zerk Solid Front Roller Axle Solid Front Roller Tube Solid Front Roller Bearings w/out seals Flanged Bearing Assembly - Includes (18) 31A-V7219 RSM 5/16 - 18 x 3/4 Socket Head Cap Screw 5/16 Hi Collar Lock Washer 3/8 - 16 x 1/4 Flat Point Set Screw 10 - 32 x 3/16 Flat Point Set Screw 5/16 - 18 x 1/2 Hex Bolt Grd 5 Ball Spring Plunger Vibe Shaft Assembly Only Eccentric Shaft cover Variable Outboard Eccentric Weight A Variable Outboard Eccentric Weight B Variable Inboard Eccentric Weight Black Belt Guard Vibe V Owner/Operator Manual Qty 6 18 3 6 3 3 6 6 6 12 6 12 6 3 3 12 6 3 6 6 3 3 6 6 6 6 6 6 6 6 3 3 3 3 6 3 1 31A-VibeKit 3 JD/Jac5: Vibe Kit 3 to Fit John Deere & Jacobsen 5 & 6 Models Dept. # H H 37P 37P 37P 37P H H H H H H H 37P 37P H 37P H 31P 31P 31P 31P 31A H H H H H H 31A 31P 31P 31P 31P 31P 31P 30S Part # 1010 1013 1014 1023 1024 1127 1140 1146 1183 1402 1505 6110 7029 7100 7101 7410 7150 V1032 V7206G V7208 V7209 V7210 NS V7219-1 V8000 V8001 V8002 V8003 V8004 V8005 VR-001-1 VR-002 VR-003A VR-003B VR-004 VR7002-1 VR7CWB Manual Vibe V Description 3/8 Split Lock Washer 5/16 Split Lock Washer Snap Ring for Shaft Shaft Bearing 2" Shaft Pulley - Includes (3) H-5087 & (3) H-6014 Bearing Snap Ring 5/16 - 18 x 3/4 Flat Head Socket Screw 5/16 - 18 x 1 3/4 FHSC Black Oxide 3/8 - 16 Smooth Flange Nut Toro/Jac Motor Mount Stud 1/4 - 20 x 3/4 Socket Cap Screw 1/4 Hi Collar Lock Waasher 5/16 - 18 x 3 1/4 Hex Bolt 5" Pulley - Includes (3) H-1025 & (3) 6012 Bearing with Set Screw Hub/Shaft Seal Bearing Housing Bolt 3/8-24 x1 Front Roller End Caps with grease zerk Solid Front Roller Axle Solid Front Roller Tube Solid Front Roller Bearings w/out seals Flanged Bearing Assembly - Includes (18) 31A-V7219 RSM 5/16 - 18 x 3/4 Socket Head Cap Screw 5/16 Hi Collar Lock Washer 3/8 - 16 x 1/4 Flat Point Set Screw 10 - 32 x 3/16 Flat Point Set Screw 5/16 - 18 x 1/2 Hex Bolt Grd 5 Ball Spring Plunger Vibe Shaft Assembly Only Eccentric Shaft cover Variable Outboard Eccentric Weight A Variable Outboard Eccentric Weight B Variable Inboard Eccentric Weight Black Belt Guard Black Counter Weight Vibe V Owner/Operator Manual Qty 6 18 3 6 3 3 6 6 6 6 6 6 12 3 3 6 3 6 6 3 3 6 6 6 6 6 6 6 6 3 3 3 3 6 3 3 1 Upgrade Kit Installation Instructions Nylon Composite Flanged Bearings/Large RSM Kit (Vibe Kit 1) 1. Turn the True-Surface® Roller over, so it is resting on the hood with the roller tube (30A-09-16) facing upward. Note: It will be easier to work on the unit if the lifting hardware is removed. 2. Remove the belt guard (31P-VR7002-1) from the True-Surface® Roller. 3. Remove the drive belt (37P-7121). 4. Remove the 5” pulley (37P-100) and the 2” pulley (37P-1024). 5. Remove the two 5/16” bolts (H-1001) keeping the flange mounted drive shaft bearing (37P-7102) attached. 6. Remove the three ¼” bolts (H-1003) attaching the hood to the endplate. Then remove the two 3/8” bolts (H-1100) that attach the endplate to the frame. 7. Remove the 5/16” bolt (H-V1032) attaching the axle to the endplate. 8. Remove the endplate by sliding it away from the frame and the roller tube. 9. Remove the roller tube from the unit. 10. Loosen the set screws on the bearing (37P-7101) that secure the spline coupler (37P-7001or 7001JD) into the bearing housing (37P-7150), and then remove the spline shaft. 11. Remove the bearing housing (37P-7150) and then replace it with the new notched bearing housing (37P7150) included in the kit. Note: The new bearing housing has two scalloped relief points. Make sure one is lined up, so the new flanged bearing rubber shock mount (37P-V7219RSM) will not touch the bearing housing. 12. Remove the current flange bearings (30A-1016-2) from the endplates by removing the 5/16” serrated flange nuts on the outside of the endplate. 13. Install the new flanged bearings (31A- V7219-1), mounting them to the endplate using the new 5/16” serrated flange nuts included. Remember, when mounting the flange, don’t over-tighten the flange nuts, which could twist the rubber shock mounts (31A-V7219RSM). Also mount the bearings so the grease fittings can be easily accessed. 14. Reverse steps 10 through 1. When you have the unit rebuilt completely, grease the new bearings using a food-grade grease. 15. Repeat this process for the remaining two units. Solid Stainless Steel Front Roller (Vibe Kit 2) 1. Remove the 1/4” bolt that attaches the axle stabilizer (37P-7009) to the frame. 2. Remove the two 5/16” bolts that hold the axle (37P-7006) in place, making the removal of the current caster bar assembly from the unit possible. 3. Using a 3/8” drill bit, drill out the current two axle bolt holes for the new 3/8” bolts (H-V1032) that will hold in the new solid front roller (31P-V7209). 4. Install the new solid front roller (31P-V7209) with the 3/8” bolts (H-V1032) included. 5. Repeat the process for the remaining two units. Upgrade Kit Installation Instructions Continued Select-A-VibeTM Dial (Vibe Kit 3) 1. Turn the True-Surface® Roller over so it is resting on the hood with the roller tube (30A-09-16) facing up. Note: It will be easier to work on the unit if all the lifting hardware is removed 2. Remove the ¼” bolt that attaches the axle stabilizer (37P-7009) to the frame. Then remove the two 5/16” bolts that hold the axle in place, allowing the complete removal of the current wheel bar assembly. 3. With a 3/8” drill bit, drill out the two holes through which the 5/16” bolts go to hold the wheel bar axle in place. 4. Remove the belt guard (31P-VR7002-1) from the unit. 5. Remove the drive belt (37P-7121). 6. Remove the 5” pulley (37P-7100) and the 2” (37P-1024) pulley. 7. Remove the two 5/16” bolts (H-1001) that attach the bearing (37P-7102). 8. Remove the three ¼” bolts (H-1003) attaching the hood (37P-7003R/G) to the endplate (37P-7001R/G). Then remove the two 3/8” bolts (H-1100) that attach the endplate to the frame (37P-7004). 9. Remove the endplate by sliding it away from the frame and roller tube (30A-09-16). 10. Remove the roller tube from the unit. You will need to replace the current eccentric shaft with the new vibe shaft (31A-VR-001-1) included. a. Remove the non-drive side hub (30A-09-002N). Using a large punch or small rod drive the hub plug out of the hub. b. Remove the drive side hub (30A-09-001). c. Press your current eccentric shaft out of the roller tube, or use a rubber mallet to drive out the shaft from the pulley end of the shaft. d. Remove the remaining shaft bearing (37P-1023) from the roller tube and replace it with the new shaft bearing (37P-1023) included in the upgrade kit. e. Install the new vibe shaft (31A-VR-001-1), inserting the longer end of the shaft in first, either by pressing it into place or use a rubber mallet to drive it into place. Install the snap ring (37P-1014) included to keep the bearing (37P-1023) from sliding on the shaft. Make sure the bearing did not move itself while you were installing shaft. If it did move, use a rubber mallet to tap the shaft and bearing back into place. f. Install one of your hubs (30A-09-001) and the new seals. g. Install the other bearing (37P-1023) by sliding it over the end of the shaft and then using the four 5/16” x 1-3/4” flat head screws included and your other hub carefully seat the bearing into place. Once the bearing is in place, remove the hub, and install the snap ring that keeps the bearing in place on the shaft. h. Install the other hub with the 5/16” x 3/4” flat head screws and then install the new seal (H-7410). i. When the rest of the upgrade is completed, the tube is now ready to be installed. 11. Loosen the set screws on the bearing (37P-7101) that secures the spline coupler (37P-7001) in the bearing housing (37P-7150), and then remove the spline shaft (37P-7007). 12. Remove the bearing housing (37P-7150), and replace it with the new bearing housing included in the kit. Note: The new bearing housing has two scalloped relief points in it. Make sure one of them lined up so the new flange bearings rubber shock mounts (31A-V7219RSM) will not touch the bearing housing. 13. Remove the current flange bearings (30A-1016-2) from the endplates by removing the 5/16” serrated flange nuts on the outside of the endplate. 14. Install the new flanged bearings (31A-V7219-1) by mounting them to the endplate (37P-7011R/G) using the new 5/16” serrated flange nuts included. Remember, when mounting the flange, do not over tighten the flange nuts and twist the rubber mounts (see page 12). Also, mount the bearings so the grease fittings can be easily accessed. 15. Reverse steps 11 through 7. 16. Install the new solid front roller (31P-V7209) using the 3/8” bolts (H-V1032) and the lock washers (H1010) included with the roller. The bolts will go through the holes drilled out earlier and will thread into the solid front roller axle. 17. Install the short key and 2” pulley. Then install the snap ring included in the groove closest to the pulley. Pull the pulley up tight to this snap ring, and then tighten the set screw. 18. Lightly grease the dimpled area on the shaft, then install the outboard eccentric weight marked “A” (31PVR-003A) – line up the roman numeral V with the line on the end of the shaft. Install another snap ring in the last groove on the shaft. You should be able to leave the ball spring plunger in its set position to install the weight. The ball spring plunger is the screw that is in line with number V. Now, tighten the set screw opposite the ball spring plunger. 19. Install your new key (H-1025) and 5” pulley (37P-7100), line it up with your 2” pulley (37P-1024), and tighten the set screw (H-6012) – when lined up with the 2” pulley, the hub of the 5” pulley will probably rest against the bearing (37P-7102). Next, reinstall the belt (37P-7121). 20. Install the black belt guard (31P-VR7002-1) included with the kit. 21. On the other end of the shaft, install a snap ring (37P-1014) in the groove closest to the hub. Lightly grease the dimpled area of the shaft, then install the outboard eccentric weight (31P-VR-003B) marked “B”. Line up roman numeral V with the line on the end of the shaft, then tighten the set screw opposite the ball spring plunger. Install another snap ring in the last groove on the shaft. 22. Install the eccentric shaft cover (31P-VR-002) included with the two 5/16” x ½” screws (H-V8004) and lock washers (H-1013) included. 23. Repeat this process for the remaining two units.
