Jeans Into a Skirt - Learning Zone Express
advertisement
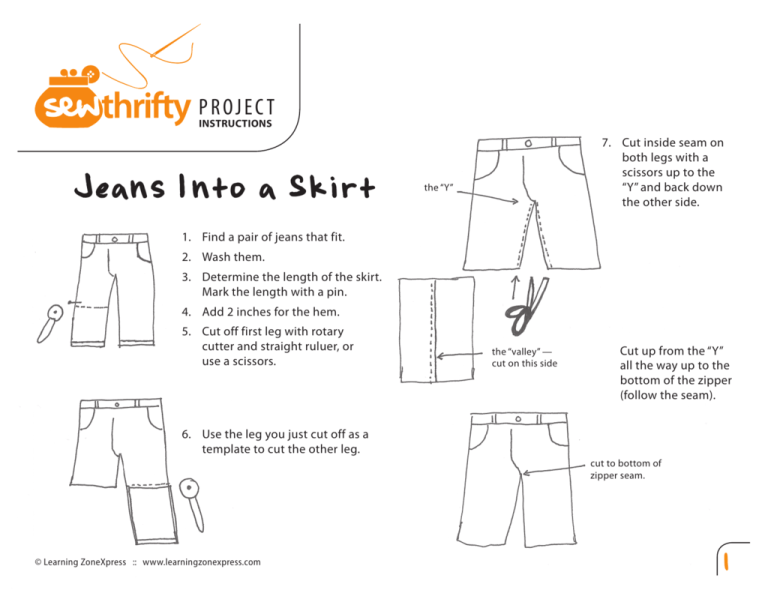
Project InstructIons Jeans Into a Skirt 7. Cut inside seam on both legs with a scissors up to the “Y” and back down the other side. the “Y” 1. Find a pair of jeans that fit. 2. Wash them. 3. Determine the length of the skirt. Mark the length with a pin. 4. Add 2 inches for the hem. 5. Cut off first leg with rotary cutter and straight ruluer, or use a scissors. the “valley” — cut on this side Cut up from the “Y” all the way up to the bottom of the zipper (follow the seam). 6. Use the leg you just cut off as a template to cut the other leg. cut to bottom of zipper seam. © Learning ZoneXpress :: www.learningzonexpress.com 1 8. Flip pants over. 9. Cut the “Y” of the pants up to the end of the curve in the “Y” with a scissors 10. Open the leg portion of the pants — both legs. Cut in the “valley “ of the seam (like the skirt). 11. Sew together “Y” seam (both front and back). x2 (unfolded) cut cut 12. Sew leg bottoms to the top of the pants. Line up fabric to cover the opening in the skirt. Pin fabric to back side following the “Y” and sew in place. Repeat on front side. Feel and pin where seam is and sew along the edge. © Learning ZoneXpress :: www.learningzonexpress.com 2 Cut away excess fabric with ¼" seam allowance on front and back 13. Hem bottom of skirt using a 1" hem. 1" hem © Learning ZoneXpress :: www.learningzonexpress.com 3 Sweater to Wool Hat Project InstructIons 1. Find a sweater, preferably 100% wool. 2. Felt the sweater: wash it in the washing machine and dry in a warm dryer to shrink it. 3. Measure the circumference of your head in inches. (Right over your ears is the largest part of your head). 4. Divide the circumference by 5. This will be the width of each section. 7. Cut out your pieces from sweater (quantity 5). 5. Measure from between your eyebrows to the top of your head. This will be the height of the hat. 6. Add ½" to each of those measurements on each segment (example 4.5" 5"). 8. Pin two pieces together along one curved edge and sew. Create the pattern: height + ½" circumference ÷ 5 + ½" © Learning ZoneXpress :: www.learningzonexpress.com sew Repeat so you have these pieces: 4 9. Create the band from sweater’s ribbing. Take your head circumference total from step 3 and add ¼” for seam allowance. Cut band, fold in half and sew together. Pin together on one side. Sew. 10. Pin ribbing to the hat (inside out) all the way around the edge of the hat (sandwich hat inside the band). Sew band to the hat. Pin on 5th section and sew. Then pin together to two remaining edges and sew. Turn inside out and flip up hat band. © Learning ZoneXpress :: www.learningzonexpress.com 5 Project InstructIons 6. Sew into pieces. Three strips sewn at 45 degree angle creates one piece. Trim sewn seam to ¼". trim to ¼" sew across at 45° Woven Belt unfold and piece will look like this: 7. Repeat step 6 four move times for a total of five pieces. 1. Find a shirt made of thicker, unforgiving fabric. 2. Wash it. 3. Cut out the back. 4. Iron the back piece of fabric. 5. Cut fabric in 1½" strips. Use a rotary cutter for best results. © Learning ZoneXpress :: www.learningzonexpress.com 8. Create the cord. Take fabric piece and fold ends into the middle and fold in half again. Sew edge. 6 9. Weave cords together. 11. Attach buckle and cover raw edges with scrap pieces of leather. Stitch around edge of leather piece. 10. Attach the buckle. Sew across the woven ends. Tuck end of belt braid into piece of scrap leather and stitch around edge of leather piece. © Learning ZoneXpress :: www.learningzonexpress.com 7 Project Instructions Freezer Paper Stencils 1. Find a shirt or sweatshirt 2. Prewash the shirt 3. Find a font or design you want to use. Use a word processor for written words. 4. Print your image, letter, or word in the size that you need. Cut a piece of paper to match. 5. Trace your image onto the paper side of the freezer paper. 6. Use an X-Acto knife to cut out your stencil on the freezer paper. 7. Iron the stencil onto the shirt. © Learning ZoneXpress :: www.learningzonexpress.com 8. Note: First iron on an extra sheet of freezer paper as a stabilizer on the opposite side of the design. Make sure when ironing the shiny side of the freezer paper is facing down. 9. Paint on stencil – 2 coats. 10. Allow to dry 24 hours 11. Pull off stencil 12. Fill in any missing areas with a fabric paint pent. 13. Heat set both front and backsides of the stenciled design with an iron. 8
