Procedure & Checklist Preparing SMRTbell™ Libraries
using PacBio® Barcoded Adapters
for Multiplex SMRT® Sequencing
Before You Begin
This document describes methods for generating SMRTbell libraries using PacBio barcoded adapters.
The procedure is a modification to the standard library preparation procedure in that samples must first go
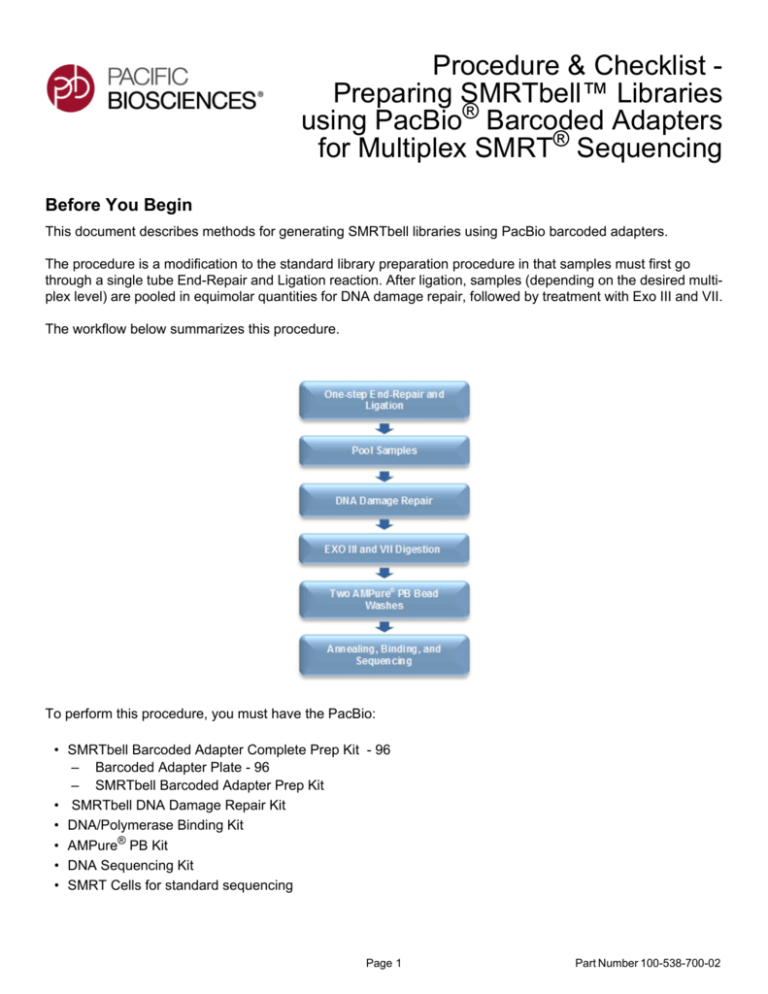
through a single tube End-Repair and Ligation reaction. After ligation, samples (depending on the desired multiplex level) are pooled in equimolar quantities for DNA damage repair, followed by treatment with Exo III and VII.
The workflow below summarizes this procedure.
To perform this procedure, you must have the PacBio:
• SMRTbell Barcoded Adapter Complete Prep Kit - 96
– Barcoded Adapter Plate - 96
– SMRTbell Barcoded Adapter Prep Kit
• SMRTbell DNA Damage Repair Kit
• DNA/Polymerase Binding Kit
• AMPure® PB Kit
• DNA Sequencing Kit
• SMRT Cells for standard sequencing
Page 1
Part Number 100-538-700-02
Sample Requirements
The table below summarizes the total input DNA required per multiplex pool
Library Size
Total Input DNA Requirement per Pool
< 1 kb
250 ng
1 - 3 kb
500 ng
3 - 10 kb
1 μg
>10 kb
Barcoding Not Recommended
The input DNA required for each sample depends on the multiplex level. To determine the input amount for EndRepair and Ligation for each sample, divide the total input DNA (using the above table) by the number of samples to be pooled (after the End-repair and Ligation reaction).
For example, for a pool 48 samples for a 3.5 kb library, 21 ng of each sample is required for End-Repair and
Ligation (1000 ng / 48). Note: For efficient multiplexing, samples for one pool should be similar in length (+/10%) and concentration.
One-Step End-Repair and Ligation Reaction
Each individual sample must first go through this step before pooling. This step repairs the ends of the DNA, followed by ligation with the barcoded adapters in a single-tube reaction.
1. Make a pre-mix of the following reaction and store in ice. Account for any pipetting errors when making a
pre-mix
Stock Conc.
For 1X
For ‘___’
Samples +
Overage
10 X
1.0 μL
μL
ATP high
10 mM
1.0 μL
μL
dNTP
10 mM
0.1 μL
μL
20X
0.5 μL
μL
30 U/μL
0.3 μL
μL
0.6 μL
μL
3.5 μL
μL
Reagent
Tube Cap
Color
Template Prep Buffer
End Repair Mix
Ligase
H2O (may be adjusted for sample
concentrations)
Total Volume
Notes
2. Mix by tapping the tube. Do a quick spin down of the tube. Note that the pre-mix must be used immediately.
3. Transfer 3.5 μL aliquots of the above pre-mix to a 96-well plate or LoBind Microcentrifuge tubes.
4. Prepare the samples by diluting each sample to a total 4 μL so that each sample contains equimolar
amounts with each other.
Page 2
Part Number 100-538-700-02
5. Add the template and barcoded adapter in the order listed (mix after each addition) for a total of 10 μL per
reaction. Keep reagents on ice at all times. Spin down to ensure the reactions are in the bottom of the wells
or tubes.
If working with less than 96 barcodes, the foil seal of the barcoded adapter plate can be easily pierced with a
pipet tip. Any untouched adapter barcodes can be stored at -20ºC for future use. Each barcode in the well is
for one time use only. See the User Bulletin - Barcode Plate Mapping for additional information.
Component
Volume
Sample
4.0 μL
Barcoded adapter (20 μM)
2.5 μL
Total
10 μL
Final Concentration
5.0 μM
6. Incubate as follows:
Temperature
Time
37ºC
20 minutes
25ºC
15 minutes
65ºC
10 minutes
4ºC
hold
7. After the End-Repair and Ligation reaction, pool the 10 μL reactions to be multiplexed and measure the total
volume.
8. Perform AMPure PB bead purification. If necessary, split the total volume in 2 to 3 aliquots for convenience.
Use the table below to determine the appropriate concentration of AMPure PB beads to use:
Library Size
X AMPure PB Beads
250 bp
1.8X
500 bp
1.0X
1 -3 kb
0.6X
3 - 10 kb
0.45X
9. Measure the concentration using a Qubit system.
Page 3
Part Number 100-538-700-02
STEP
Purify DNA
Notes
1
Add the appropriate volume of AMPure PB beads to the pooled End-Repair and
Ligation reaction.
2
Mix the bead/DNA solution thoroughly by tapping the tube.
3
Quickly spin down the tube to collect the beads.
4
Allow the DNA to bind to beads by shaking in a VWR vortex mixer at 2000 rpm for
10 minutes at room temperature.
5
Spin down the tube to collect beads.
6
Place the tube in a magnetic bead rack to collect the beads to the side of the tube.
7
Slowly pipette off cleared supernatant and save in another tube. Avoid disturbing
the bead pellet.
8
Wash beads with freshly prepared 70% ethanol.
9
Repeat step 8 above.
10
Remove residual 70% ethanol.
– Remove tube from magnetic bead rack and spin to pellet beads. Both the
beads and any residual 70% ethanol will be at the bottom of the tube.
– Place the tube back on the magnetic bead rack.
– Pipette off any remaining 70% ethanol.
11
Check for any remaining droplets in the tube. If droplets are present, repeat step
10.
12
Remove the tube from the magnetic bead rack and allow beads to air-dry (with
tube caps open) for 30 to 60 seconds.
13
Elute the DNA off the beads in 37 μL Elution Buffer. Mix until homogeneous, then
vortex for 1 minute at 2000 rpm.
14
The eluted DNA can be stored overnight at 4ºC or at -20ºC for longer duration.
Page 4
Part Number 100-538-700-02
Repair DNA Damage
DNA Damage Repair is recommended for all libraries. Use the following table to prepare the reaction, followed
by exonuclease digestion.
Library Size
Total Input DNA Requirement per Pool
< 1 kb
250 ng
1 - 3 kb
500 ng
3 - 10 kb
1 - 5 μg
1. In a LoBind microcentrifuge tube, add the following reagents per pooled library.
Reagent
DNA
Tube Cap Color
Stock Conc.
Volume
Final Conc.
37 μL
DNA Damage Repair
Buffer
10 X
5.0 μL
1X
NAD+
100 X
0.5 μL
1X
ATP high
10 mM
5.0 μL
1 mM
dNTP
10 mM
0.5 μL
0.1 mM
15X
2.0 μL
DNA Damage Repair
Mix
H2O
__ μL to adjust to
50.0* μL
50.0 μL
Total Volume
Notes
2. Mix the reaction well by pipetting or flicking the tube.
3. Spin down contents of tube with a quick spin in a microfuge.
4. Incubate at 37ºC for 20 minutes, then return the reaction to 4ºC.
Page 5
Part Number 100-538-700-02
Exonuclease Digestion
Add exonuclease to remove failed ligation products.
Reagent
Tube Cap Color
Stock Conc.
Volume
Ligated - Damage Repaired DNA
50 μL
Mix reaction well by pipetting
ExoIII
100.0 U/μL
1.0 μL
ExoVII
10.0 U/μL
1.0 μL
Total Volume
52 μL
1. Mix the reaction well by pipetting or flicking the tube.
2. Spin down contents of tube with a quick spin in a microfuge.
3. Incubate at 37ºC for 1 hour, then return the reaction to 4ºC. Do not exceed the 1 hour incubation time. You
must proceed with purification after this step.
Purify SMRTbell™ Templates
There are 2 purification steps. The AMPure PB bead concentration for both steps depends on the library size.
Use the recommended concentrations shown below:
Library Size
X AMPure PB Beads
250 bp
1.8X
500 bp
1.0X
1 -3 kb
0.6X
3 - 10 kb
0.45X
Page 6
Part Number 100-538-700-02
STEP
Purify SMRTbell™ Templates - First Purification
Notes
1
Add the appropriate volume of AMPure PB beads to the exonuclease-treated
reaction.
2
Mix the bead/DNA solution thoroughly.
3
Quickly spin down the tube (for 1 second) to collect the beads. Do not pellet
beads.
4
Allow the DNA to bind to beads by shaking in a VWR vortex mixer at 2000 rpm for
10 minutes at room temperature.
5
Spin down the tube (for 1 second) to collect beads.
6
Place the tube in a magnetic bead rack to collect the beads to the side of the
tube.
7
Slowly pipette off cleared supernatant and save (in another tube). Avoid
disturbing the bead pellet.
8
Wash beads with freshly prepared 70% ethanol.
9
Repeat step 8 above.
10
Remove residual 70% ethanol and dry the bead pellet.
– Remove tube from magnetic bead rack and spin to pellet beads. Both the
beads and any residual 70% ethanol will be at the bottom of the tube.
– Place the tube back on magnetic bead rack.
– Pipette off any remaining 70% ethanol.
11
Check for any remaining droplets in the tube. If droplets are present, repeat step
10.
12
Remove the tube from the magnetic bead rack and allow beads to air-dry (with
tube caps open) for 30 to 60 seconds.
13
Elute the DNA off the beads in 50 μL of Elution Buffer. Vortex for 1 minute at 2000
rpm.
Page 7
Part Number 100-538-700-02
STEP
Purify SMRTbell™ Templates - Second Purification
1
Add the appropriate volume of AMPure PB beads to the 50 μL of eluted DNA.
2
Mix the bead/DNA solution thoroughly.
3
Quickly spin down the tube (for 1 second) to collect the beads. Do not pellet
beads.
4
Allow the DNA to bind to beads by shaking in a VWR vortex mixer at 2000 rpm for
10 minutes at room temperature.
5
Spin down the tube (for 1 second) to collect beads.
6
Place the tube in a magnetic bead rack to collect the beads to the side of the
tube.
7
Slowly pipette off cleared supernatant and save (in another tube). Avoid
disturbing the bead pellet.
8
Wash beads with freshly prepared 70% ethanol.
9
Repeat step 8 above.
10
Notes
Remove residual 70% ethanol and dry the bead pellet.
– Remove tube from magnetic bead rack and spin to pellet beads. Both the
beads and any residual 70% ethanol will be at the bottom of the tube.
– Place the tube back on magnetic bead rack.
– Pipette off any remaining 70% ethanol.
11
Check for any remaining droplets in the tube. If droplets are present, repeat step
10.
12
Remove the tube from the magnetic bead rack and allow beads to air-dry (with
tube caps open) for 30 to 60 seconds.
13
Elute the DNA off the beads in 8 - 10 μL of Elution Buffer.
– Mix until homogeneous.
– Vortex for 1 minute at 2000 rpm.
– Spin the tube down to pellet beads, then place the tube back on the
magnetic bead rack.
– Carefully collect the eluted sample.
– Discard the beads.
14
Verify your DNA amount and concentration on a Bioanalyzer instrument using a
High Sensitivity DNA Analysis Kit, or check quantitation using Qubit dsDNA HS
Assay Kit. If there is too little sample, estimate the concentration based on 10%
yield of input amount into the damage repair step.
Page 8
Part Number 100-538-700-02
Control Complex Dilution
You must have the PacBio Control Complex for this step. Dilute the Control Complex according to the volumes
and instructions specified in the Calculator.
Anneal and Bind SMRTbell™ Templates
Before adding the primer to the SMRTbell template, the primer must go through a melting step at 80ºC. This
avoids exposing the sample to heat. The template and primer mix can then be incubated at 20ºC for 30 minutes.
Note that you must have the PacBio DNA/Polymerase Kit and use LoBind microcentrifuge tubes for this step.
For polymerase binding, incubation at 30ºC for 30 minutes is sufficient. Instructions for polymerase binding are
provided by the calculator.
For more information about using the Binding Calculator, see the Pacific Biosciences Template Preparation and
Sequencing Guide and QRC - Annealing and Binding Recommendations.
Sequence
To prepare for sequencing on the instrument, refer to the RS Remote Online Help system or Pacific Biosciences
Software Getting Started Guide for more information. Follow the touchscreen UI to start your run. Note that you
must have a DNA Sequencing Kit and SMRT® Cells for standard sequencing.
For Research Use Only. Not for use in diagnostic procedures. © Copyright 2015, Pacific Biosciences of California, Inc. All rights reserved. Information in this document is subject to change without notice. Pacific Biosciences assumes no responsibility for any errors or omissions in this document. Certain notices, terms, conditions and/o r use restrictions may pertain to your use of Pacific Biosciences products and/or third p arty products. Please refer to the applicable Pacific Biosciences Terms and Conditions of S ale and
to the applicable license terms at http://www.pacificbiosciences.com/licenses.html. Pacific Biosciences, the Pacific Biosciences logo, PacBio, S MRT, SMRTbell and Iso-Seq are
trademarks of Pacific Biosciences. BluePippin and SageELF are trademarks of Sage Science, Inc. NGS-go and NGSengine are trademarks of GenDx. All other trademarks are
the sole property of their respective owners.
Page 9
Part Number 100-538-700-02

