Blackboard Grade Center
advertisement

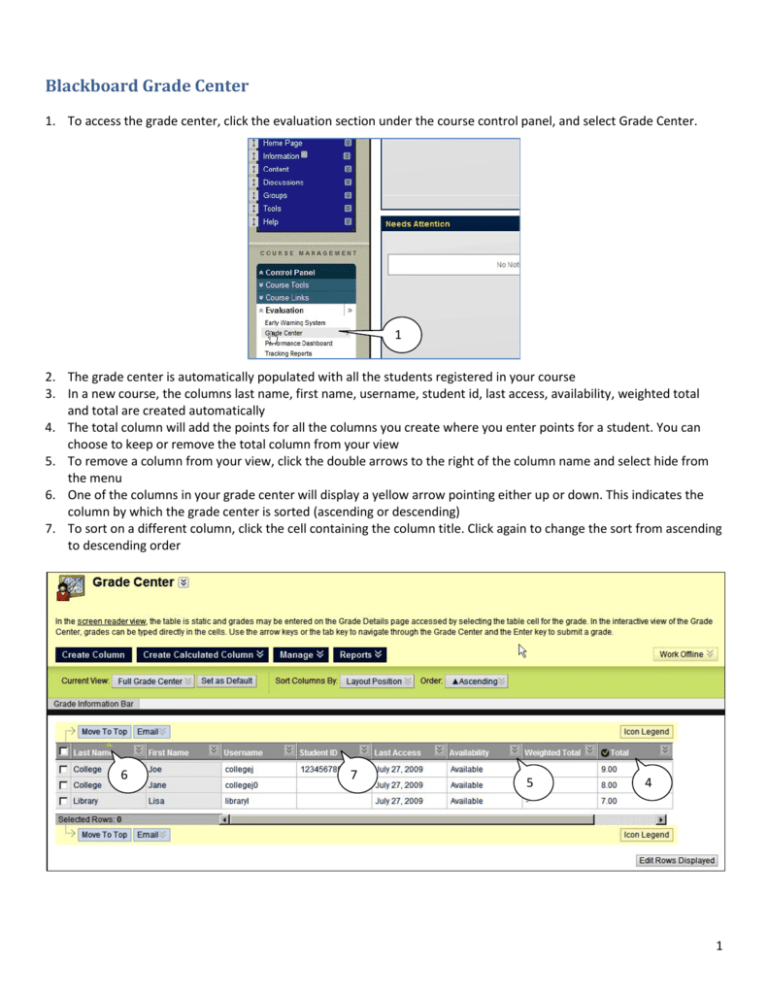
Blackboard Grade Center 1. To access the grade center, click the evaluation section under the course control panel, and select Grade Center. 1 2. The grade center is automatically populated with all the students registered in your course 3. In a new course, the columns last name, first name, username, student id, last access, availability, weighted total and total are created automatically 4. The total column will add the points for all the columns you create where you enter points for a student. You can choose to keep or remove the total column from your view 5. To remove a column from your view, click the double arrows to the right of the column name and select hide from the menu 6. One of the columns in your grade center will display a yellow arrow pointing either up or down. This indicates the column by which the grade center is sorted (ascending or descending) 7. To sort on a different column, click the cell containing the column title. Click again to change the sort from ascending to descending order 6 7 5 4 1 Creating a Column 1. For every exam, quiz, assignment or other item you want to use in calculating student grades, there must be a column in the grade center 2. Click the Create Column button 3. Enter a name for the item you will be grading 4. If you wish to display an optional, abbreviated name in the grade center window, enter that 5. You may enter a description if you wish 6. Select the type of display you would like for the grade 7. You can set a secondary display if you wish 3 4 5 6 7 8. 9. 10. 11. 12. 13. 14. 15. Set a category for the item if you wish (categories are addressed later in this packet) Set the number of points possible for this exam or assignment If you set a due date, then overdue or missed items can be monitored using the early warning system Verify that you wish to include this column in grade center calculations (total points and final grade) Verify if you wish students to be able to see their grade for this item when it is entered Verify if you wish students viewing their grades to see class statistics along with their own grades Click Submit You will see the new item in your grade center. You may have to scroll to the right to see it. 8 9 10 11 12 13 2 Using Categories When you create a weighted final grade, you will have two options. You can assign a percent weight to every item in your grade center, or you can assign a percent to groups of items, if those items have a category assigned. For example, you can assign each quiz as worth 10%, or you can assign a quiz category to each of them and say that the category quizzes is worth 40%. If you use categories, you also have the option of telling Blackboard to drop the lowest or highest grade in a category. Creating a category 1. Click the Manage button in the main Grade Center window 2. Select categories 3. Click the Add category button 4. Enter a name for the category 5. Click Submit 1 2 4 Assigning a Category to an Item 6. In the grade center main window, click the down arrows on the right edge of the column you wish to assign a category to 7. From the menu, select Edit Column Information 8. In the category drop down box, select the appropriate category for the item 9. Click submit 6 8 7 3 Creating a Weighted Column (such as final grade) 1. In the main grade center window, click the Create Calculated Column button 2. From the menu, select weighted column 3. Enter a name for the grade you are assigning 4. Optionally, you can enter a shorter display name for the grade center 5. You can enter a description for this grade if you wish 6. Select the primary display you would like (percentage, score, letter) Note: It is possible to create a custom grading schema. If you do so, that schema will also be available as a display option 1 3 4 2 5 6 Setting the Weight Using Individual Columns 7. If you wish to have a secondary display, enter that. 8. To calculate the grade, select from the left side of the screen which columns (scores) should be included in the final grade 9. Use the arrow in the window to move those from the left to the right side 10. Once you have selected the columns to include, enter the percent weight each item will have in the final grade 11. They should add up to 100%. 7 10 8 9 11 4 Setting the Weight Using Categories If you have created and assigned categories to the columns in your grade center, you can assign the weight to the categories rather than to each item. 12. When setting the weight of items, use the area ‘categories to select’, and add each category (quizzes, exams, assignments, or whatever you use in your class 13. Enter the weight that the entire category gets in the final grade. In this example, all quizzes together are worth 30%, exams are worth 60% and assignments worth 10%. 14. You can choose to apply the percent equally to all items in the category or proportionally based on the point values assigned to items in the category 15. You can also have Blackboard drop the lowest or highest grade, or use only the lowest or highest value in a category 13 14 15 12 Calculate as a Running Total 16. Immediately under the weighting, you are asked if you wish to calculate the grade as a running total 17. If you leave the default ‘yes’, then students will be able to view their grade throughout the semester to see how they are doing ‘so far’. The running total will not include any columns where a grade has not been entered. 18. If you check ‘no’, then the grade center will calculate the grade as if all empty grades are zero. 19. If you are using the running total feature, then you must be sure not to leave any blank grades at the end of the term, as that column will not be included at all in the final grade, and Blackboard will calculate the student’s grade based only on the columns where you have entered data. 16 5 Options 20. Under Options, verify: - that you wish to include this column in the grade center calculations - whether you wish students to be able to see this grade in their My Grades view - whether you wish student to be able to see statistics for the class when they see their grade 20 21. When all the options are set as you wish, click submit 22. As you enter grades in the grade center, the weighted grade will recalculate Additional Grade Center Options 23. To reorganize the order in which columns are displayed, select Manage, Column Organization 24. Columns can be dragged up or down in the list to change the order in which they appear. Click and drag the crosshair icon to the left of the column name 24 6 Grade Center Reports 25. You can get reports created through the grade center, including grade history and ‘create report’ which gives you a printed report for each student showing their grades to date. Click the reports button in the main grade center window to run reports. Emailing from the Grade Center 26. You may notice something in the grade center that you wish to discuss with a student (such as a low grade or a missing assignment). You can easily email a student or students from the grade center by checking the checkbox before their name and clicking the e-mail button. 27. If you e-mail multiple students from the grade center or from elsewhere in the Blackboard course, they will not see who else the message is addressed to. The To: box in the email message will show the course name. 7


