Total Dissolved Solids
advertisement
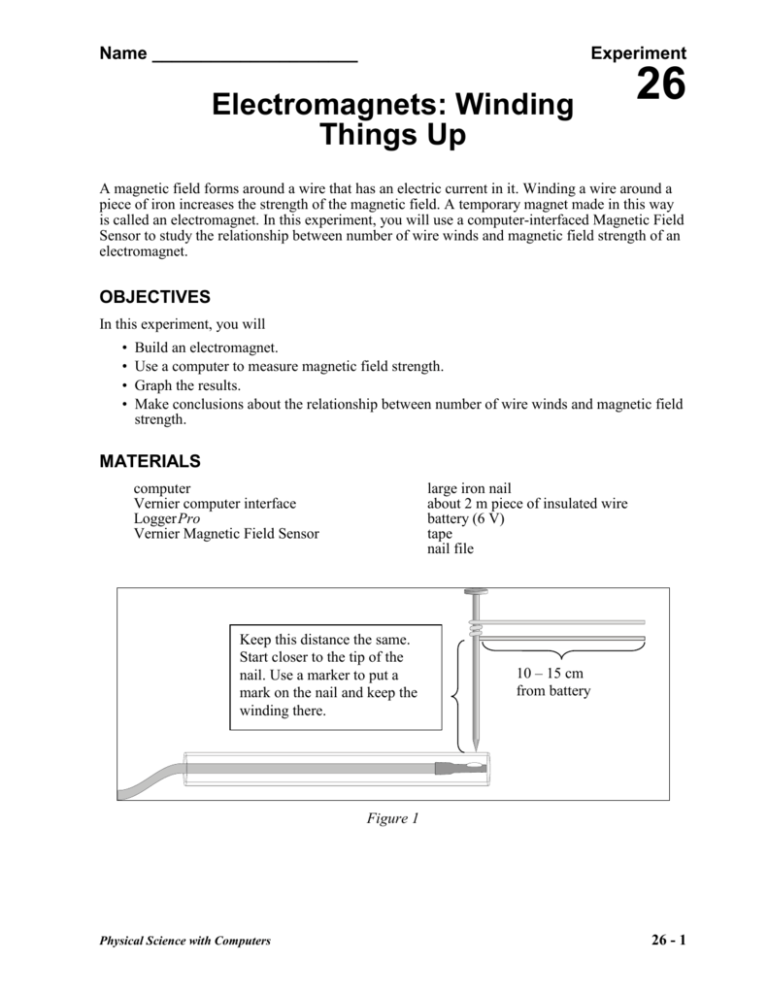
Name _____________________ Experiment Electromagnets: Winding Things Up 26 A magnetic field forms around a wire that has an electric current in it. Winding a wire around a piece of iron increases the strength of the magnetic field. A temporary magnet made in this way is called an electromagnet. In this experiment, you will use a computer-interfaced Magnetic Field Sensor to study the relationship between number of wire winds and magnetic field strength of an electromagnet. OBJECTIVES In this experiment, you will • • • • Build an electromagnet. Use a computer to measure magnetic field strength. Graph the results. Make conclusions about the relationship between number of wire winds and magnetic field strength. MATERIALS computer Vernier computer interface Logger Pro Vernier Magnetic Field Sensor large iron nail about 2 m piece of insulated wire battery (6 V) tape nail file Keep this distance the same. Start closer to the tip of the nail. Use a marker to put a mark on the nail and keep the winding there. 10 – 15 cm from battery Figure 1 Physical Science with Computers 26 - 1 Experiment 26 PROCEDURE 1. Tape a Magnetic Field Sensor to the table top. The white dot at the top of the sensor should face up and be parallel to the table top. The sensor should be set on its 6.4 mT amplification setting. 2. Connect the Magnetic Field Sensor to the computer interface. Prepare the computer for data collection by opening the file “26 Electromagnets” from the Physical Science w Computers folder. 3. Collect data for zero winds. a. Click . b. Get a large iron nail and place its pointed end perpendicular to the top of the Magnetic Field Sensor at its very end, as shown in Figure 1. When the reading has stabilized, click . c. Type “0” in the edit box (for 0 Winds). d. Press ENTER. The magnetic field strength value for zero winds is now saved. e. DO NOT click on STOP until you are finished with the experiment. 4. Strip the insulation from both ends of the insulated wire. Insert one bare end of the 2 meter insulated wire into one terminal of the battery. 5. Place the nail on the wire at a position 10-15 cm from the battery. Tightly wind the wire around the nail 10 times as shown in Figure 1. 6. Collect data for 10 winds. a. Insert the other bare end of the wire into the other terminal of the battery. b. A partner should again touch the pointed end of the nail to the top of the sensor at its very end as shown in Figure 1. Important: If the reading decreases, reverse the connections on the battery. c. When the reading has stabilized, click . d. Type “10” in the edit box (for 10 Winds). e. Press ENTER. The magnetic field strength value for 10 winds is now saved. 7. Right click on graph and choose the graph option then the axes options. Look at the x axis portion of the table and increase the range to 100 winds. 8. Repeat Step 6 for 20, 30, 40, 50, 60, and 70 winds. Caution: The battery will become warm as it is used. To keep it from getting hot, and to save energy, remove the wire from the top of the battery immediately after has been clicked. Important: Wrap all winds at nearly the same distance from the nail end using your mark on the nail to help you 9. Click to end data collection. Record the magnetic field strength values displayed in the table in your data table. 10. Print a copy of the graph. 11. 26 - 2 Physical Science with Computers Electromagnets: Winding Things Up DATA Winds (#) Magnetic Field (mT) Winds (#) Magnetic Field (mT) 0 _______ 40 _______ 10 _______ 50 _______ 20 _______ 60 _______ 30 _______ 70 _______ PROCESSING THE DATA 1. What is the relationship between number of winds and magnetic field strength? 2. Use the power of Logger Pro by adding a “best-fitting” straight line or “regression” line to your graph and then analyzing this line. a. To obtain a “best-fitting” straight line, click on the Linear Fit button, . b. Choose Interpolate on the Analyze menu. c. Move the cursor along the graph to a position above 15 winds—the x-value displayed on the screen should be 15. The y-value displayed on the screen is your magnetic field strength value for 15 winds. Record it. d. Move the cursor along the graph until the x-value is 90. Read and record magnetic field strength, the y-value, for 90 winds. Record it. 15 winds _____________ mT 90 winds _______________ mT Print one copy of your graph for your group and attach to the lab. Explain your results. Physical Science with Computers 26 - 3 Experiment 26 3. Connect the wire to the battery like it was during the experiment. Click . Place the head of the nail instead of the pointed end near the magnetic field sensor. What happened to the sign of the magnetic field? _________________________ Explain your answer. 4. Remove the wire from the battery and measure the magnetic field of the nail. Record it ___________________ mT Drop the nail on the floor and measure the magnetic field of the nail. Record it ________________________ mT Explain these results using the idea of magnetic domains. 26 - 4 Physical Science with Computers

