Chapter 6 - Studygig
advertisement
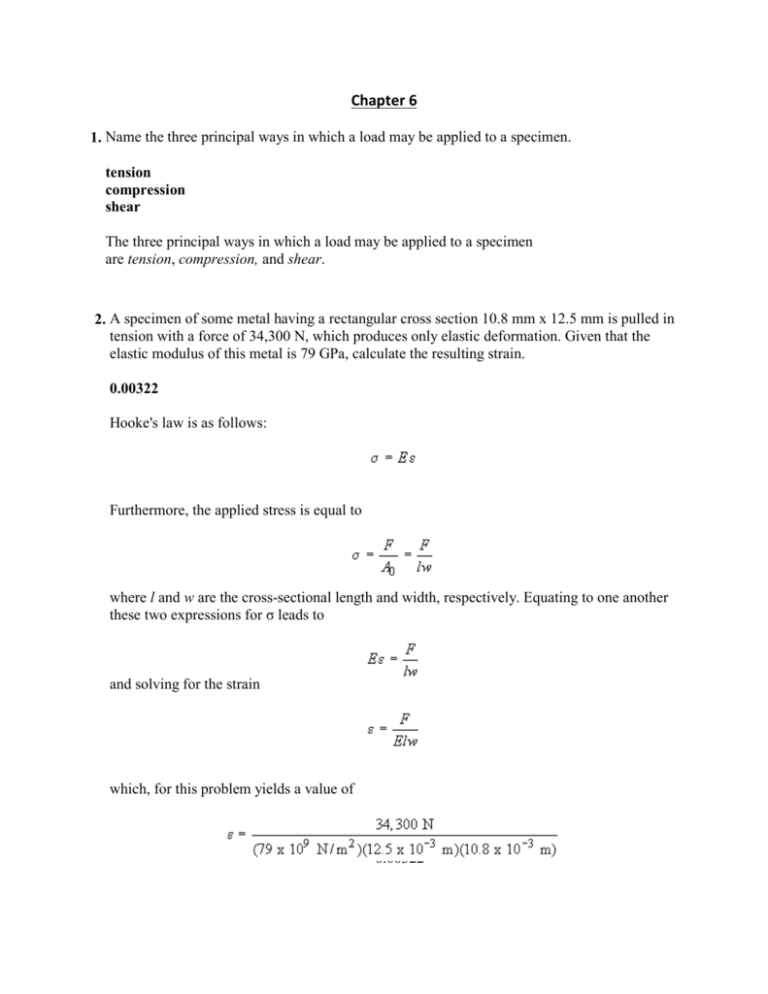
Chapter 6 1. Name the three principal ways in which a load may be applied to a specimen. tension compression shear The three principal ways in which a load may be applied to a specimen are tension, compression, and shear. 2. A specimen of some metal having a rectangular cross section 10.8 mm x 12.5 mm is pulled in tension with a force of 34,300 N, which produces only elastic deformation. Given that the elastic modulus of this metal is 79 GPa, calculate the resulting strain. 0.00322 Hooke's law is as follows: Furthermore, the applied stress is equal to where l and w are the cross-sectional length and width, respectively. Equating to one another these two expressions for σ leads to and solving for the strain which, for this problem yields a value of = 0.00322 3. Consider a brass alloy the stress-strain behavior of which is shown below. A cylindrical specimen of this alloy having a length of 63 mm must elongate only 0.11 mm when a tensile load of 53,500 N is applied. Under these circumstances, what is the radius of the specimen (in mm)? 10.7 mm For this problem, strain may be computed as follows: We next locate the point on the stress-strain curve at this strain value, and then read the corresponding stress value, which is 150 MPa. From the definition of stress for a specimen of a circular cross-section it is possible to solve for the specimen radius, r0 as = 0.0107 m = 10.7 mm 4. Consider a brass alloy the stress-strain behavior of which is shown below. A cylindrical specimen of this alloy 20 mm in diameter and 188 mm long is to be pulled in tension. Calculate the stress (in MPa) necessary to cause a 0.0105 mm reduction in diameter. Assume a value of 0.34 for Poisson's ratio. 135 MPa Poisson's ratio is defined as which is the negative ratio of transverse and longitudinal strains. For this cylindrical specimen that has an initial diameter d0, the transverse strain is equal to Inasmuch as we know that the value of ν is 0.34, it is possible to solve for the longitudinal strain from the definition of Poisson's ratio as Next, locate the point on the stress-strain curve at this strain value and read the corresponding stress from the vertical axis; the value of this stress is about 135 MPa. 5. For a bronze alloy, the stress at which plastic deformation begins is 267 MPa and the modulus of elasticity is 115 GPa. (a) What is the maximum load (in N) that may be applied to a specimen having a crosssectional area of 300 mm2 without plastic deformation? (b) If the original specimen length is 137 mm, what is the maximum length (in mm) to which it may be stretched without causing plastic deformation? (a) 80,100 N (b) 137.3 mm (a) The maximum stress that may be applied without plastic deformation taking place is the yield strength, σy; thus, from the definition of stress the load at yielding (or maximum load), Fy, is = 80,100 N (b) Combining Hooke's law (at the stress corresponding to the yield strength) with the definition of strain as and solving for the maximum length li gives which, for this problem is equal to = 137.3 mm 6. A cylindrical bar of metal having a diameter of 18.8 mm and a length of 198 mm is deformed elastically in tension with a force of 49,400 N. Given that the elastic modulus and Poisson's ratio of the metal are 67.1 GPa and 0.34, respectively, determine the following: (a) The amount by which this specimen will elongate (in mm) in the direction of the applied stress. (b) The change in diameter of the specimen (in mm). Indicate an increase in diameter with a positive number and a decrease with a negative number. (a) 0.525 mm (b) - 0.0169 mm (a) Combining Hooke's law - i.e., with the definition of stress for a cylindrical specimen--i.e., and also incorporating the expression for longitudinal strain--i.e., we get the following: Then solving for the change in length, Δl, leads to and, for this problem, the following value for Δl: = 0.525 x 10⁻³ m = 0.525 mm (b) When the definition for Poisson's ratio--i.e., is combined with the expression for transverse strain, and longitudinal strain, The following equation results: and, finally solving for the change in diameter, Δd, leads to which, for this problem, yields the following value for Δd: = - 0.0169 mm 7. Consider a brass alloy the stress-strain behavior of which is shown below. A cylindrical specimen of this alloy 12.8 mm in diameter and 109.1 mm long is pulled in tension; after the load is released the final length is 109.3 mm. Calculate the magnitude of the load (in N) necessary to cause this elongation. 32,170 N It is first necessary to calculate the final strain of the specimen after the load release. From the definition of strain Next locate this strain value on the bottom horizontal axis of the inset plot, and then draw a straight line from this strain value parallel to the linear elastic region. This line intersects the stress-strain curve at a stress of about 250 MPa. From the definition of stress for a cylindrical specimen of diameter d solving for the applied load leads to = 32,170 N 8. An alloy has a yield strength of 805 MPa and an elastic modulus of 107 GPa. Calculate the modulus of resilience for this alloy [in J/m^3 (which is equivalent to Pa)] given that it exhibits linear elastic stress-strain behavior. 3.03E6 J/m^3 The modulus of resilience Ur may be calculated using the following equation: Using values of σy and E provided in the problem statement, the modulus of resilience is equal to 9. A cylindrical specimen of a metal alloy 48.5 mm long and 9.72 mm in diameter is stressed in tension. A true stress of 369 MPa causes the specimen to plastically elongate to a length of 54.7 mm. If it is known that the strain-hardening exponent for this alloy is 0.20, calculate the true stress (in MPa) necessary to plastically elongate a specimen of this same material from a length of 48.5 mm to a length of 57.2 mm. 393 MPa True stress and strain are related to one another as follows: The true strain is defined by By substitution the equation defining true strain into the first equation and after some rearrangement, it is possible to solve for the value of K using the first set of l0and li values as follows: (The "1" subscript is used to denote the first set of values given in the problem statement.) Now it is possible to determine the value of σT for the second set of data (σT2) by combining the first two equations, and by substitution of the above expression for K as follows: Thus, the value of σT2 for this problem is = 393 MPa 10. A 10-mm-diameter Brinell hardness indenter produced an indentation 1.55 mm in diameter in a steel alloy when a load of 500 kg was used. Calculate the Brinell hardness (in HB) of this material. 263 HB The Brinell hardness may be calculated using the following equation: where P, D, and d are, respectively, the applied load (in kg), the ball diameter (in mm), and the indentation diameter (in mm). Thus, = 263 HB 11. Using the following figure estimate the (a) Brinell hardness (in HB), and (b) Rockwell hardness (in HRB) for a brass alloy having the stress-strain behavior shown below. (a) 125 HB (b) 80 HRB (a) From the stress-strain plot, the tensile strength of this alloy (i.e., the maximum point on the curve) is 450 MPa. Using the tensile strength-hardness plot (the line for brass) a tensile strength of 450 MPa corresponds to a Brinell hardness of approximately 125 HB (as read from the bottom horizontal axis). (b) For this same tensile strength value, the Rockwell hardness (as read from the top horizontal axis) is approximately 80 HRB.
