History of the Microscope
advertisement
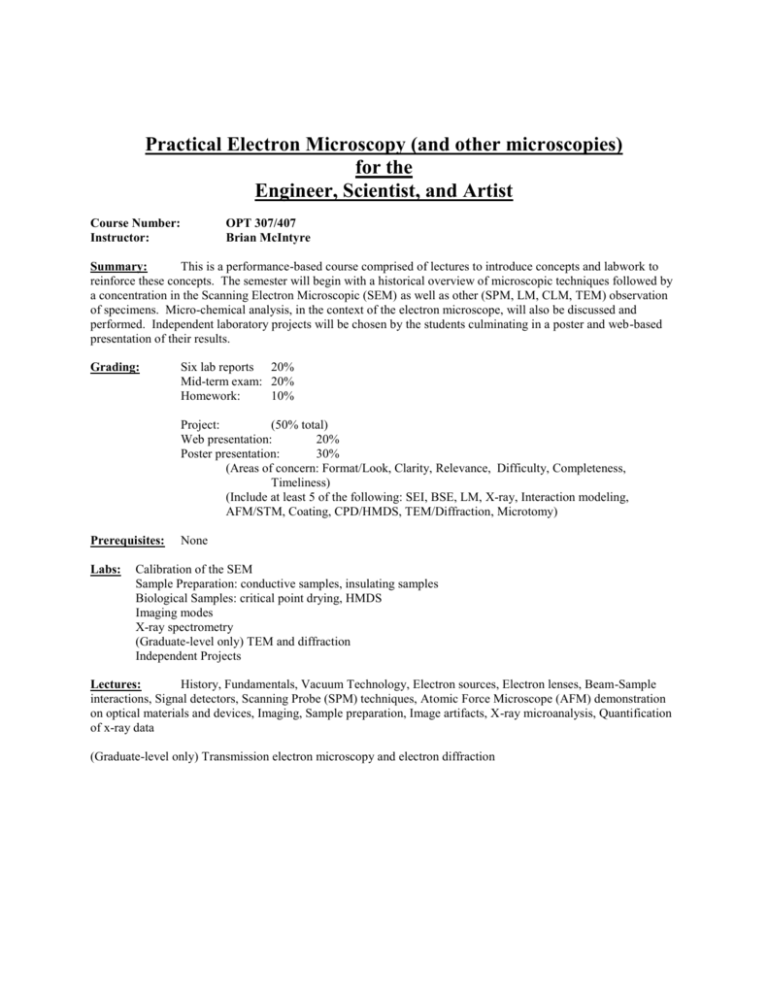
Practical Electron Microscopy (and other microscopies) for the Engineer, Scientist, and Artist Course Number: Instructor: OPT 307/407 Brian McIntyre Summary: This is a performance-based course comprised of lectures to introduce concepts and labwork to reinforce these concepts. The semester will begin with a historical overview of microscopic techniques followed by a concentration in the Scanning Electron Microscopic (SEM) as well as other (SPM, LM, CLM, TEM) observation of specimens. Micro-chemical analysis, in the context of the electron microscope, will also be discussed and performed. Independent laboratory projects will be chosen by the students culminating in a poster and web-based presentation of their results. Grading: Six lab reports 20% Mid-term exam: 20% Homework: 10% Project: (50% total) Web presentation: 20% Poster presentation: 30% (Areas of concern: Format/Look, Clarity, Relevance, Difficulty, Completeness, Timeliness) (Include at least 5 of the following: SEI, BSE, LM, X-ray, Interaction modeling, AFM/STM, Coating, CPD/HMDS, TEM/Diffraction, Microtomy) Prerequisites: Labs: None Calibration of the SEM Sample Preparation: conductive samples, insulating samples Biological Samples: critical point drying, HMDS Imaging modes X-ray spectrometry (Graduate-level only) TEM and diffraction Independent Projects Lectures: History, Fundamentals, Vacuum Technology, Electron sources, Electron lenses, Beam-Sample interactions, Signal detectors, Scanning Probe (SPM) techniques, Atomic Force Microscope (AFM) demonstration on optical materials and devices, Imaging, Sample preparation, Image artifacts, X-ray microanalysis, Quantification of x-ray data (Graduate-level only) Transmission electron microscopy and electron diffraction Opt 307/407 Spring 2005 Course Syllabus Week of 1: Jan 9 2: Jan 16 3: Jan 23 4: Jan 30 5: Feb 6 6: Feb 13 7: Feb 20 Lecture Topic Introduction to Course Text Syllabus Exams, Project, Lectures, Labs Introduction to Microscopies Vacuum Systems Putting together your project proposal Electron Sources and Lenses The SEM System Specimen Preparations Tour of Pathology Lab at URMC Image Recording 12: Mar 27 13: Apr 3 14: Apr 10 15: Apr 17 16: Apr 24 Complementary Techniques The Art of Presentations Artifacts and Advanced Topics The TEM System (Graduate required) Spring Break SPM systems Case Study (Organ Metal Project) Light Microscopies/Confocal LM Review/ Final Exam Project Work Project Work Project Work Project Work 17: Apr 28 Reading week/Poster presentation 8: Feb 27 9: Mar 6 10: Mar 13 11: Mar 20 mcintyre@optics.rochester.edu x53058 Wilmot 206a (TEM lab) x54875 Wilmot Annex (SEM lab) Text Lab Chap 1-2 Chap. 14.1 Handouts Chap. 14-15 Notes Chap. 15 Chap. 16 Lab Tour Vacuum (in-class). No report due 1- Calibration check 2- Sample Prep.: Conductors/Insulators 3- Sample Prep. Biologicals Chap. 8,9,1617,19 Chap. 18 Handouts Chap. 18 Handouts 4-Three imaging standards Project proposals due 5- X-ray spectrometry Handouts Chap. 10 SPM demo (in class) Approval of Projects In-class photo critique 6-TEM imaging and diffraction In-class discussion w/web and poster Wilmot display History of the Microscope Light Microscopes and Electron Microscopes By Mary Bellis (adapted by Brian McIntyre 12/2003) (Information from Newtom BBS A Division of Educational Programs at Argonne National Laboratory and the National Institute of Health as well as web resources) During that historic period known as the Renaissance, after the "dark" Middle Ages, there occurred the inventions of printing, gunpowder and the mariner's compass, followed by the discovery of America. Equally remarkable was the invention of the microscope: an instrument that enables the human eye, by means of a lens or combinations of lenses, to observe enlarged images of tiny objects. It made visible the fascinating details of worlds within worlds. Long before, in the hazy unrecorded past, someone picked up a piece of transparent crystal thicker in the middle than at the edges, looked through it, and discovered that it made things look larger. Someone also found that such a crystal would focus the sun's rays and set fire to a piece of parchment or cloth. Magnifiers and "burning glasses" or "magnifying glasses" are mentioned in the writings of Seneca and Pliny the Elder, Roman philosophers during the first century A. D., but apparently they were not used much until the invention of spectacles, toward the end of the 13th century. They were named lenses because they are shaped like the seeds of a lentil. The earliest simple microscope was merely a tube with a plate for the object at one end and, at the other, a lens that gave a magnification less than ten diameters -- ten times the actual size. These excited general wonder when used to view fleas or tiny creeping things and so were dubbed "flea glasses. " About 1590, two Dutch spectacle makers, Zaccharias Janssen and his son Hans, while experimenting with several lenses in a tube, discovered that nearby objects appeared greatly enlarged. That was the forerunner of the compound microscope and of the telescope. In 1609, Galileo, father of modern physics and astronomy, heard of these early experiments, worked out the principles of lenses, and made a much better instrument with a focusing device. The father of microscopy, Anton Van Leeuwenhoek of Holland (1632-1723), started as an apprentice in a dry goods store where magnifying glasses were used to count the threads in cloth. Anton van Leeuwenhoek was inspired by the glasses used by drapers to inspect the quality of cloth. He taught himself new methods for grinding and polishing tiny lenses of great curvature which gave magnifications up to 270x diameters, the finest known at that time. These lenses led to the building of Anton Van Leeuwenhoek's microscopes considered the first practical microscopes, and the biological discoveries for which he is famous. Anton Van Leeuwenhoek was the first to see and describe bacteria (1674), yeast plants, the teeming life in a drop of water, and the circulation of blood corpuscles in capillaries. During a long life he used his lenses to make pioneer studies on an extraordinary variety of things, both living and nonliving, and reported his findings in over a hundred letters to the Royal Society of England and the French Academy. "My work, which I've done for a long time, was not pursued in order to gain the praise I now enjoy, but chiefly from a craving after knowledge, which I notice resides in me more than in most other men. And therewithal, whenever I found out anything remarkable, I have thought it my duty to put down my discovery on paper, so that all ingenious people might be informed thereof." - Anton Van Leeuwenhoek Letter of June 12, 1716 None of Anton Van Leeuwenhoek's microscopes exist today. His instruments were made of gold and silver and were sold by his family after he died. Robert Hooke, the English father of microscopy, re-confirmed Anton van Leeuwenhoek's discoveries of the existence of tiny living organisms in a drop of water. Hooke made a copy of Leeuwenhoek's microscope and then improved upon his design. He looked at a sliver of cork through a microscope lens and noticed some "pores" or "cells" in it. Robert Hooke believed the cells had served as containers for the "noble juices" or "fibrous threads" of the once-living cork tree. He thought these cells existed only in plants, since he and his scientific contemporaries had observed the structures only in plant material. Robert Hooke wrote Micrographia, the first book describing observations made through a microscope. Hooke was the first person to use the word "cell" to identify microscopic structures when he was describing cork. Hooke also wrote Hooke's Law -- a law of elasticity for solid bodies. Later, few major improvements were made until the middle of the 19th century. Then several European countries began to manufacture fine optical equipment but none finer than the marvelous instruments built by the American, Charles A. Spencer, and the industry he founded. Present day instruments, changed but little, give magnifications up to 1250 diameters with ordinary light and up to 5000 with blue light. A light microscope, even one with perfect lenses and perfect illumination, simply cannot be used to distinguish objects that are smaller than half the wavelength of light. White light has an average wavelength of 0.55 micrometers, half of which is 0.275 micrometers. (One micrometer is a thousandth of a millimeter, and there are about 25,000 micrometers to an inch. Micrometers are also called microns.) Any two lines that are closer together than 0.275 micrometers will be seen as a single line, and any object with a diameter smaller than 0.275 micrometers will be invisible or, at best, show up as a blur. To see tiny particles under a microscope, scientists must bypass light altogether and use a different sort of "illumination," one with a shorter wavelength. The introduction of the electron microscope in the 1930's filled the bill. The invention of the electron microscope was made possible by a number of theoretical and experimental advances in physics and engineering. The main concept on which the electron microscope is founded—that electrons have a wavelike nature—was hypothesized by French physicist Prince Louis Victor de Broglie in 1923. In 1927, de Broglie’s hypothesis was experimentally verified by American physicists Clinton J. Davisson and Lester H. Germer, and independently by English physicist George Paget Thomson. Co-invented by Germans, Max Knott and Ernst Ruska in 1931, Ernst Ruska was awarded half of the Nobel Prize for Physics in 1986 for his invention. (The other half of the Nobel Prize was divided between Heinrich Rohrer and Gerd Binnig for the STM.) In this kind of microscope, electrons are speeded up in a vacuum until their wavelength is extremely short, only one hundred-thousandth that of white light. Beams of these fast-moving electrons are focused on a cell sample and are absorbed or scattered by the cell's parts so as to form an image on an electron-sensitive photographic plate. In 1938 Ruska and German engineer Bodo von Borries built the first model of the commercial TEM for the Siemens-Halske Company in Berlin, Germany. The English engineer Sir Charles Oatley invented the SEM in its present form in 1952. Shown below is a similar microscope from the University of Toronto from 1938. If pushed to the limit, electron microscopes can make it possible to view objects as small as the diameter of an atom. Most electron microscopes used to study biological material can "see" down to about 10 angstroms--an incredible feat, for although this does not make atoms visible, it does allow researchers to distinguish individual molecules of biological importance. In effect, it can magnify objects up to 1 million times. Nevertheless, all electron microscopes suffer from a serious drawback. Since no living specimen can survive under their high vacuum, they cannot show the ever-changing movements that characterize a living cell. Using an instrument the size of his palm, Anton van Leeuwenhoek was able to study the movements of one-celled organisms. Modern descendants of van Leeuwenhoek's light microscope can be over 6 feet tall, but they continue to be indispensable to cell biologists because, unlike electron microscopes, light microscopes enable the user to see living cells in action. The primary challenge for light microscopists since van Leeuwenhoek's time has been to enhance the contrast between pale cells and their paler surroundings so that cell structures and movement can be seen more easily. To do this they have devised ingenious strategies involving video cameras, polarized light, digitizing computers, and other techniques that are yielding vast improvements in contrast, fueling a renaissance in light microscopy. Relative Size Scales in the Macro and Micro (Nano) World Development of Microscopic Imaging Techniques Calibration of the SEM Procedure: Use certified latex microspheres and larger silicon calibration chip to calibrate over the 0.1 to 100 um range. Use built in measurement calipers to find sizes. Record micrographs with sizes noted as image overlays. Plot measured vs. certified size Determine error and correction factor. Data/Notes: What you submit: Name: ______________________ Date: ______________________ Report on: ________________ Materials and Methods: Data: Discussion: Summary: ******************************************************************************
