UNIT: Art of Japan - Textiles
advertisement
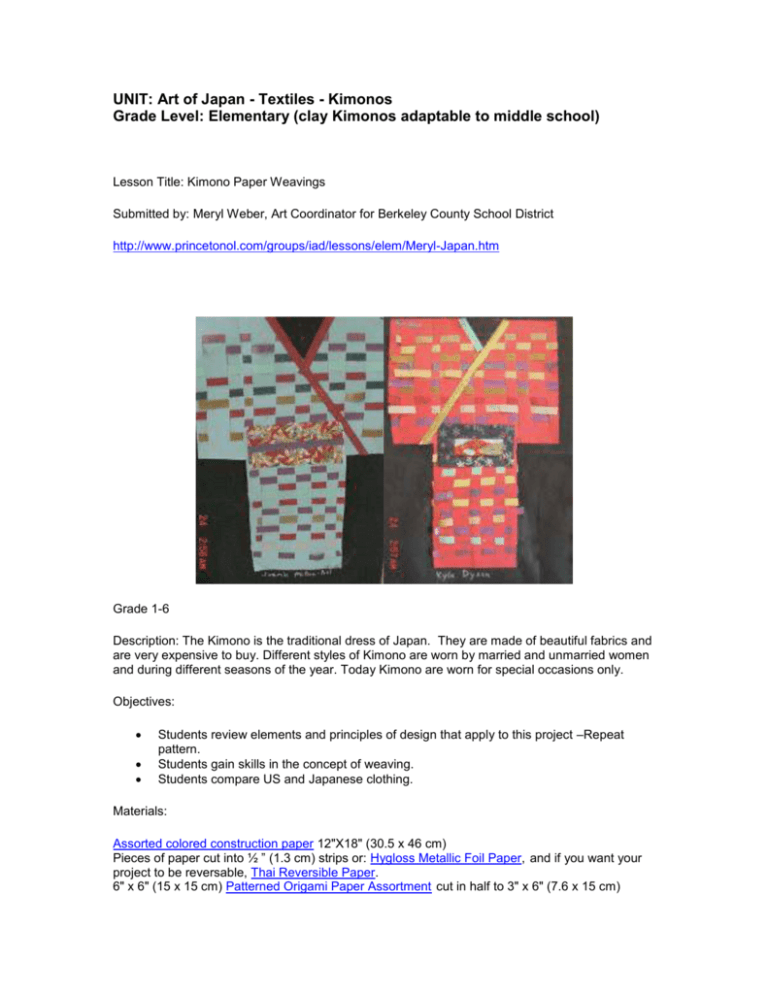
UNIT: Art of Japan - Textiles - Kimonos Grade Level: Elementary (clay Kimonos adaptable to middle school) Lesson Title: Kimono Paper Weavings Submitted by: Meryl Weber, Art Coordinator for Berkeley County School District http://www.princetonol.com/groups/iad/lessons/elem/Meryl-Japan.htm Grade 1-6 Description: The Kimono is the traditional dress of Japan. They are made of beautiful fabrics and are very expensive to buy. Different styles of Kimono are worn by married and unmarried women and during different seasons of the year. Today Kimono are worn for special occasions only. Objectives: Students review elements and principles of design that apply to this project –Repeat pattern. Students gain skills in the concept of weaving. Students compare US and Japanese clothing. Materials: Assorted colored construction paper 12"X18" (30.5 x 46 cm) Pieces of paper cut into ½ ” (1.3 cm) strips or: Hygloss Metallic Foil Paper, and if you want your project to be reversable, Thai Reversible Paper. 6" x 6" (15 x 15 cm) Patterned Origami Paper Assortment cut in half to 3" x 6" (7.6 x 15 cm) pieces Elmer's Glue-All , Scissors Resources: Example of a Kimono or doll wearing a Kimono, images of Kimono Kimono with Flower Design Kimono Robe with Hokusai Japanese Wave Design Kimono Robe with Good luck Design Websites: http://web.mit.edu/jpnet/Kimono/ -very complete site with information and images on men’s, women’s and child’s Kimono http://web-japan.org/kidsweb/virtual/kimono/kimono01.html - site designed for children. Includes sections on history, types, and occasions for wearing Kimono. Students can design a Virtual Kimono. http://www.japaneseKimono.com Site has many pictures of different types of Japanese clothing, Kimono fabric and how to tie an Obi Sash. Oriental Patterns: http://patterns.ming-ling.net/large.html Horn, Diane Victoria. Japanese Kimono Designs, Owings Mills, MD: Stemmer House, 1991. Directions: DAY 1. Show examples of Kimono and internet resources. (See above in Resources) Talk about the different fibers (silk, wool, cotton, linen) and where they come from. Have students examine their shirts to see if they are knitted or woven. Compare Kimono to American clothing. Define loom. Demonstrate how to make the “loom”. There will actually be 2 loom areas cut. The top half of the Kimono is woven first then the bottom half is folded up and cut to create another “loom." 1. Hold paper vertically. Fold in half vertically, open and fold again horizontally. Open and fold long edges of paper so that they meet in the middle. Paper is divided into 1/8ths. Cut away the shaded areas to form a Kimono shape. Fold the top edge down to the center. Draw lines about 1 inch apart and cut to form the loom. DAY 2- Demonstrate how to weave the paper strips. Weave the top half of the Kimono. Use color strips to create a repeating pattern. DAY 3-6- Continue weaving top half. When finished, fold and cut the bottom half. Weave the bottom. DAY 3- When weaving is complete use origami paper to add details (obi, collar) National Standards: I. Understanding And Applying Media, Techniques, And Processes III. Choosing And Evaluating A Range Of Subject Matter, Symbols, And Ideas IV. Understanding the Visual Arts in Relation to History and Cultures. Title: Kimono Scratch Art Grade 4 Description: The Kimono is the traditional dress of Japan. They are made of beautiful fabrics and are very expensive to buy. Different styles of Kimono are worn by married and unmarried women and during different seasons of the year. Today Kimono are worn for special occasions only. The designs on the Kimono are created using many techniques (batik, shibori, weaving). Many artists today use the image of Kimono in their own artwork. Objectives: Students review elements and principles of design that apply to this project –pattern, negative/positive. Students gain skills in observational drawing. Compare the designs of images of Kimono. Materials: Rainbow White Scratch-Art Paper 9" X 12” (23 x 30.5 cm) Wooden stylus Silk Flowers White Copy paper, Pencils Note: this lesson would also be stunning on gold or silver scratchboard Resources: Example of a Kimono (See Resources above) or Kimono Doll, images of Kimono Websites: http://web.mit.edu/jpnet/Kimono/ -very complete site with information and images on men’s, women’s and child’s Kimono http://web-japan.org/kidsweb/virtual/kimono/kimono01.html - site designed for children. Includes sections on history, types, and occasions for wearing Kimono. Students can design a Virtual Kimono. http://www.japaneseKimono.com Site has many pictures of different types of Japanese clothing, Kimono fabric and how to tie an Obi Sash. Oriental Patterns: http://patterns.ming-ling.net/large.html Horn, Diane Victoria. Japanese Kimono Designs, Owings Mills, MD: Stemmer House, 1991. Directions: DAY - Show examples of Kimono and internet resources. Discuss the image of Kimono as art. Show examples of nature designs on Kimono. Students sketch3 different silk flowers. DAY 2- Students draw a simple outline of a Kimono. Use drawings of flowers to design the Kimono pattern. DAY 3 - 6- Transfer Kimono design to Rainbow White Scratch-Art Paper. Place sketch on paper and trace over lines with a ball point pen. Impression of lines will come out on Scratch–Art paper. Use wooden stylus to scratch away the design. Make decisions as to which areas with remain white, which will be solid color and which will have pattern. Title: Clay Kimono Grade 5 Description: The Kimono is the traditional dress of Japan. They are made of beautiful fabrics and are very expensive to buy. Different styles of Kimono are worn by married and unmarried women and during different seasons of the year. Today Kimono are worn for special occasions only. The designs on the Kimono are created using many techniques (batik, shibori, weaving). Many artists today use the image of Kimono in their own artwork. Objectives: Students review elements and principles of design that apply to this project –pattern, texture, color. Students gain skill in slab building clay forms. Materials: White Amaco Buff ½ lb (227 g) per student Rolling Pins , Clay Tools Cardboard cones, 8” (20 cm) high, covered with a plastic sandwich bag Objects to create texture: buttons, lace, etc Black Acrylic Paint , Sargent Metallic Acrylics Wood bases (You can make your own to save money), Liquid Nails Adhesive Glazes Note: these would also be beautiful underglazed and glazed. Resources: Example of a clay Kimono Websites: http://web.mit.edu/jpnet/Kimono/ -very complete site with information and images on men’s, women’s and child’s Kimono http://web-japan.org/kidsweb/virtual/kimono/kimono01.html - site designed for children. Includes sections on history, types, and occasions for wearing Kimono. Students can design a Virtual Kimono. http://www.japaneseKimono.com Site has many pictures of different types of Japanese clothing, Kimono fabric and how to tie an Obi Sash. Oriental Patterns: http://patterns.ming-ling.net/large.html Horn, Diane Victoria. Japanese Kimono Designs, Owings Mills, MD: Stemmer House, 1991. Directions: DAY 1. Show examples of Kimono and internet resources. Discuss the image of Kimono as art. Show examples of nature designs on Kimono. Review clay techniques and procedures. DAY 2-3. Students roll out clay to 3/8 inch thickness, use cutting tool to cut out an oval about 8 inches long. Cut a small circle in the center. Drape clay over plastic covered cardboard cones. Score and attach under the sleeves. Roll out a thin coil and attach around the neck. Press objects into clay for pattern and texture. Dry for one day and remove plastic bag from cone. Replace Kimono on cone until dry. DAY 3-5. Fire clay in kiln. Paint Kimono a solid color. When dry rub metallic acrylic paint to bring out textures. Mount on wood base using Liquid Nails adhesive. Additional Information on presenting Kimonos, using web searches for bacKground knowledge: Colorful Kimonos Grade Level: Third Grade Subjects: Social Studies, Art, and Language Arts Learner Outcomes: The student will be able to learn the significance of the traditional Japanese clothing through selected readings and hands-on activities. Duration of Lesson: 4-5 days Materials: Computer with Internet access Butcher Paper Construction Paper Glue Globe or Map The Boy of the Three Year Nap by Deanne Snyder and Allen Say A to Zen: A book of Japanese Culture by Ruth Wells and Yoshi Technology Tools/Courseware: Computer with internet access and color printer Teacher Notes: *Teacher will need to add the virtual kimono designer on every computer's browser favorites list for easy access. Procedures: Day one: Begin the lesson by reading A to Zen to the children. Allow plenty of time for the children to observe the artwork. Pay special attention to the Kimono while you are reading. Explain that after reading the story they are going to become "Kimono experts". Ask the children what they know about the Kimono. Fill out a KWL chart. Tell the students that tomorrow they will learn more about the Kimono and will design their own! Day two: This lesson takes place in the computer lab.* Instruct students to go to the favorites list on their browser. Then click on Virtual Japanese Culture After everyone is there (walk around to make sure all students are there) have them click on "Design your own beautiful Kimono". Then Click on "History of the Kimono". They will need to take approximately 15 minutes to read this. Discuss the contents and ask the students what they thought was most interesting. Explain that they may use their Back button on their browser and proceed to design their own Kimono in Virtual Kimono. Tell them they need to pay close attention to the repeating pattern on the Kimono. Day three: Today the students will be making their own 3-d Kimono out of butcher paper. Pass out the template for each student. Tell them they will design their Kimono first on this template. After they have your approval, you will pass out the big Butcher paper that you have you have shaped to look like a life-size kimono. See these examples. They will use construction paper to make their designs. Modifications: If the school does not have computer access they can simply skip this activity where they make a virtual kimono. If there are only a few computers have children go in groups at different times. Students with reading difficulties may have the website read to them by the teacher as they read along on the computer. Enrichment Activities: A guest speaker bringing real kimonos for the children to see and feel would be a real delight. Evaluation/Assessment: Rubric for final product.
