Owner`s Manual (Sawyer Guide)
advertisement

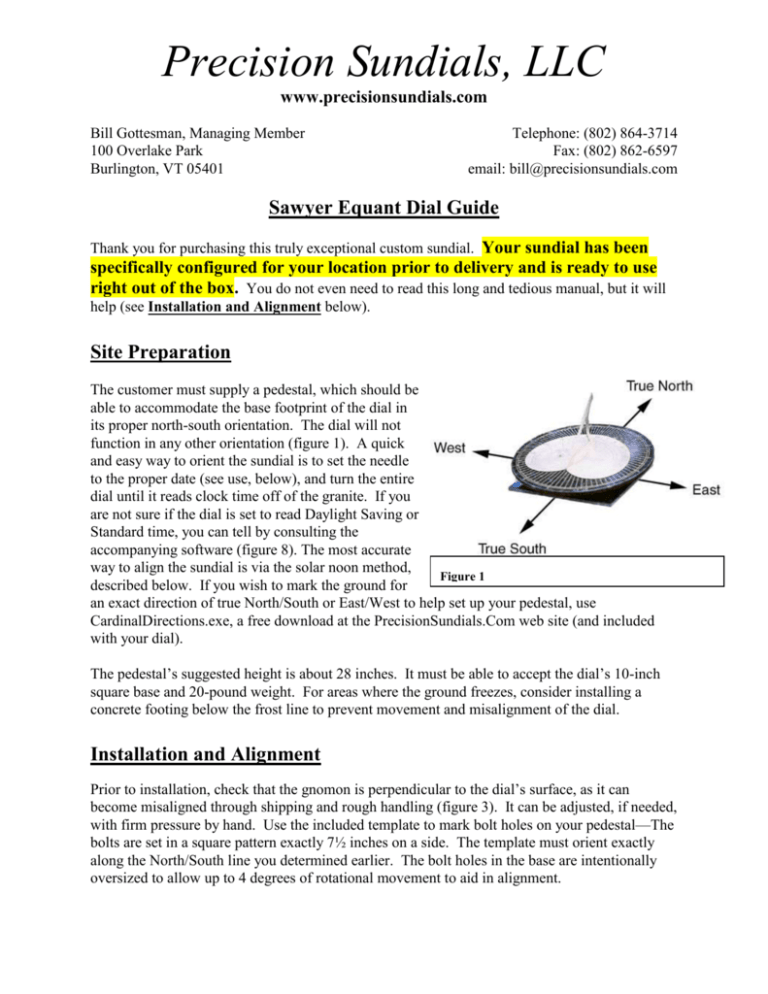
Precision Sundials, LLC www.precisionsundials.com Bill Gottesman, Managing Member 100 Overlake Park Burlington, VT 05401 Telephone: (802) 864-3714 Fax: (802) 862-6597 email: bill@precisionsundials.com Sawyer Equant Dial Guide Thank you for purchasing this truly exceptional custom sundial. Your sundial has been specifically configured for your location prior to delivery and is ready to use right out of the box. You do not even need to read this long and tedious manual, but it will help (see Installation and Alignment below). Site Preparation The customer must supply a pedestal, which should be able to accommodate the base footprint of the dial in its proper north-south orientation. The dial will not function in any other orientation (figure 1). A quick and easy way to orient the sundial is to set the needle to the proper date (see use, below), and turn the entire dial until it reads clock time off of the granite. If you are not sure if the dial is set to read Daylight Saving or Standard time, you can tell by consulting the accompanying software (figure 8). The most accurate way to align the sundial is via the solar noon method, Figure 1 described below. If you wish to mark the ground for an exact direction of true North/South or East/West to help set up your pedestal, use CardinalDirections.exe, a free download at the PrecisionSundials.Com web site (and included with your dial). The pedestal’s suggested height is about 28 inches. It must be able to accept the dial’s 10-inch square base and 20-pound weight. For areas where the ground freezes, consider installing a concrete footing below the frost line to prevent movement and misalignment of the dial. Installation and Alignment Prior to installation, check that the gnomon is perpendicular to the dial’s surface, as it can become misaligned through shipping and rough handling (figure 3). It can be adjusted, if needed, with firm pressure by hand. Use the included template to mark bolt holes on your pedestal—The bolts are set in a square pattern exactly 7½ inches on a side. The template must orient exactly along the North/South line you determined earlier. The bolt holes in the base are intentionally oversized to allow up to 4 degrees of rotational movement to aid in alignment. Secure the dial so that its base is level, and the gnomon points north as shown on page 1. The included level should be placed on the base, not the dial surface, to assist in leveling (figure 4). Weather resistant ¼” x 1” Silicone bronze lag bolts and washers are supplied for fastening the dial. Additional bronze washers are included for use as leveling shims under the dial. Use the Solar Noon Method to align the dial exactly north/south: when Figure 3. Checking that the Gnomon is perpendicular to the dial surface. your watch reads the time for solar noon (see figure 8), turn the dial so that the gnomon’s shadow falls at exactly 12:00 on the bronze dial. Tighten the lag bolts, and the dial is properly set. The dial will now accurately tell time accurately. Figure 4 Use The Bronze lily pad—shaped dial tells solar (sun) time. This means it reads noon when the sun reaches its highest point in the sky. However, for most locations, solar time is not the same as clock time. This is due to the effect of time zones, Daylight Savings, and of the Earth’s position in its yearly orbit. Clock time is read off the round Granite dial as follows: The pointer on the left side of the dial should be set to the proper date; this positions the Figure 5 granite to compensate for the seasonal variations between solar and clock time. The first, tenth, and twentieth day of each month is marked with a tic on the calendar graphic. Figure 5 shows the dial set for approximately January 7th (as well as for March 25th, July 16th, and August 5rd). To 2 obtain clock time, read the granite where the shadow crosses the edge of the bronze. Figures 6 and 7 depict how to properly read clock time from the granite dial. If the dial needs to be adjusted for Daylight Savings (or vice-versa), the granite can be advanced (or retarded) one hour by one complete rotation of the pointer. Figure 6 Figure 7 Aging No lacquer has been applied to the Sawyer Equant, as this would interfere with the natural and inevitable oxidation of the bronze. Silicon bronze is extremely durable, and over the course of approximately one 1 year the dial will mature from a shiny finish, to an awkward mottled finish, to finally a permanent uniform dark patina customary to outdoor bronze statuary. Unfortunately, until the bronze fully weathers, fingerprints and smudges tend to show noticeably. Waxing the dial can slow this process, but is not required. Prior to shipping, the dial was waxed with Renaissance Micro-Crystalline Wax Polish (by Picreator Enterprises LTD), a superior wax which tends to hide fingerprints. I do not recommend polishing only because it seems to be a lot of work fighting the natural oxidation process, but if you feel the need to use a polish, I recommend Museum Blend Fine Polish (by English Custom Polish)-it is the best bronze polish I have tried. 3 Adjustments The latitude wedges and the calendar mechanism have been properly set for your location at our workshop prior to shipping, and should not require readjustment. If for some reason this becomes necessary (if you move to a new location, or the pointer loosens), you can perform these one-time adjustments as follows: Figure 8. Use alignment software to calculate solar noon for a given date. The geared calendar mechanism can be adjusted without removing the dial from the pedestal. First loosen the clamping screw on the indicator (pointer). Determine Solar Noon for a given date using the sundial alignment software (figure 8). You must specify Standard Time or Daylight Savings for the program to show the time of Solar Noon. Turn the granite by hand so that the solar noon time is exactly opposite the 12:00 mark on the bronze (figure 9). Placing straight edges along both sides of the gnomon will help you see this alignment best. Keeping the granite steady in this position, slide the calendar indicator to the correct date, and then re-tighten the clamping screw on the pointer (figure 10). Figure 10. Setting indicator to December first 4 Figure 9. Setting granite to 11:50 at solar noon. Straight edges placed along side the gnomon help you see this accurately. To adjust the latitude wedges (patent #6,301,793) the dial must be removed from the pedestal. Loosen (but do not remove! —they can be difficult to replace) the central screw, and the two side bolts (use a 5/16” crescent wrench) as shown (figure 11). The latitude wedges are now free to rotate, though they may require a bit of force and dexterity. Latitudes are engraved on the lower wedge. Align the wedges so that your latitude (40 in the example shown in figure 12) is set both against the base mark, and the upper wedge mark. Retighten the center screw, being sure that the wedges have fully seated over the hidden tabs on both the base and between the upper and lower wedges (figure 13). Then retighten the side bolts, and loosen the center bolt just a bit to relieve strain on the internal mechanism. Figure 11 Figure 12. In this example, the wedges are being set to 40 degrees latitude. Figure 13 5 Why it works Fred Sawyer, a world-renowned American sundialist, developed the mathematics for this dial in the 1980’s. This is just one of his many remarkable contributions to sundialing. Here is a horizontal dial designed for 37 degrees latitude. The hour lines are not equally spaced. Rotating the design would advance some hours more than others. Here are equally spaced (Equant) hour lines. Rotating this design advances all hours the same amount. Unfortunately, this design would not tell time as a sundial. Here the two designs are overlapped. The intersection of matching hour lines is noted with red circles. At these points the design works both as a sundial and as equally spaced (blue) hour lines. Here the black curve traces the intersection not only of the hours, but of the minutes as well, showing the derivation of the lily pad shape. Rotating the equant blue lines about their origin allows the blue time scale to be adjusted for the date and daylight savings, and still keep time accurately if read where it crosses the "lily pad". 6 Possibilities for Pedestals A suggested height for a pedestal for the Sawyer Equant is 24 to 28 inches. The dial weighs 20 pounds and has a base footprint of 10-inches square. Regardless of the pedestal’s orientation, the dial must point north. Three possible sources for mail order pedestals are as follows. We do not have direct experience with these vendors, but their pedestals are the right size, and the vendors claim that they are suitable for outdoor use. Christianne 120 N. Main St. Port Chester, NY 10573 (800) 486-3569 www.christianne.com Christianne’s L-77KK is a 28” tall light gray fiberglass Doric Column with a 12” square top. It retails in the $300 range. The Garden Gate 5122 Morningside Dr. Houston, TX 7705 (713) 528-2654 www.gardengateco.com The Garden Gate sells Chilstone, a cast stone product made in England. The C6300 is 25” tall with a 12.4” square top. The C4900 is 23.5” tall with a 10.8” square top, which might look a bit undersized. You may have several color options. 7 Fletcher Granite makes a granite pedestal made of stackable components. The pieces needed for the Sawyer Equant dial are three 12”x 12”x 8” column blocks, and one 14”x 14”x 4” top. Each piece weighs about 60 lbs, and all four cost about $600 altogether. I have personally used this pedestal, and it works fine. Fletcher Granite Company, Inc. 275 Groton Road (Route #40) North Chelmsford, Ma. - 01863 (800) 253-8168, (978) 251-4031 www.fletchergranite.com -Bill Gottesman Jan, 2005 8


