SOP for Cultured Renal Tubular Epithelial Cells in Nortis Devices
advertisement
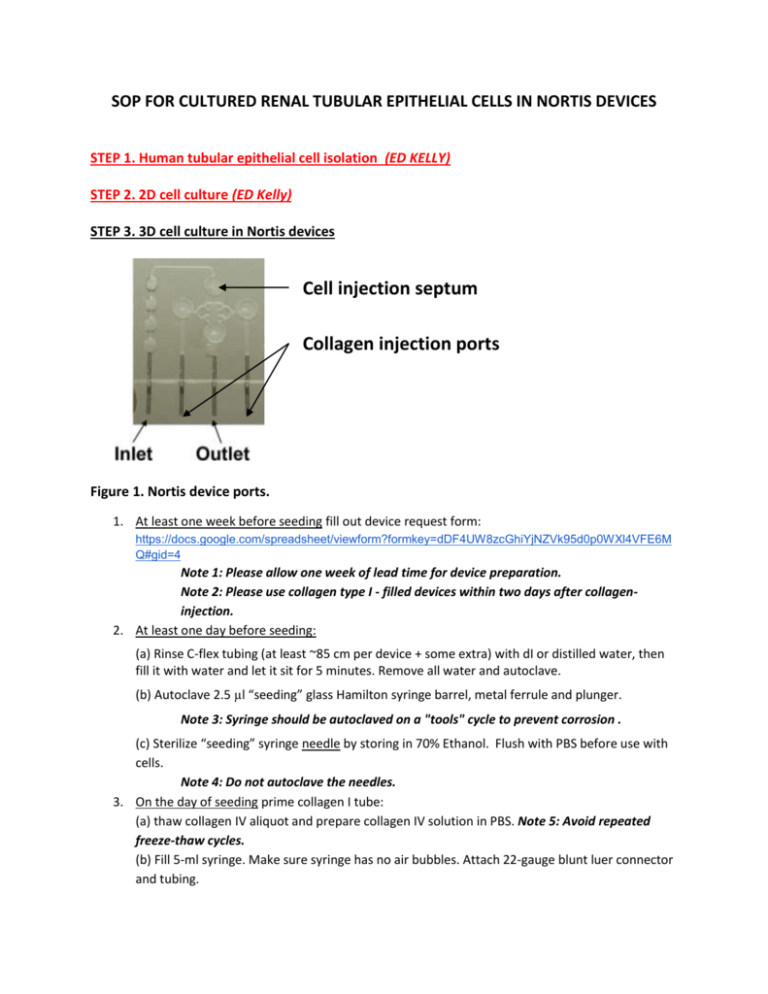
SOP FOR CULTURED RENAL TUBULAR EPITHELIAL CELLS IN NORTIS DEVICES STEP 1. Human tubular epithelial cell isolation (ED KELLY) STEP 2. 2D cell culture (ED Kelly) STEP 3. 3D cell culture in Nortis devices Cell injection septum Collagen injection ports Figure 1. Nortis device ports. 1. At least one week before seeding fill out device request form: https://docs.google.com/spreadsheet/viewform?formkey=dDF4UW8zcGhiYjNZVk95d0p0WXl4VFE6M Q#gid=4 Note 1: Please allow one week of lead time for device preparation. Note 2: Please use collagen type I - filled devices within two days after collageninjection. 2. At least one day before seeding: (a) Rinse C-flex tubing (at least ~85 cm per device + some extra) with dI or distilled water, then fill it with water and let it sit for 5 minutes. Remove all water and autoclave. (b) Autoclave 2.5 µl “seeding” glass Hamilton syringe barrel, metal ferrule and plunger. Note 3: Syringe should be autoclaved on a "tools" cycle to prevent corrosion . (c) Sterilize “seeding” syringe needle by storing in 70% Ethanol. Flush with PBS before use with cells. Note 4: Do not autoclave the needles. 3. On the day of seeding prime collagen I tube: (a) thaw collagen IV aliquot and prepare collagen IV solution in PBS. Note 5: Avoid repeated freeze-thaw cycles. (b) Fill 5-ml syringe. Make sure syringe has no air bubbles. Attach 22-gauge blunt luer connector and tubing. 4. 5. 6. 7. 8. 9. 10. 11. 12. 13. 14. 15. 16. 17. 18. 19. (c) Set up pump: adjust syringe type and size settings (or diameter) and flow rates (up to 10 microL/min - higher flow rates will compromise collagen attachment to the surface of the device). (d) under a microscope carefully pull back the capillary in the devices and discard as sharps. (e) attach tubing to the outlet of the device (see figure 1) and prime for 1 hour. Note 6: Make sure there is a droplet of fluid on the end of tubing before connecting it to the device. (f) after one hour, wash out collagen IV solution with growth medium for 1 hour by attaching tubing to the inlet (see figure 1). Block the outlet with provided "blocker" tubing. Remove tubing from the collagen injection ports (see figure 1) ports. Prepare cell suspension at 15-20 mln cells/ml. Assemble seeding syringe aseptically and rinse with PBS solution. Note 7: To remove air either 1) use vacuum to aspirate fluid from the top of the syringe barrel or 2) with some force insert the plunger all the way repeatedly until you can withdraw fluid that has no air bubbles. Secure the device on a 150mm dish with tape so no components can move. Mix cell suspension and aspirate with seeding syringe. Note 8: When holding seeding syringe be sure to keep one finger on the plunger so it does not move. Before inserting syringe make sure there is a droplet coming out of the needle. With needle orifice facing towards the collagen channel puncture cell injection septum (see figure 1) and insert it straight down to the bottom of the injection port. Slowly inject cell suspension. When flow into the channel is established, slowly remove the syringe from the injection port. Watch the cells under the microscope. Rinse needle with water immediately after use to prevent clogging. Then place it in 70% isopropanol until use. Gently place dish in the incubator and allow cells to attach at least overnight (~18 hours). Equilibrate an appropriate volume of growth medium per device in the incubator in p-100 dishes for at least 30-40 min. The volume needed = (flow rate of 0.5 microL/min) X (days). Quickly fill syringe with media before the media re-equilibrates. Holding the syringe vertically with the needle facing downwards, tap the needle to remove any trapped air. Note: balance the volume in multiple syringes as much as possible as to not waste cell culture media. Attach luer blunt 22 ga needle to syringe. Attach tubing (C-flex, 85 cm) to syringe and fill half of the tubing. Load syringes on pump adjusting for the diameter of the syringe. Place ends of the tubing in a sterile 15-ml conical tube. Use a high flow-rate at first (200ul/min) to make sure syringe is set tightly against the back of the pump. Once fluid is coming out of the tubing at a steady rate, adjust to your desired flow rate (0.5 ul/min). Block the side ports with tubing "blockers". 20. Once the cells are attached and/ or spread connect the device to the pump and start perfusion at 0.5 microL/min. Note 6: Make sure there is a droplet of fluid on the end of tubing before connecting it to the device. STEP 4. Imaging 1. Take 4x, 10x and 20x phase or oblique illumination images at least every other day. 2. Post on Flickr account. STEP 5. Medium change in Nortis devices (ZHICAN) HOW OFTEN? EQUILIBRATE AND ADD RETINOIC ACID IMMEDIATELY BEFORE FILLING SYRINGES. STEP 6. Viability staining in Nortis devices 3. Perform viability staining at 7, 14, 21 and 28 days of culture. Calcein AM is not a stable dye and will gradually fade and disappear. Different time points can be performed on the same cultures as they can be re-stained. 4. Use LIVE/DEAD viability/cytotoxicity kit for mammalian cells from Molecular Probes according to the manufacturer's product information. 5. Dilute 5 microL of calcein AM and 20 microL of EthD-1 in sterile pre-warmed D-PBS (with Ca and Mg) and mix well. 6. Load it in a syringe and perfuse the cell tube via the outlet (see figure 1) at 0.5 microL/min for 10 minutes and then let it incubate for 10 min (all at 37⁰ C). Also pre-warm your PBS. STEP 7. Fixation and Immunofluorescence 1. Prepare 4% formaldehyde solution in PBS, fill a syringe and flow via outlet at room temperature for 20 min at 0.5 microL/min. 2. Wash out fixative with PBS for 30 min at 10 microL/min. Pause point: the devices can be stored at +4⁰C until the next step. 3. Block with 2.5% BSA in PBS (if permeabilization is not needed) or with 2.5% BSA, 0.5% Triton x100 in PBS (to permeabilize) at 10 microL/min at room temperature. 4. Primary antibody (or antibodies) should be injected via cell injection septum using gravity: fill 22-gauge blue blunt with PBS and make sure solution is coming through. Insert in the cell injection port, look under the microscope to make sure solution is flowing through the tube. Carefully remove most of the PBS and inject antibody solution. Look if solution is still flowing: you should see particles and cell debris moving through the tube. 5. Place the device in the +4C fridge overnight. 6. Wash out primary antibody with PBS as in the step 2. 7. Add secondary antibody (or antibodies) and incubate at room temperature for 2 hours. Protect from light. 8. Wash as in the step 2 without or with DAPI. Protect from light. 9. Image. Renal tubular reabsorption and secretion KIM-1 staining (ZHICAN and Ed KELLY)
