Journal Entry Import Window
advertisement
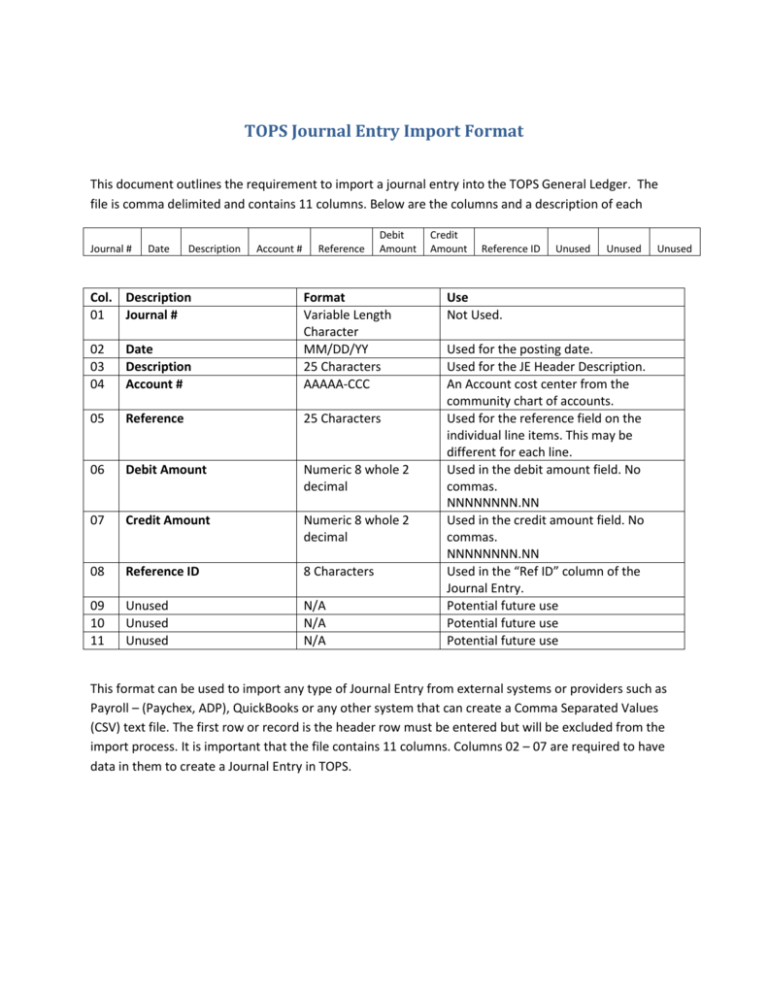
TOPS Journal Entry Import Format This document outlines the requirement to import a journal entry into the TOPS General Ledger. The file is comma delimited and contains 11 columns. Below are the columns and a description of each Journal # Date Description Col. Description 01 Journal # Account # Reference Debit Amount 02 03 04 Date Description Account # Format Variable Length Character MM/DD/YY 25 Characters AAAAA-CCC 05 Reference 25 Characters 06 Debit Amount Numeric 8 whole 2 decimal 07 Credit Amount Numeric 8 whole 2 decimal 08 Reference ID 8 Characters 09 10 11 Unused Unused Unused N/A N/A N/A Credit Amount Reference ID Unused Unused Unused Use Not Used. Used for the posting date. Used for the JE Header Description. An Account cost center from the community chart of accounts. Used for the reference field on the individual line items. This may be different for each line. Used in the debit amount field. No commas. NNNNNNNN.NN Used in the credit amount field. No commas. NNNNNNNN.NN Used in the “Ref ID” column of the Journal Entry. Potential future use Potential future use Potential future use This format can be used to import any type of Journal Entry from external systems or providers such as Payroll – (Paychex, ADP), QuickBooks or any other system that can create a Comma Separated Values (CSV) text file. The first row or record is the header row must be entered but will be excluded from the import process. It is important that the file contains 11 columns. Columns 02 – 07 are required to have data in them to create a Journal Entry in TOPS. Creating the Import file The file itself can be created as a .txt file then renamed to .csv. Or the file can be created from an excel spreadsheet and then converted to .csv. This is an example of what a sample .txt file will look like. Journal #,Date,Description,Account #,Reference,Debit Amt,Credit Amt,Reference ID,Space Holder,Space Holder,Space Holder 1,7/01/2014,Payroll,1010,Jane Doe,2500,,Employee,,, 1,7/01/2014,Payroll,1010,Jane Doe,,2500,Employee,,, When done entering all the transactions in the .txt file, rename it to .csv and it is ready to import. This is an example of what the .csv file will look like with the above data: The data entered in columns 1, 9, 10 and 11 will not be used for now, however for your own records these fields can contain any information you may wish to enter. i.e., Journal #,Date,Description,Account #,Reference,Debit Amt,Credit Amt,Reference ID,Check Number,Branch Number,Client Number. To convert an existing Excel file into.csv format: 1. Open the Excel file. 2. Click on File and Save as. 3. Select where you would like to save the file. 4. In the File Name field, name your document. 5. In the Save as Type field select CSV (comma delimited) (*.csv). 6. Click Save. 7. You may receive one or two warnings about the formatting of .csv, click yes. Journal Entry Import Window To get to this window you click on Utilities then Journal Entry Import and the import window will open. Next, select your Import file by either entering the path and file name of the import file or using the search button to search for your file. The screen will then fill in with all the information from your Imported file. Review the information on the screen to ensure that all the data is correct. If changes need to be made to any GL Account Numbers, user the “View G/L Accounts” button to view available account numbers for this community. If any rows need to be removed, use the “Delete Row” button to perform this action. When you are certain you are ready to create the Journal Entry batch, select the Create JE Batch button. The message below will be displayed providing the TOPS Journal Batch number that was created from the import. Once the import is completed you would then go to GL, select the Journal Entries tab and click on the drop down arrow net to Batch # to choose the imported batch. The following window will then display: Once you have the batch open, make any changes to the Description field if needed and click the OK button to open the detail. After reviewing the Journal Entry Batch to ensure accuracy, you would post the Batch just like any other Journal Entry Batch. If you review the General Ledger Account through GL > View Accounts, you will notice that the Source for the transaction begins with “IM” to designate this as a Journal Entry Import batch.
![[#DTC-130] Investigate db table structure for representing csv file](http://s3.studylib.net/store/data/005888493_1-028a0f5ab0a9cdc97bc7565960eacb0e-300x300.png)
