protein test - SandyBiology1-2
advertisement
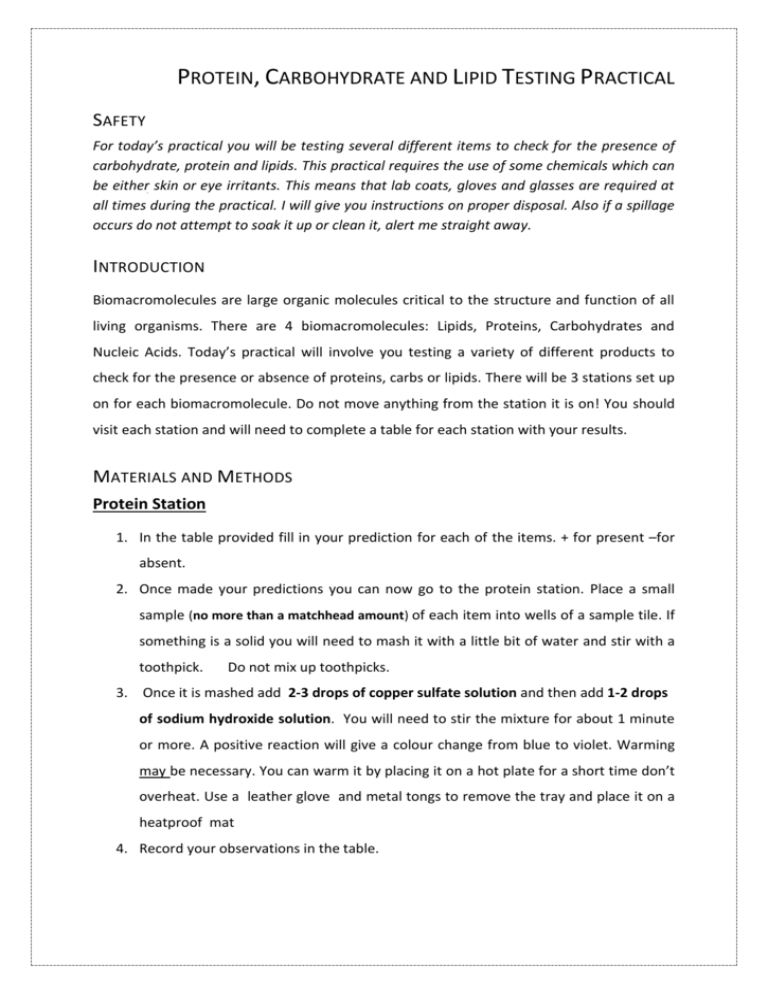
PROTEIN, CARBOHYDRATE AND LIPID TESTING PRACTICAL SAFETY For today’s practical you will be testing several different items to check for the presence of carbohydrate, protein and lipids. This practical requires the use of some chemicals which can be either skin or eye irritants. This means that lab coats, gloves and glasses are required at all times during the practical. I will give you instructions on proper disposal. Also if a spillage occurs do not attempt to soak it up or clean it, alert me straight away. INTRODUCTION Biomacromolecules are large organic molecules critical to the structure and function of all living organisms. There are 4 biomacromolecules: Lipids, Proteins, Carbohydrates and Nucleic Acids. Today’s practical will involve you testing a variety of different products to check for the presence or absence of proteins, carbs or lipids. There will be 3 stations set up on for each biomacromolecule. Do not move anything from the station it is on! You should visit each station and will need to complete a table for each station with your results. MATERIALS AND METHODS Protein Station 1. In the table provided fill in your prediction for each of the items. + for present –for absent. 2. Once made your predictions you can now go to the protein station. Place a small sample (no more than a matchhead amount) of each item into wells of a sample tile. If something is a solid you will need to mash it with a little bit of water and stir with a toothpick. Do not mix up toothpicks. 3. Once it is mashed add 2-3 drops of copper sulfate solution and then add 1-2 drops of sodium hydroxide solution. You will need to stir the mixture for about 1 minute or more. A positive reaction will give a colour change from blue to violet. Warming may be necessary. You can warm it by placing it on a hot plate for a short time don’t overheat. Use a leather glove and metal tongs to remove the tray and place it on a heatproof mat 4. Record your observations in the table. PROTEIN TEST ITEM PREDICTION OBSERVATION Milk Yogurt Meat Tofu Apple Potato Yeast Boiled Egg Carbohydrate Station At this station you will be conducting 2 types of test a glucose test and a starch test. To conduct the glucose test you will use Benedict’s solution and to test for starch you will use iodine solution. 1. Fill in your predictions in the tables provided below. 2. Once you have made your predictions you can now go to the carbohydrate station. Once you are there you will need to collect a small amount of each item. 3. For the GLUCOSE test. Once you have each item, chop them up finely and add water to make it mushy, then place them into separate test tubes or in wells of a sample tile and add 1ml of Benedict’s solution to each. Stir with a toothpick for about a minute. Then place the sample tray on a hot plate for a short time. You may need to stir some more until the liquid boils. Observe the colour changes. If glucose is present the solution will change from blue to orange-red precipitate. 4. For the STARCH test. Place labelled samples on a large plate or sample tile. Again chop finely and mix with water each item, then place a couple of drops of iodine solution on each item and observe the colour changes. A bluish black colour indicates a positive result. 5. Record your observations in the tables. GLUCOSE TEST ITEM PREDICTION OBSERVATION PREDICTION OBSERVATION Sweet Potato Apple Potato cubes Bread Crackers Corn Chips Corn starch Cooked pasta STARCH TEST ITEM Sweet Potato Apple Potato cubes Bread Crackers Corn Chips Corn starch Cooked pasta Lipid Station For Lipids a Grease spot test and a Sudan Red test will be conducted. (Please note the Sudan red test is only to be used on the milk) 1. Fill in your predictions into the tables provided below. 2. Once you have made your predictions you can now go to the Lipid station. 3. For Sudan Red testing. In a test tube or in a sample tile place 2ml of the liquid you are testing and add 2ml of water. Place 2-5 drops of Sudan Red to the mix and stir. A positive result will be seen when Sudan red stains fat particles within the solution. 4. For Grease Spot testing: Collect some brown paper squares and draw 4 squares onto each paper. Place a little (1 small drop or no more matchhead amount ) of each item onto a portion of the square. Smear the samples around until there is no excess. Allow the paper to dry. Label each of the samples. Once dry, lipids or fats will stain the paper translucent. 5. Record your observations in the table. LIPID TEST ITEM Olive oil Grapeseed oil Sesame oil Butter Lard Skim milk Full cream milk No fat milk PREDICTION OBSERVATION STEP BY STEP GUIDE TO WRITING YOUR REPORT Introduction - Include your aim and background to the study What are biomacromolecules? Why are they important? What tests are we conducting? What is your hypothesis for each station? Materials and Methods - You can refer to this practical sheet, but must state any changes to procedure. Result - Include here your table of results You must include a table or graph with the results of your findings but do not include your prediction at this point. Discussion - - Discuss your results here. So why did certain items react? What does it mean? (Example: A positive test for starch means that the iodine has reacted with the starch and caused the colour to change to blue-brown) How does this relate to your hypothesis? You may include diagrams that explain your results etc Include here your conclusion. Discuss improvements and errors. What other experiments could you conduct to further explore this area in the future? References or Bibliography - Make sure you list all the resources you used and that they are all in the same format. If you collected an image from a website you must say where it has come from (cite) underneath it. EXTRA THINGS TO REMEMBER Reports are always written in 3rd person, so there should be no I, We or Me All tables and diagrams must have an explanatory caption and be numbered. All reports should be typed up neatly and include clear titles for each section. All work should be your own. Do not copy and paste from any website (I will find out!!!). Put everything into your own words. POSSIBLE DEMONSTRATION ETHANOL EMULSION TEST FOR FATS AND OILS The Ethanol Emulsion Test is a food test which determines the presence of a broad group of naturally occurring compounds known as lipids. Lipids consist of fats and oils. Other lipid tests include the Grease Spot Test and the Sudan Stain Test. The Grease spot test is performed on fats – lipids which are solid at room temperature. Sudan stain colours lipids red, but is a less common bench reagent than ethanol. The Ethanol Emulsion Test is the most common test amongst the three. Procedure: Solid sample : 1. 2. 3. 4. 5. 6. Crush the food sample and place in a dry test tube. Add ethanol to about 2 cm3 above the level of the sample and shake thoroughly. Allow the solid to settle (about 3 min) to allow the lipid to be extracted. Decant the ethanol into another test tube. Add 2 cm3 of deionized water to the second test tube Make observations. Liquid sample: 1. 2. 3. 4. Add a few drops of the liquid food sample to a dry test tube. Add 2 cm3 ethanol and shake it thoroughly Add 2 cm3 of deionized water. Make observations. OBSERVATIONS & INTERPRETATION The above image shows the presence of lipids.
