Getting Started With ChemSketch Okay, so you`ve just downloaded
advertisement
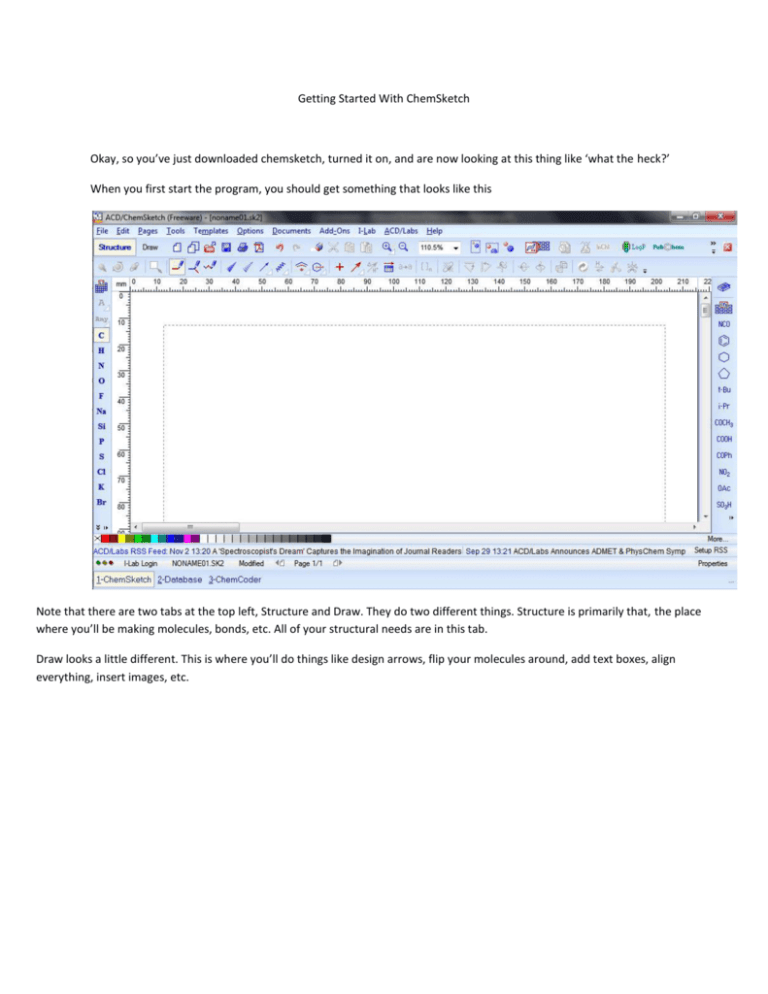
Getting Started With ChemSketch Okay, so you’ve just downloaded chemsketch, turned it on, and are now looking at this thing like ‘what the heck?’ When you first start the program, you should get something that looks like this Note that there are two tabs at the top left, Structure and Draw. They do two different things. Structure is primarily that, the place where you’ll be making molecules, bonds, etc. All of your structural needs are in this tab. Draw looks a little different. This is where you’ll do things like design arrows, flip your molecules around, add text boxes, align everything, insert images, etc. So let’s get down to it. I’m going to show you some basic tricks to using the program. Then we’re going to do draw the mechanism for the Ozonolysis of alkenes, since this involves everything you’ll need to know to work the program. Go back to the Structure tab. Along the left-hand side of the screen you should see a list of atoms. Go ahead and click on C. Once C is highlighted, move the cursor anywhere on the page and click. You should automatically get CH4. Chemsketch automatically adds hydrogens to all molecules, so you don’t have to worry about them. It can be a problem later, but I’ll show you how to get around that. Now, say you don’t want to have everything bunched like that, you want to show the bonds between Carbon and hydrogen. Go back to the left hand side and click on H. Once it’s highlighted, go to CH4, left-click on it (it should have a little box around it once the program knows that what you want to work with) and drag the mouse a little distance away. Once you’re done, you shout have CH 3 and a hydrogen connected by a single bond. Repeat that step three more times until you have something that looks like this. Aw, crap, the Carbon went away. If it didn’t don’t worry. If it did, we can fix that. Run the cursor over the center of the molecule until the C appears, and left-click. Once it’s been selected go up to Tools, then select structure properties. You should get a dialogue box that looks like this. Under ‘Show Carbons’ make sure All is checked, then click apply. Tada! The central carbon is back You can add atoms and groups to your molecules in much the same way. Start with the basic molecule you want, highlight it, click it onto the workspace, then click other atoms and build away. Chemsketch does most of the work for you. It will even add charges for you on central molecules. To quickly clear the workspace, go up to the left hand side right under the Structure tab. You should see three little cursors and balls The arrow cursor and round ball are to select and move. The ball with the red line and fishhook arrows is for selecting when you want to rotate or resize. The third ball with the arrows going all the way around it is to rotate in 3D space. Click on the first one, then drag to select everything in the workspace. Hit CTRL X, DEL, or go up to EDIT then select Delete. If ever you get somewhere and the program isn’t selecting your objects, always to back to this and make sure that the correct SELECT is clicked. This will save you time. Okay, on to the ozonolysis. Clear the workspace, grab your carbon, and click it on there. Once it’s there click on it again and drag a little away from it. You should end up with this. Don’t worry if your lines are perfectly straight. Chemsketch will take care of that too when we’re done. Next to the select tools, there are some pencils drawing things. Select the first pencil, and click on the bond between the two groups. You should end up with a double bond. Now that you’ve done that, select H from the left and add them to the carbons until you have something that looks like this If the carbons disappeared again, select the molecule, go up to the Tools menu and do the ‘Show Carbons’ command and apply. Now, we want those hydrogens to be R groups. On the bottom left of the screen, below the Br, you should see two sets of arrows, two point down, and one pointing to the right. Click on the arrows going down and you get this Click on the tiny arrow under the R, and you’ll get a dialogue box that lets you choose whether you want just R, or how you want to number them. I’ll choose numbering them. Go back to those hydrogens and left click on them. They should all be R’s now. Chemsketch doesn’t automatically change the number, so you’ll have to go back and select it manually for each R. When you’re done with that you should have something that looks like this Okay, now that that’s done, we’ll draw in our ozone. To do that, click on O on the left side of the screen and click somewhere on the workspace. If you click three times, you should end up with it an OH –O – OH. Go up to the pencil again, select it, and click on one of the bonds. You should get this Now you just have to get rid of the OH. Chemsketch really really really really likes to put hydrogens where it can, but there’s a way around that. Go back to the bottom left and click the two down arrows. To bring up this dialogue This time, click on the ‘abc’ button, then go back and click on that pesky OH group and this dialogue will pop up Now, there aren’t any entries for straight atoms like Me or S, so you’ll have to add. Go to the input line and type in O, then click save. When you do it should show up somewhere in the list below. When it does, click on it then click insert. Your OH group should now be a plain little O Now, to do those lone pairs. If you want more room between your atoms, left-click on one and drag it a little ways, this will lengthen the bonds and give you room to work. Once you’ve done that, go up to the Templates menu and click on it, select Template Window. A dialogue should show up that looks like this Now, there are two drop-down lists. Click the far left and go down to Lewis Structures and click on it. You’ll get this That box of dots in the upper right? Those are your lone pairs. Click on any one, then click near your O’s, and you have lone pairs. Put them however you want. Once you’ve chosen, the cursor will keep that particular style of lone pair until you go back up to the Template menu and select another kind. You’ll also notice that this will change you from the STRUCTURE tab to the DRAW tab. Okay, so we have our two starting molecules, time for the arrows. In the DRAW tab on the left hand side there are a bunch of lines. Click on the curved one (when you mouse over it it should show Arc 90°). Put the cursor to it’s close to the double bond of the alkene, and left-click. Hold and drag until it’s at the lone pairs of one of the oxygens, then let it go. Now, go to the curve and double-click on it. You’ll get this dialogue box. Click on the ARROW tab. You can now choose what the body and arrow head will look like. Make sure when selecting that you choose the end you want the arrow head to be at. There are two boxes, once will place an arrowhead to the left, the other to the right Once you’ve chosen arrow style, apply, and you get this. Repeat the steps to put all the arrows where you want them to be, and you get this. Now, at the top of the screen, on the same like with the select and bond drawer, there is a red arrow point up and to the right. This is the reaction arrow. Just like with any of the others if you click the little triangle directly below it you can choose how you want it to look. Once you’ve made your choice, click on the workspace and drag. The arrow will be as long or as short at you like. There are two ways we can continue the mechanism. You can go through, redraw everything and make the necessary changes. Or, you can copy and paste our first molecule and make changes to it. To do this go to the first select option (the ball with the arrow) and click on it. Then click somewhere near the alkene (clicking near the R groups should do it). A box should appear around the alkene. Now go up to EDIT, select COPY, then go back to EDIT and select PASTE – SPECIAL. When you do that the above dialogue appears. Go ahead and paste as a ACD/Chemsketch. You should get a stick outline of your molecule that’s attached to your mouse. Go ahead and click where you want it. Do the same for our ozone molecule. NOTE – Chemsketch treats every part of your mechanism as an individual. If you move a molecule, the arrows will not move with it. Keep this in mind when rearranging things. To make it so Chemsketch does, select the objects you want to group, go to the DRAW tab. In the tab there is a little box and circle button. That is the grouper. Click it and it will treat what you’ve selected as a single object. This is helpful when you have things like lone pairs in what you need to copy or move. Once that’s done, rearrange the bonds as you like to make room for the oxygens. Remember, you can do this by left clicking on the R groups and moving them to where you want them to go. Now, copy and paste your Ozone so that its above your alkene and do some rearranging. To make bond between the two molecules, select the bond drawer (the pencil and line in the structure tab) and click on one atom and drag to the other, Chemsketch does the rest. Once that’s done, add the arrows to show what’s going on and who is going where. You should end up with something like this. Now select your shiny new molecule on the right, copy it, paste special it, and move it to another row so you can finish. Now, to get rid of those arrows, you can use the DELETE tool in the structure tab. It looks like an eraser. Click on it, and it will selectively erase whatever you scroll it over. So, scroll it over those arrows to ger rid of them. After the arrows are gone, click on the bond drawer (the pencil and line button) and click on the bonds between the carbon and oxygen to make double bonds. Lastly, use the Delete tool to delete the bond between the two carbons and the oxygens. You’ll notice when you’re done that the program has added an unwanted H to one or more of your atoms. Go ahead and use the same technique covered earlier to rename the atom back to plain old O At this point it’s wash, rinse, repeat with everything. Add your arrows, delete or add bonds, move about your lone pairs, and in the end you get this. If you have any questions about this or other aspects of Chemsketch that you can’t find in the manual or figure out, let me know. Email: apoc158@cheerful.com
