More Miscellaneous Experiments
advertisement

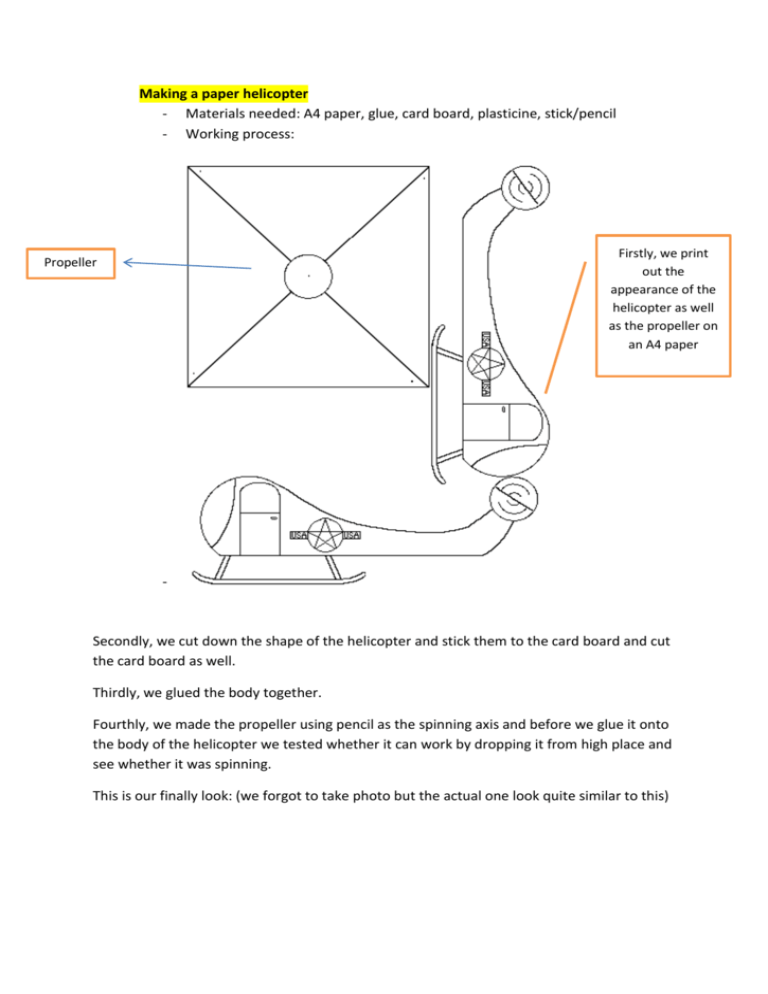
Making a paper helicopter - Materials needed: A4 paper, glue, card board, plasticine, stick/pencil - Working process: Firstly, we print out the appearance of the helicopter as well as the propeller on an A4 paper Propeller - Secondly, we cut down the shape of the helicopter and stick them to the card board and cut the card board as well. Thirdly, we glued the body together. Fourthly, we made the propeller using pencil as the spinning axis and before we glue it onto the body of the helicopter we tested whether it can work by dropping it from high place and see whether it was spinning. This is our finally look: (we forgot to take photo but the actual one look quite similar to this) Lastly, trial and improve. We tried to test our helicopter from the second and the fourth floor. - First trial: - We found that our helicopter was a little shaky during the dropping process. Improvements: We made another bigger propeller instead. Second trial: It works. Our helicopter dropped steadily at the second time. Why does the helicopter with larger propeller drop more steadily? - Larger propeller has a larger surface area. Hence it encountered larger upward air resistance which lead to a smaller downward resultant force. Therefore, the helicopter with larger propeller has a relatively smaller falling speed. What’s more, the larger surface area is easier for the helicopter to balance and stay horizontal during falling. - Hence, the helicopter with larger propeller drops more steadily. Lava lamp experiment: Materials need: vegetable oil, food colourings, salts, cups. Working steps: - Add ¾ water into the cup Add few drops (about 5 drops) of food colouring into the cup and mix well Add ¼ vegetable oil into the cup Add one spoon of salt Observation - How does this happen? Oil is less dense than water, so it is able to rise to the surface all the time. As for the salt, it is denser than both water and oil, hence it sinks to the bottom. When we added the salt, blobs of oil attach to the grains of salts and sank. After the salt dissolved, the oil returns to the top surface again due to its smallest density. Hence we were able to see the continuous bubbles flowing up during the experiment. Soup experiment: Materials need: milk, food colourings, soap, plates. Working steps: - Add some milk into the container Drop few drops of food colourings separately into the milk Dip finger into the soap and pock the centre of the colourings The part of colouring which was touched by our finger encounters emulsification. final product why the part of colouring which was touched by your finger encountered emulsification? - - As we added the soap into the milk, it reduced the surface tension of the milk by dissolving the fat molecules within the milk. The surface of the milk around the soap drop had a higher surface tension, so it pulls the surface away from that spot. The food coloring moves with the surface, flowing away from the soap drop. Actually the food coloring may be drawn down into the liquid, due to the convection that results from the moving surface, and appear rising again somewhere else. can float on the water. Diffusion of water of different temperatures - Materials needed: a small cup, warm water, cold water, food colouring, a container Working process: Firstly, we filled the small cup with warm water and added red food colouring into the water Secondly, we filled the larger container with cold water. Thirdly, we placed the cup into the container and observe the diffusion of the red warm water. Lastly, we changed the temperature of the warm water, and repeated the above three steps - - - What are we supposed to see? 1) The red warm water diffused to the cold water in a lava fountain explosion 2) The warmer the water, the faster it diffuse Result: we were able to see, our experiment was successful. Why does the warmer water diffuse faster? Water molecules are moving all the time. The speed of its moving is affected by temperature. When the temperature goes high, the water molecules move faster. Hence the rate of diffusion becomes faster as well. Mini volcano - Materials needed: baking powder, vinegar, vegetable oil, water, flour, food colouring, salt - Working process: Firstly, we kneaded the mixture of baking powder, water, vegetable oil, salt and few drops of green food coloring to fine dough which was going to be the exterior shape of the volcano. Secondly, we added water, detergent, baking soda and red food colouring into the cup and placed it into the middle of the volcano. Lastly, we poured the vinegar into the cup and observe the eruption of our volcano. - How does the mini volcano form? The formation of the eruption actually is the reaction between baking soda and vinegar which produces lots of carbon dioxide gas. The main composition of baking soda is sodium carbonate, and vinegar is an acid. When sodium carbonate meets vinegar, carbon dioxide gas will come out. The reason we put detergent is that detergent functions as activator, it fastens the reaction rate of baking soda and vinegar. Hence we were able to see a spectacular eruption of our mini volcano. Explore air and water pressure Materials needed: a cup, water, a sheet of cardboard Working process: Firstly, we filled water into the cup fully. Secondly, we put a sheet of cardboard on the top of the cup and hold together with the cup of water. Thirdly, we inverted the whole thing and slowly remove our hands from the cardboard and observe whether the cardboard will drop. What are we supposed to see? After we release our hands from the cardboard, the cardboard will remain the same position (not dropping), and the water will not flow out. Why does the card board remain the same position and not fall down? This is due to the upward air pressure exerting on the bottom surface of the card board is larger than the water pressure inside the cup exerting on the top surface of the card board. Hence when we inverted the cup and released hand, the card board would remain the same position and stick to the cup. Inflating a balloon without blowing Materials needed: balloon, baking soda, vinegar, a water bottle Working process: Firstly, we added half cup of baking soda into the water bottle and poured one cup of vinegar into the water bottle as well. Secondly, we fast wrap the neck of the balloon around the neck of the bottle Lastly, observe the change of the volume of the balloon. What are we supposed to see? The balloon becomes bigger. Result: The balloon became slightly bigger. Reason: When the baking soda reacts with vinegar, large amount of carbon dioxide gas is produced. Hence the balloon gets inflated. However, we did not have sufficient baking soda and vinegar to blow up the entire balloon. Maybe we can do this again next time when we have enough materials. Never wet newspaper Materials needed: a cup, water, a sheet of newspaper, a big container Working process: Firstly, we filled up some water into the big container and put the sheet of newspaper tightly at the bottom of the cup Secondly, we inverted the cup and placed it into the water holding for 10 seconds What are we supposed to see? The newspaper inside the cup does not get wet when we put the cup into the water. Result: we succeeded. After we took out the cup from the water, the newspaper inside was still dry. Why does the newspaper remain dry after we put the cup into the water? This is because there used to have air inside the cup. When we inverted the cup and inserted it into the water, the air within the cup would push the water away due to large air pressure. Hence, the water did not get the chance to touch the newspaper at the bottom of the cup. Therefore, the newspaper still remained dry after we put it into the water. Breathing apparatus Materials needed: balloon, water bottle, funnel Working process: Firstly, we inserted a balloon into the bottle by strapping it into the neck of the bottle and inverting it Secondly, we placed a funnel at the neck of the bottle over the top of the balloon. Lastly, we kept squeezing and releasing the bottle constantly and observe the change of the balloon. Breath out Breath in What are we supposed to see? The balloon in the bottle is representing our lungs. When we squeeze the bottle, the balloon shrinks. When we release the bottle, the balloon inflates to its original state. Reason: The change of volume of balloon is due to the increasing and decreasing air pressure inside the bottom. On the other words, the contract and expansion of our lungs depends on our inside body pressure. When we squeeze the bottle, the volume of the air inside the bottle becomes smaller, hence the inside air pressure becomes larger. Therefore, the balloon shrinks. When we release the bottle, the volume of the air inside the bottle gets larger, hence the inside air pressure becomes less. Therefore, the balloon inflates. Making a spinning disc Materials needed: cardboard, long string Working process: Firstly, we drew a circle on the cardboard and cut it out. Secondly, we poked 2 holes which are 1 cm apart from each other in the center of the circle. Thirdly, we put the long string through the two holes and tied the two ends together. Lastly, we twisted the circle a few times and pulled each end of the string playing it as the circle spun. How does the spinning disc work? The main concept is the conversion of potential energy and kinetic energy triggers the disc keeps spinning. When we pull/tighten the string, the potential energy of the string reaches maximum, and the kinetic energy of the disc reaches minimum. After we release/ loosen the string, the potential energy of the string converts into the kinetic energy of the disc. Therefore, the disc starts spinning and spinning faster. We keep tightening and loosening the string is to keep the conversion of energy happening, hence the spinning disc is able to spin continuously.


