Pyramid Project (Chapter 2 Test)
advertisement
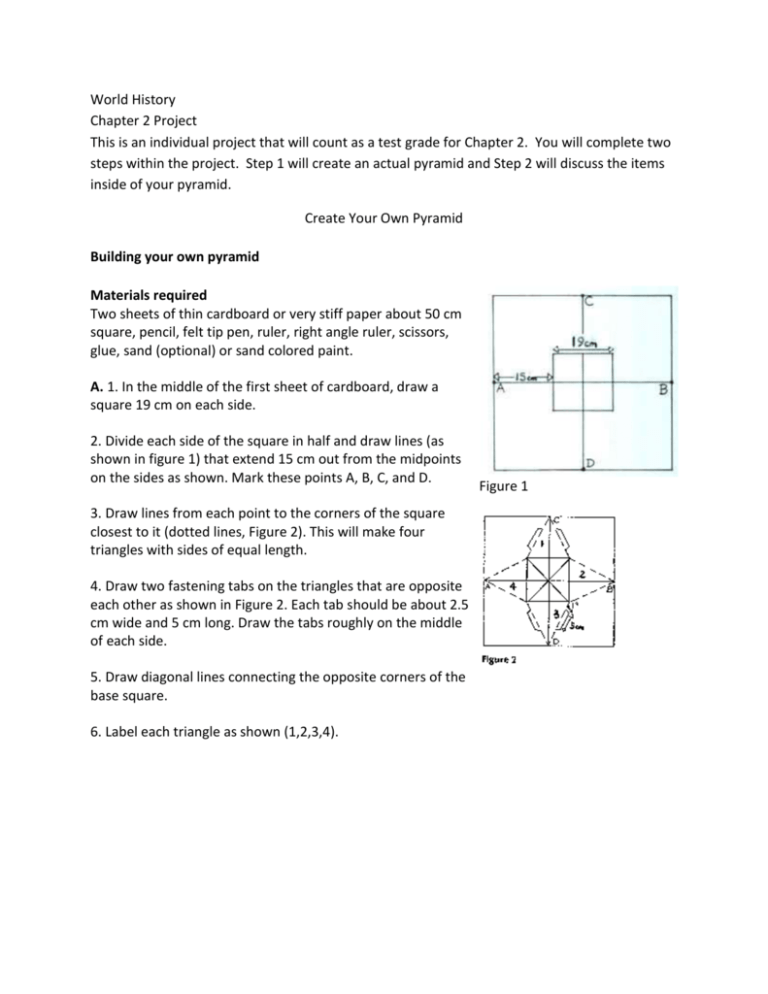
World History Chapter 2 Project This is an individual project that will count as a test grade for Chapter 2. You will complete two steps within the project. Step 1 will create an actual pyramid and Step 2 will discuss the items inside of your pyramid. Create Your Own Pyramid Building your own pyramid Materials required Two sheets of thin cardboard or very stiff paper about 50 cm square, pencil, felt tip pen, ruler, right angle ruler, scissors, glue, sand (optional) or sand colored paint. A. 1. In the middle of the first sheet of cardboard, draw a square 19 cm on each side. 2. Divide each side of the square in half and draw lines (as shown in figure 1) that extend 15 cm out from the midpoints on the sides as shown. Mark these points A, B, C, and D. 3. Draw lines from each point to the corners of the square closest to it (dotted lines, Figure 2). This will make four triangles with sides of equal length. 4. Draw two fastening tabs on the triangles that are opposite each other as shown in Figure 2. Each tab should be about 2.5 cm wide and 5 cm long. Draw the tabs roughly on the middle of each side. 5. Draw diagonal lines connecting the opposite corners of the base square. 6. Label each triangle as shown (1,2,3,4). Figure 1 B. To see inside the pharaoh's burial chamber, make an interior view panel. 1. Draw a triangle as shown in Figure 3. Mark a base line 26.5cm long on the cardboard's edge. 2. Divide the base line in half, marking a point 13 cm in from the edge. Use the right-angle ruler to mark a top line 12 cm above the centre point. Connect the top point and the edges of the base line. 3. Draw tabs A and B the same size as the pyramid tabs. Add tab C. 4. Cut the shape out around the heavy black line as shown in Figure 3. C. On this panel, draw a diagram of the pyramid's interior and label the parts as shown in Figure 4. 1. Fold back tabs A and B. 2. Fold tab C forward. 3. Fold the pyramid tabs over onto the front of each triangle. D. The interior panel will now fit inside the pyramid. 1. Spread glue on the underside of folded-out tab C. 2. With this tab forward, glue the base line onto the diagonal line as shown in Figure 5. 3. Then glue the side tabs of the interior panel onto triangles 1 and 4 using the tabs to hold them together. 4. Fold triangles 2 and 3 toward the inside. If you want to close pyramid entirely, put a piece of double-sided tape on each tab of triangle 3. Press it against sides two and 4 to close them up, or leave sides 2 and 3 open so you can view the interior. E. You can make a base for your pyramid. 1. Cut a 30.5cm square of stiff cardboard. 2. Spread it with glue and sprinkle on a coating of sand. Shake off any loose sand. Or, paint the cardboard to look like sand. 3. To attach the pyramid, spread glue on the pyramid base and press it down on the platform. (See Figure 6.) NAME______________________________________________ Step 2 of Chapter 2 Project Fill out the chart below and explain what items you would place inside your pyramid and why those objects are important to you. Items You Would Place Inside Your Pyramid 1. 2. 3. 4. 5. 6. 7. 8. Explanation of Importance of Each Object 1 2 3 4 5 6 7 8
