Fluid Warmer lesson plan
advertisement

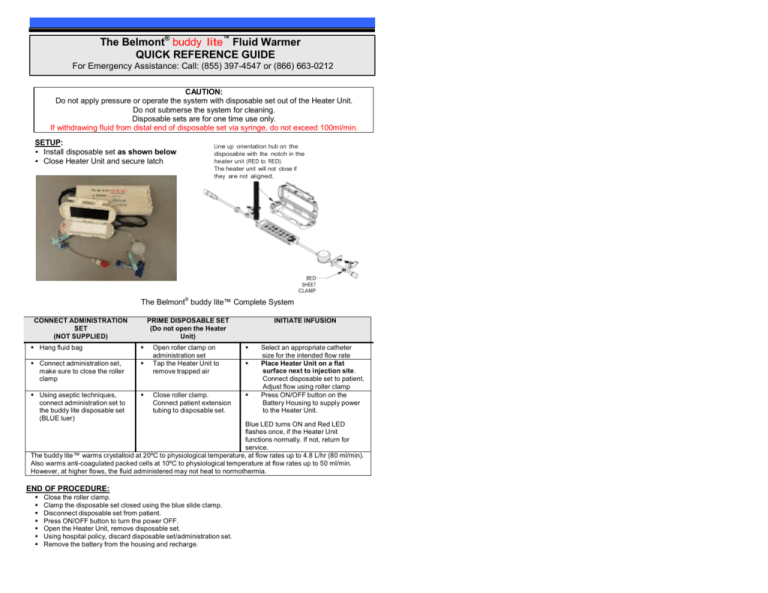
The Belmont® buddy lite™ Fluid Warmer QUICK REFERENCE GUIDE For Emergency Assistance: Call: (855) 397-4547 or (866) 663-0212 CAUTION: Do not apply pressure or operate the system with disposable set out of the Heater Unit. Do not submerse the system for cleaning. Disposable sets are for one time use only. If withdrawing fluid from distal end of disposable set via syringe, do not exceed 100ml/min. SETUP: • Install disposable set as shown below • Close Heater Unit and secure latch Line up orientation hub on the disposable with the notch in the heater unit (RED to RED). The heater unit will not close if they are not aligned. BED SHEET CLAMP The Belmont® buddy lite™ Complete System CONNECT ADMINISTRATION SET (NOT SUPPLIED) PRIME DISPOSABLE SET (Do not open the Heater Unit) Hang fluid bag Connect administration set, make sure to close the roller clamp Using aseptic techniques, connect administration set to the buddy lite disposable set (BLUE luer) INITIATE INFUSION Open roller clamp on administration set Tap the Heater Unit to remove trapped air Close roller clamp. Connect patient extension tubing to disposable set. Select an appropriate catheter size for the intended flow rate Place Heater Unit on a flat surface next to injection site. Connect disposable set to patient. Adjust flow using roller clamp Press ON/OFF button on the Battery Housing to supply power to the Heater Unit. Blue LED turns ON and Red LED flashes once, if the Heater Unit functions normally. If not, return for service. The buddy lite™ warms crystalloid at 20ºC to physiological temperature, at flow rates up to 4.8 L/hr (80 ml/min). Also warms anti-coagulated packed cells at 10ºC to physiological temperature at flow rates up to 50 ml/min. However, at higher flows, the fluid administered may not heat to normothermia. END OF PROCEDURE: Close the roller clamp. Clamp the disposable set closed using the blue slide clamp. Disconnect disposable set from patient. Press ON/OFF button to turn the power OFF. Open the Heater Unit, remove disposable set. Using hospital policy, discard disposable set/administration set. Remove the battery from the housing and recharge. IT IS ESSENTIAL THAT YOU READ AND UNDERSTAND THE OPERATOR’S MANUAL BEFORE USING THIS DEVICE Air Venting: The air is released through the side vents of the set. W hen infusing crystalloid, the set can vent large amounts of air. Caution: With blood or blood products, the set can vent only small amounts of air. You should be vigilant to avoid infusing air especially if using a hand squeeze pump during infusion. During normal operation – water vapor, along with out-gassed air from warmed fluid, will be vented and will cause condensation to appear within the side vents after prolonged use. This should not be mistaken as a seal failure due to materials or workmanship. BATTERY and CHARGER: Blue/Red LED ON/OFF Switch Strain Relief Battery Battery Housing Power Supply Battery 5 Segment LCD Battery Pack in the Battery Housing Status W indow Battery Charger Battery LCD displays state-of-charge. Each segment represents 20% of the full charge capacity. Remove battery from the Housing to charge the battery. The Battery Charger LED (in the Status Window) turns Solid Green when battery is fully charged. ALARM: ALARM/MESSAGE POSSIBLE CAUSE SOLUTION Fluid source is empty or air in the fluid path Line is clamped Failure of the microprocessor or temperature sensor Replace fluid bag OVER TEMPERATURE Repeatedly stopping and restarting during high flow conditions Failure of microprocessor or temperature sensor PROBE FAULT Hardware temperature override circuit not working properly Clamp line, press the ON/OFF switch to OFF and turn back ON to repower If failure recurs, replace the system Turn power OFF and turn back ON to re-power If failure recurs, replace the system CHECK FOR AIR NO HEAT Open clamps If failure reoccurs, obtain replacement system and contact service. At these alarms, system stops heating, and flashes the red and blue LEDs alternately. To reset or retry, press ON/OFF switch to OFF, and then turn back ON to resume operation. 702-00092/Rev D


