Configure AD FS 2.0
advertisement
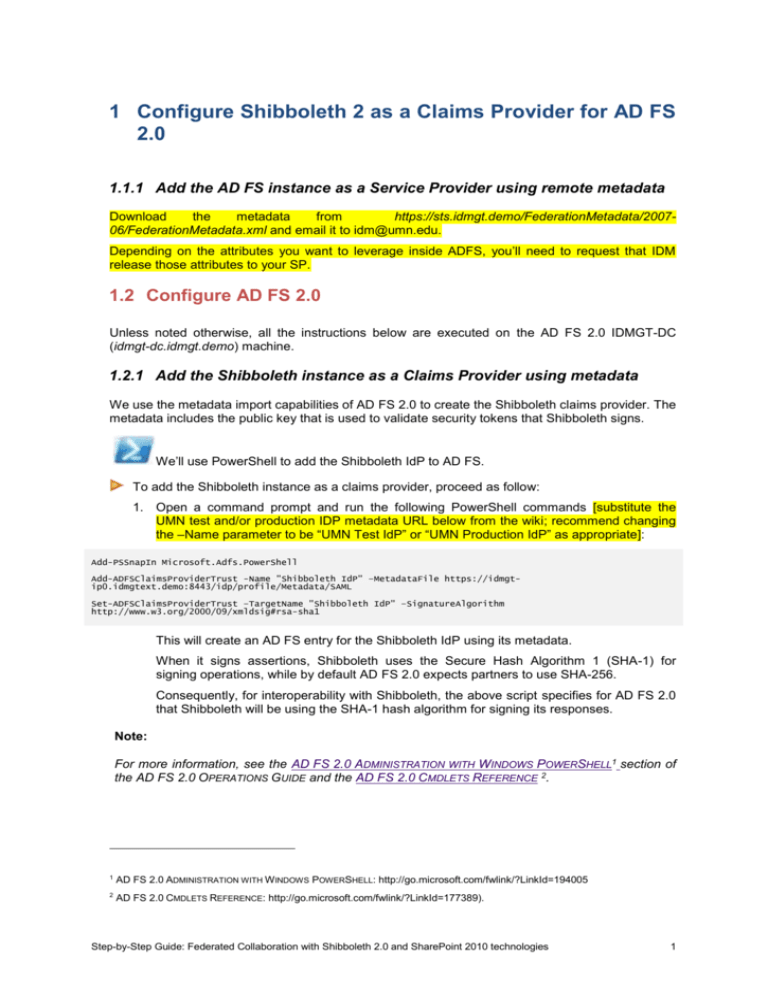
1 Configure Shibboleth 2 as a Claims Provider for AD FS 2.0 1.1.1 Add the AD FS instance as a Service Provider using remote metadata Download the metadata from https://sts.idmgt.demo/FederationMetadata/200706/FederationMetadata.xml and email it to idm@umn.edu. Depending on the attributes you want to leverage inside ADFS, you’ll need to request that IDM release those attributes to your SP. 1.2 Configure AD FS 2.0 Unless noted otherwise, all the instructions below are executed on the AD FS 2.0 IDMGT-DC (idmgt-dc.idmgt.demo) machine. 1.2.1 Add the Shibboleth instance as a Claims Provider using metadata We use the metadata import capabilities of AD FS 2.0 to create the Shibboleth claims provider. The metadata includes the public key that is used to validate security tokens that Shibboleth signs. We’ll use PowerShell to add the Shibboleth IdP to AD FS. To add the Shibboleth instance as a claims provider, proceed as follow: 1. Open a command prompt and run the following PowerShell commands [substitute the UMN test and/or production IDP metadata URL below from the wiki; recommend changing the –Name parameter to be “UMN Test IdP” or “UMN Production IdP” as appropriate]: Add-PSSnapIn Microsoft.Adfs.PowerShell Add-ADFSClaimsProviderTrust -Name "Shibboleth IdP" –MetadataFile https://idmgtip0.idmgtext.demo:8443/idp/profile/Metadata/SAML Set-ADFSClaimsProviderTrust –TargetName "Shibboleth IdP" –SignatureAlgorithm http://www.w3.org/2000/09/xmldsig#rsa-sha1 This will create an AD FS entry for the Shibboleth IdP using its metadata. When it signs assertions, Shibboleth uses the Secure Hash Algorithm 1 (SHA-1) for signing operations, while by default AD FS 2.0 expects partners to use SHA-256. Consequently, for interoperability with Shibboleth, the above script specifies for AD FS 2.0 that Shibboleth will be using the SHA-1 hash algorithm for signing its responses. Note: For more information, see the AD FS 2.0 ADMINISTRATION WITH WINDOWS POWERSHELL1 section of the AD FS 2.0 OPERATIONS GUIDE and the AD FS 2.0 CMDLETS REFERENCE 2. 1 AD FS 2.0 ADMINISTRATION WITH WINDOWS POWERSHELL: http://go.microsoft.com/fwlink/?LinkId=194005 2 AD FS 2.0 CMDLETS REFERENCE: http://go.microsoft.com/fwlink/?LinkId=177389). Step-by-Step Guide: Federated Collaboration with Shibboleth 2.0 and SharePoint 2010 technologies 1 1.2.2 Edit Claim Rules for Claims Provider Trust [Note: these rules may vary depending on which attributes you plan to use. You’re basically mapping a SAML attribute name (which we tell you) to a Claim (which can be whatever you like subject to ADFS’s rules). Just be sure that you set up the Claims to be consistent between ADFS and Sharepoint.] The following claim rule describes how data from Shibboleth is used in the security token that is sent to the AD FS 2.0. To configure the claims for inbound receipt, proceed as follow: 1. Open the AD FS 2.0 Management console. On the Start menu, click Administrative Tools, and then click AD FS 2.0 Management. 2. After the snap-in is loaded, click on the Trust Relationships node, and then highlight Claims Provider Trusts. 3. In the AD FS 2.0 Management center pane, right-click Shibboleth IdP, and then click the Edit Claim Rules item. 4. On the Acceptance Transform Rules tab, click the Add Rule button. 5. On the Select Rule Template page, select Send Claims Using a Custom Rule, and then click the Next button. 6. On the Configure Rule page, in the Claim rule name box, type “Transform mail to E-Mail Address”. 7. In the Custom Rule window, type or copy and paste the following: c:[Type == "urn:oid:0.9.2342.19200300.100.1.3"] => issue(Type = "http://schemas.xmlsoap.org/ws/2005/05/identity/claims/emailaddress", Issuer = c.Issuer, OriginalIssuer = c.OriginalIssuer, Value = c.Value, ValueType = c.ValueType); 8. Click the Finish button. 9. On the Acceptance Transform Rules tab, click the Add Rule button. 10. On the Select Rule Template page, select Send Claims Using a Custom Rule, and then click the Next button. 11. On the Configure Rule page, in the Claim rule name box, type “Transform eduPersonPrimaryAffiliation to Role”. 12. In the Custom Rule window, type or copy and paste the following: c:[Type == "urn:oid:1.3.6.1.4.1.5923.1.1.1.5"] => issue(Type = "http://schemas.microsoft.com/ws/2008/06/identity/claims/role", Issuer = c.Issuer, OriginalIssuer = c.OriginalIssuer, Value = c.Value, ValueType = c.ValueType); 13. Click the Finish button, and then click the OK button. Note: The object-identifier-style URN strings are the formal SAML 2.0 names for mail and eduPersonPrimaryAffiliation names that the Shibboleth IdP software sends by default. 2 Step-by-Step Guide: Federated Collaboration with Shibboleth 2.0 and SharePoint 2010 technologies Note: Attributes with formal names that are represented in URN strings cannot be passed untransformed to WIF-based applications like SharePoint 2010, because WIF can only understand claims using URL-style names. That is why we transform the incoming mail and eduPersonPrimaryAffiliation attributes to E-Mail Address and Role claims, instead of retaining their original claim types. Note: Unlike Shibboleth, when it reads inbound attributes AD FS 2.0 ignores the urn:oasis:names:tc:SAML:2.0:attrname-format:uri name format that Shibboleth uses, and it simply reads the value. Note: Some Shibboleth attributes like eduPersonScopedAffiliation are scoped attributes, meaning that Shibboleth (when it acts as the SP) checks the scope section of the attributes against a value that is provided in an IdP partner's metadata. When AD FS 2.0 acts as an SP, it does not read or store the IdP partner's scope value during its metadata import. However, it is possible to use the AD FS 2.0 claim rule language to simulate the "scope check" behavior of a Shibboleth SP, as shown below in the condition part of a rule: c:[Type == "urn:oid:1.3.6.1.4.1.5923.1.1.1.9", Value =~ "^.+@<scope>"] 1.3 Test Shibboleth as the Identity Provider and AD FS 2.0 as the Relying Party All the instructions below are executed on the AD FS 2.0 IDMGT-DC (idmgt-dc.idmgt.demo) machine. Note: Clear all the cookies in Internet Explorer on the AD FS 2.0 IDMGT-DC (idmgt-dc.idmgt.demo). To clear the cookies, click Tools, click Internet Options, click Delete under Browsing History, and then select cookies for deletion. To test the federation relationship between Shibboleth and AD FS 2.0, proceed as follow: 1. Visit https://sts.idmgt.demo/adfs/ls/IdpInitiatedSignon.aspx with Internet Explorer. 2. When prompted at the AD FS 2.0 Home Realm Discovery page, choose Shibboleth IdP in the combo box, and then click the button Continuer la connexion (Continue to Sign in English). You are redirected to Shibboleth IdP. The UMN Internet Login page appears. Step-by-Step Guide: Federated Collaboration with Shibboleth 2.0 and SharePoint 2010 technologies 3 3. Log in with the user name “cc” and the password you created for the user earlier, and then click the Login button. The Shibboleth IdP will grant you access and send an encrypted token back to AD FS 2.0. 4 Step-by-Step Guide: Federated Collaboration with Shibboleth 2.0 and SharePoint 2010 technologies
