Polar Coordinates Pre Calculus Up to this point we`ve dealt
advertisement
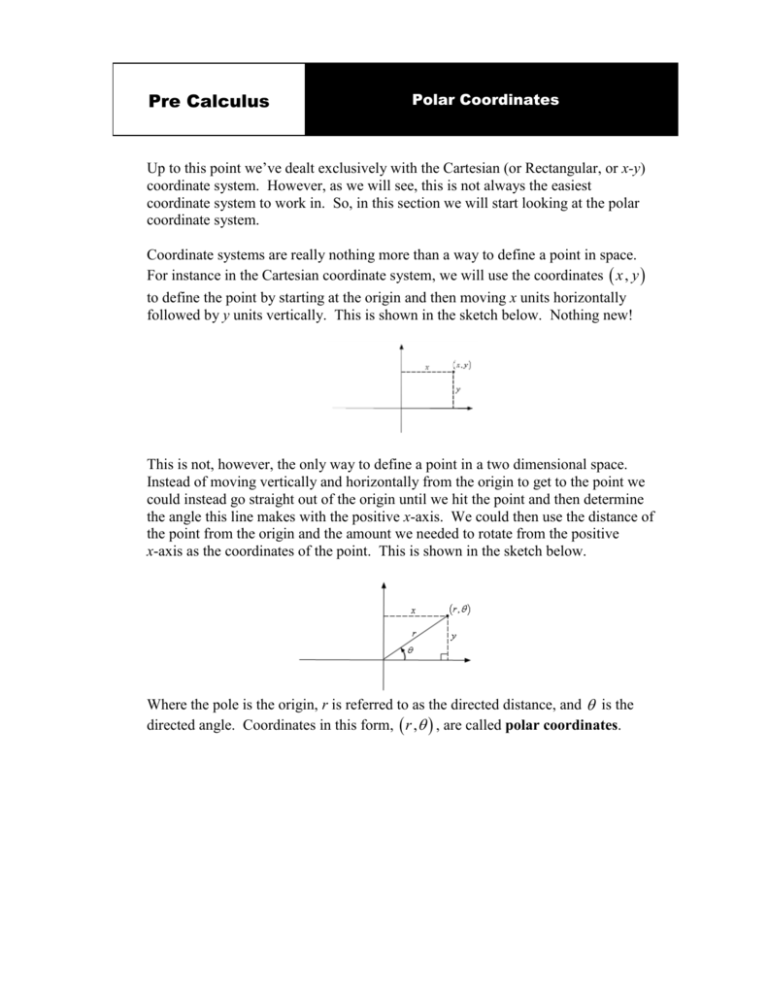
Pre Calculus Polar Coordinates Up to this point we’ve dealt exclusively with the Cartesian (or Rectangular, or x-y) coordinate system. However, as we will see, this is not always the easiest coordinate system to work in. So, in this section we will start looking at the polar coordinate system. Coordinate systems are really nothing more than a way to define a point in space. For instance in the Cartesian coordinate system, we will use the coordinates x , y to define the point by starting at the origin and then moving x units horizontally followed by y units vertically. This is shown in the sketch below. Nothing new! This is not, however, the only way to define a point in a two dimensional space. Instead of moving vertically and horizontally from the origin to get to the point we could instead go straight out of the origin until we hit the point and then determine the angle this line makes with the positive x-axis. We could then use the distance of the point from the origin and the amount we needed to rotate from the positive x-axis as the coordinates of the point. This is shown in the sketch below. Where the pole is the origin, r is referred to as the directed distance, and is the directed angle. Coordinates in this form, r , , are called polar coordinates. From website: http://www.dummies.com/how-to/content/how-to-plot-polarcoordinates.html Polar coordinates are an extremely useful addition to your mathematics toolkit because they allow you to solve problems that would be extremely ugly if you were to rely on standard x- and y-coordinates. In order to fully grasp how to plot polar coordinates, you need to see what a polar coordinate plane looks like. A blank polar coordinate plane (not a dartboard). In the figure, you can see that the plane is no longer a grid of rectangular coordinates; instead, it's a series of concentric circles around a central point, called the pole. The plane appears this way because the polar coordinates are a given radius and a given angle in standard position from the pole. Each circle represents one radius unit, and each line represents the special angles from the unit circle. Because you write all points on the polar plane as in order to graph a point on the polar plane, you should find theta first and then locate r on that line. This approach allows you to narrow the location of a point to somewhere on one of the lines representing the angle. From there, you can simply count out from the pole the radial distance. Pg 2 Examples: 11 (a) Sketch the polar coordinates: 3, and 3, . 6 6 𝜋 𝜋 To graph (3, 6 ) , begin by finding the . 𝜃 = 6 . You can see where this angle is. Now from the center of the graph, travel along this angle for a radius of 3. You will now reach the red dot that represents this point. 11 −11𝜋 To graph (3, − 6 𝜋) , go in the negative direction . 𝜃 = 6 . This takes you to the first quadrant. Next, again travel along this angle for a radius of 3. You will now reach the red dot again, and this represents this point. So we see, these two polar coordinates can be represented by the same point. Pg 3 7 (b) Sketch the polar coordinates: 3, and 3, 6 6 𝜋 𝜋 To graph (3, 6 ) , begin by finding the . 𝜃 = 6 . You can see where this angle is. Now from the center of the graph, travel along this angle for a radius of 3. You will now reach the red dot that represents this point. 7 7𝜋 To graph (−3, 6 𝜋) , begin by finding . 𝜃 = 6 . This takes you to the third quadrant. Next, again travel along this angle for a radius of -3. You will now reach the red dot again, and this represent this point. So we see, these two polar coordinates can be represented by the same point. But this can be confusing – going a negative radius. I find this point easier to plot by beginning at the origin, going along the polar axis negative three, then rotating my angle 7𝜋 of 𝜃 = 6 . Whichever way makes more sense to you, please try that until you get used to being able to plot the polar coordinates. Pg 4 7 (c) Sketch the polar coordinates: 2, and 2, 6 6 Again, you see that these two polar coordinates are represented by the same point (in green). (d) Are these polar coordinates 2, and 2, representing the same point? 6 6 These two polar coordinates are not the same point. Pg 5 4 2 (e) Are these polar coordinates 5, and 5, representing the same 3 3 point? If so, can you name others? 𝜋 Yes they are. Others would be (5, 3 ) 𝑎𝑛𝑑 (5, −5𝜋 3 ) Pg 6 These points only represent the coordinates of the point without rotating around the system more than once. If we allow the angle to make as many complete rotation about the axis system as we want then there are an infinite number of coordinates for the same point. In fact the point r , can be represented by any of the following coordinate pairs. r , 2 n r , 2n 1 , where n is any integer. (f) Find all the polar coordinates of 3, . 4 Remember to make sure you have all four representations when you are done. 7𝜋 (𝑟, 𝜃 ) = (−3, ) 4 (𝑟, 𝜃) = (3 , (𝑟, 𝜃 ) = (3, 3𝜋 ) 4 −5𝜋 ) 4 Pg 7 Next we should talk about the origin of the coordinate system. In polar coordinates the origin is often called the pole. Because we aren’t actually moving away from the origin/pole we know that r 0 . However, we can still rotate around the system by any angle we want and so the coordinates of the origin/pole are 0, . Polar to Rectangular (Cartesian) Conversions Note that we’ve got a right triangle above and with that we can get the following equations that will convert polar coordinates into Rectangular (Cartesian) coordinates: x r cos y r sin Pg 8 Formulas: x r cos y r sin Examples: (a) Convert 2, into rectangular (Cartesian coordinates). (𝑟, 𝜃) = (2, 𝜋) Recall: x r cos y r sin (𝑥, 𝑦) = (𝑟 cos 𝜃, 𝑟 sin 𝜃) (𝑥, 𝑦) = (2 cos 𝜋 , 2 sin 𝜋) (𝑥 , 𝑦) = (2 (−1), 2 (0) ) = (−2, 0) 5 (b) Convert 3, into rectangular (Cartesian coordinates). 6 5 5 1 √3 (𝑥 , 𝑦 ) = (3 cos 𝜋, 3 sin 𝜋) = (3 (− ) , 3 ( ) ) 6 6 2 2 −3√3 3 (𝑥 , 𝑦 ) = ( , ) 2 2 (c) Convert 3 , into rectangular (Cartesian coordinates). 6 𝜋 𝜋 , √3 sin ) 6 6 1 √3 (𝑥 , 𝑦) = (√3 ( ) , √3 ( ) ) 2 2 3 √3 (𝑥 , 𝑦 ) = ( , ) 2 2 (𝑥 , 𝑦 ) = (√3 cos 2 (d) Convert 4, into rectangular (Cartesian coordinates). 3 2𝜋 2𝜋 , − 4 sin ) 3 3 −1 √3 (𝑥 , 𝑦) = (−4 ( ) , −4 ( ) ) 2 2 (𝑥 , 𝑦 ) = (2 , −2√3 ) (𝑥 , 𝑦 ) = (−4 cos Pg 9 Rectangular to Polar Conversions Once again the right triangle will assist us in the conversion from rectangular to Polar Conversions. Thus we can obtain the following formulas: tan y x x2 y 2 r 2 Examples: (a) Convert 0, 2 into polar form. tan y x x2 y 2 r 2 2 = 𝑢𝑛𝑑𝑒𝑓𝑖𝑛𝑒𝑑 0 2 𝜋 𝜃 = 𝑎𝑟𝑐 tan = 0 2 tan 𝜃 = 𝑥2 + 𝑦2 = 𝑟2 02 + 22 = 𝑟 2 𝑟=2 Therefore, one of the representations of the polar form of this point is: 𝜋 (𝑟 , 𝜃) = (2 , ) 2 (b) Convert 1,1 into polar form. First when you plot this point, you see it is graphed in the second quadrant: tan y x x2 y 2 r 2 1 tan 𝜃 = = −1 −1 3𝜋 𝜃 = 𝑎𝑟𝑐 tan −1 = 𝑟𝑒𝑐𝑎𝑙𝑙: 𝐼𝐼 𝑞𝑢𝑎𝑑𝑟𝑎𝑛𝑡 𝑎𝑛𝑔𝑙𝑒 4 𝑥2 + 𝑦2 = 𝑟2 (−1)2 + (1)2 = 𝑟 2 1 + 1 = 𝑟2 2 = 𝑟2 𝑟 = √2 Therefore, one of the representations of the polar form of this point is: 3𝜋 (𝑟 , 𝜃) = (√2 , ) 4 Pg 10 (c) Convert 2, 2 into polar form. tan y x x2 y 2 r 2 −2 tan 𝜃 = = −1 2 7𝜋 𝜃 = 𝑎𝑟𝑐 tan −1 = 𝑟𝑒𝑐𝑎𝑙𝑙: 𝐼𝑉 𝑞𝑢𝑎𝑑𝑟𝑎𝑛𝑡 𝑎𝑛𝑔𝑙𝑒 4 𝑥2 + 𝑦2 = 𝑟2 (2)2 + (−2)2 = 𝑟 2 4 + 4 = 𝑟2 8 = 𝑟2 𝑟 = √8 = 2√2 Therefore, one of the representations of the polar form of this point is: 7𝜋 (𝑟 , 𝜃) = (2√2 , ) 4 (d) Convert 3,0 into polar form. tan y x x2 y 2 r 2 0 =0 −3 𝜃 = 𝑎𝑟𝑐 tan 0 = 𝜋 𝑟𝑒𝑐𝑎𝑙𝑙: 𝑤ℎ𝑒𝑟𝑒 𝑡ℎ𝑒 𝑙𝑜𝑐𝑎𝑡𝑖𝑜𝑛 𝑜𝑓 𝑡ℎ𝑒 𝑟𝑒𝑐𝑡𝑎𝑛𝑔𝑢𝑙𝑎𝑟 𝑝𝑜𝑖𝑛𝑡 𝑖𝑠 𝑥2 + 𝑦2 = 𝑟2 (−3)2 + (0)2 = 𝑟 2 9 + 0 = 𝑟2 9 = 𝑟2 𝑟=3 tan 𝜃 = Therefore, one of the representations of the polar form of this point is: (𝑟 , 𝜃) = (3 , 𝜋 ) (e) Convert x 1 into polar form 𝑥 = 𝑟 cos 𝜃 1 = 𝑟 cos 𝜃 1 =4 cos 𝜃 𝑟 = sec 𝜃 Pg 11
