inv3_teacher - Lehigh University Environmental Initiative
advertisement
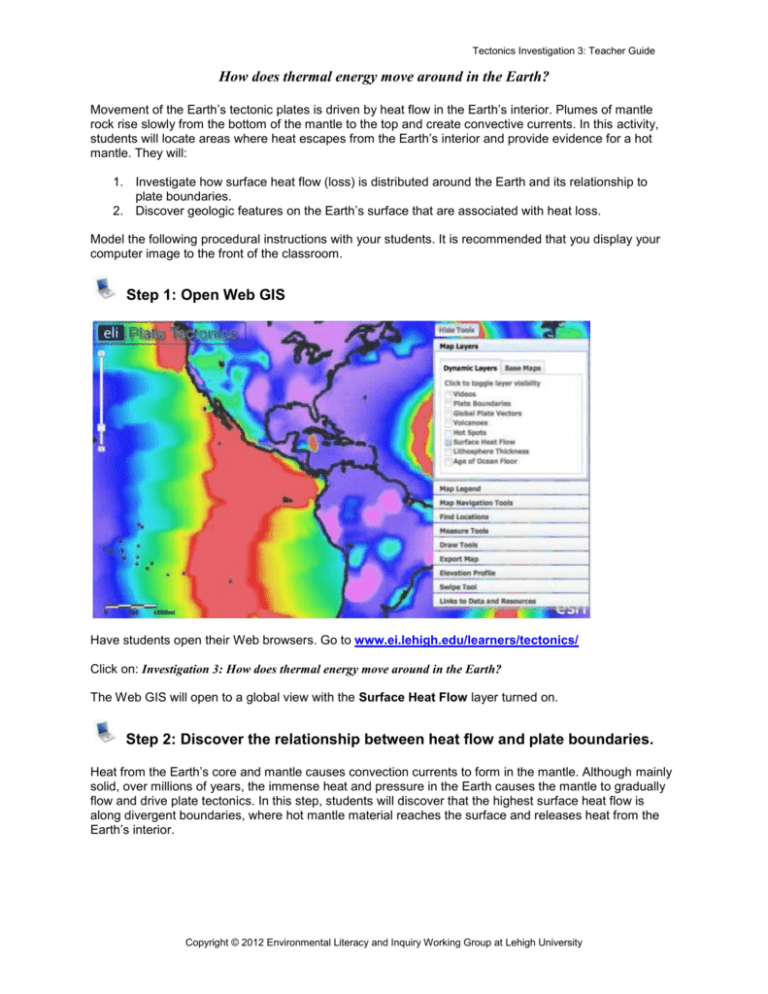
Tectonics Investigation 3: Teacher Guide How does thermal energy move around in the Earth? Movement of the Earth’s tectonic plates is driven by heat flow in the Earth’s interior. Plumes of mantle rock rise slowly from the bottom of the mantle to the top and create convective currents. In this activity, students will locate areas where heat escapes from the Earth’s interior and provide evidence for a hot mantle. They will: 1. Investigate how surface heat flow (loss) is distributed around the Earth and its relationship to plate boundaries. 2. Discover geologic features on the Earth’s surface that are associated with heat loss. Model the following procedural instructions with your students. It is recommended that you display your computer image to the front of the classroom. Step 1: Open Web GIS Have students open their Web browsers. Go to www.ei.lehigh.edu/learners/tectonics/ Click on: Investigation 3: How does thermal energy move around in the Earth? The Web GIS will open to a global view with the Surface Heat Flow layer turned on. Step 2: Discover the relationship between heat flow and plate boundaries. Heat from the Earth’s core and mantle causes convection currents to form in the mantle. Although mainly solid, over millions of years, the immense heat and pressure in the Earth causes the mantle to gradually flow and drive plate tectonics. In this step, students will discover that the highest surface heat flow is along divergent boundaries, where hot mantle material reaches the surface and releases heat from the Earth’s interior. Copyright © 2012 Environmental Literacy and Inquiry Working Group at Lehigh University Tectonics Investigation 3: Teacher Guide 2 a. On the students’ GIS, different colors on the Surface Heat Flow layer represent the heat released from the Earth’s interior at that location. Students should click on the Map Legend tab in the toolbox menu to view the map legend. The color indicates the amount of heat released from the interior of the Earth in mW/m2, a unit of heat flow in milliwatts of heat energy per square meter at the Earth’s surface. b. Have students explore the map using the Map Navigation Tools located on the toolbox menu. i. To move around the map, select the hand tool location. and click and drag the map to a new Copyright © 2012 Environmental Literacy and Inquiry Working Group at Lehigh University Tectonics Investigation 3: Teacher Guide c. Have students click on in the upper right hand corner to hide the toolbox menu. d. Make sure students understand the map legend. Ask students to compare the surface heat flow on the continents to the oceans. Instruct students to answer Question #1 on their investigation sheets. e. Instruct students to click on in the upper right hand corner to show the toolbox menu. Click on the Map Layers tab. Turn-on the Plate Boundaries layer by clicking on the check box. f. Students should click the Map Legend tab in the toolbox menu to view the map legend. The color of the boundary indicates the type of plate boundary. g. Ask students to examine the patterns of the Surface Heat Flow layer and to compare the heat flow patterns to the location and types of plate boundaries. They should realize the highest surface heat flow is along divergent plate boundaries. Instruct students to answer Questions #2-4 on their investigation sheets. Step 3: Discover the relationship between surface heat flow and the age of the ocean floor. As heat is released at divergent boundaries, the sea floor spreads apart along both sides of the midocean ridges and new crust is added. This creates symmetry of ocean age on each side of the divergent boundary. In this step, students learn the hottest crust is the youngest crust and use the profile tool to observe the symmetry in age and bathymetry across the boundary. Copyright © 2012 Environmental Literacy and Inquiry Working Group at Lehigh University 3 Tectonics Investigation 3: Teacher Guide 4 a. Instruct students to click on the Map Layers tab in the toolbox menu. They will turn-off the Surface Heat Flow layer and activate the Age of the Ocean Floor layer by clicking on the check boxes. b. Students should click the Map Legend tab in the toolbox menu to view the map legend. The color indicates the age of the ocean floor at the location. Note that you will need to show students how to use the scroll bar to see that the legend extends down to 280 m.y. c. For this step, students should focus on the Mid-Atlantic Ridge in the North Atlantic Ocean. Click on the Map Navigation Tools tab in the toolbox menu. Select Mid-Atlantic Ridge from the list of bookmark locations. Instruct students to answer Question #5 on their investigation sheets. d. Next, students will compare the age of the ocean floor with the surface heat flow using the swipe tool. Copyright © 2012 Environmental Literacy and Inquiry Working Group at Lehigh University Tectonics Investigation 3: Teacher Guide 5 e. Explicitly model how to use the swipe tool with your students. First, click on the Map Layers tab in the toolbox menu and activate the Surface Heat Flow layer by clicking on the check box. f. Next, click on the Swipe Tool tab in the toolbox menu. i. From the “Choose Layer to Swipe” drop down menu, select Surface Heat Flow. ii. Next, click on to activate the swipe tool. Then corner to hide the toolbox menu so they can see the whole map. in the upper right hand iii. Using the mouse, click and drag the divider across the map. As you drag the swipe tool, the surface heat flow layer is removed, revealing the age of the ocean floor underneath that layer. Instruct students to answer Question #6 on their investigation sheets. g. When they are finished, students will click on the toolbox menu and then click in the upper right hand corner to show in the Swipe Tool tab to turn the tool off. The elevation of the seafloor is also related to surface heat flow and the age of the ocean floor. Younger ocean floor is warmer, and therefore more buoyant and sits at higher elevations. As the ocean floor cools and spreads away from the divergent boundary, it sinks and decreases in elevation. To understand this relationship, students will use the elevation profile tool to draw elevation profiles. Implementation suggestion: Before you begin this step, we recommend that you explicitly model how to interpret an elevation profile graph from a profile line drawn on the map. Reading an Elevation Profile: All elevations below sea level will be negative numbers, while elevations above sea level will be positive numbers. Sea level is at 0 meters elevation. A deeper sea floor elevation corresponds to a higher negative number. A shallower sea floor elevation corresponds to a lower negative number. A point on an elevation profile at – 3000 meters means that the elevation of the sea floor at that point is Copyright © 2012 Environmental Literacy and Inquiry Working Group at Lehigh University Tectonics Investigation 3: Teacher Guide 6 3000 meters below sea level. Likewise, a point on an elevation profile at – 1000 meters means that the sea floor elevation at that point is 1000 meters below sea level. -3000 meters is deeper than -1000 meters. h. Instruct students to click on the Map Layers tab in the toolbox menu and turn-off the Surface Heat Flow and Age of the Ocean floor layers. i. First, ask students to look at the relief shading in the oceans as displayed on the GIS base map. Darker shades of blue represent lower elevations and lighter shades of blue represent higher elevations. If student have trouble seeing the relief shading, instruct them to turn on the Enhanced Bathymetry/Topography layer. This layer will create a stronger contrast between different elevations. j. Next, to help students observe the ocean bathymetry, instruct students to draw a few elevation profiles across the Atlantic Ocean. k. Instruct students to click on the Elevation Profile tab in the toolbox menu. l. To draw a line, students should click on . On their maps, they will click once to start drawing a profile, and double-click to finish the profile line. An elevation profile of the line they defined will appear in the Elevation Profile tab. They can place their cursor on the elevation profile to view corresponding points along the profile line on their maps. We recommend that you explicitly model how to use the elevation profile tool with your students. m. After drawing a few profiles, instruct students to click on in the Elevation Profile tab. This will draw a preset profile in the North Atlantic that corresponds with the profile in question #6 on their investigation sheets (see image below). n. Next, instruct students to click on the Map Layers tab in the toolbox menu and turn-on the Age of the Ocean Floor layer. Copyright © 2012 Environmental Literacy and Inquiry Working Group at Lehigh University Tectonics Investigation 3: Teacher Guide 7 Instruct students to answer Questions #7-9 on their investigation sheets. Implementation Suggestion: Some students may require additional scaffolding to interpret the age of the ocean floor in the elevation profile display for item #7. We suggest you start at the Mid-Atlantic Ridge to first identify the age of the ocean floor with your students. Next, note to students that the age of the ocean floor is symmetrical as it moves away from the Mid-Atlantic Ridge. o. When they are finished, students should click on the tool off. in the Elevation Profile tab to turn Step 4: Learn about surface heat flow near hotspots. Most of the Earth’s heat is released at plate boundaries, but some volcanoes form hotspots. A hotspot is an area where hot material from deep within the mantle rises and melts through a lithospheric plate. Hotspot volcanoes can occur in the middle of a plate far away from plate boundaries. They can also occur on or near the plate boundary (e.g. Iceland). In this step, students will learn which plates have the most hotspots and how lithosphere thickness and plate speed affect hotspot abundance. a. Instruct students to click on the Map Layers tab in the toolbox menu and turn-off the Age of the Ocean Floor layer. Instruct them to activate the Hot Spots layer by clicking on the check box. b. To view the map legend, students should click the Map Legend tab in the toolbox menu. A red and yellow circular target marks each hotspot. c. Instruct students to use the zoom tool on the left side of their maps to zoom out so they can see the entire map. Instruct students to answer Questions #10-11 on their investigation sheets. To answer question #10, students will need to click on their maps to learn the names of two plates with the most hotspots. Copyright © 2012 Environmental Literacy and Inquiry Working Group at Lehigh University Tectonics Investigation 3: Teacher Guide 8 a. Next, instruct student to click on the Map Layers tab in the toolbox menu and turn-on the Global Plate Vectors layer. b. Explain to your students that the arrow head direction points in the direction the plate is moving. The length of the tail represents how fast the plate is moving. A longer tail means the plate is moving faster. Instruct students to answer Questions #12-13 on their investigation sheets. For questions #13, direct students towards the lithospheric thickness layer. Copyright © 2012 Environmental Literacy and Inquiry Working Group at Lehigh University
