ce_Word-2010-Overview
advertisement
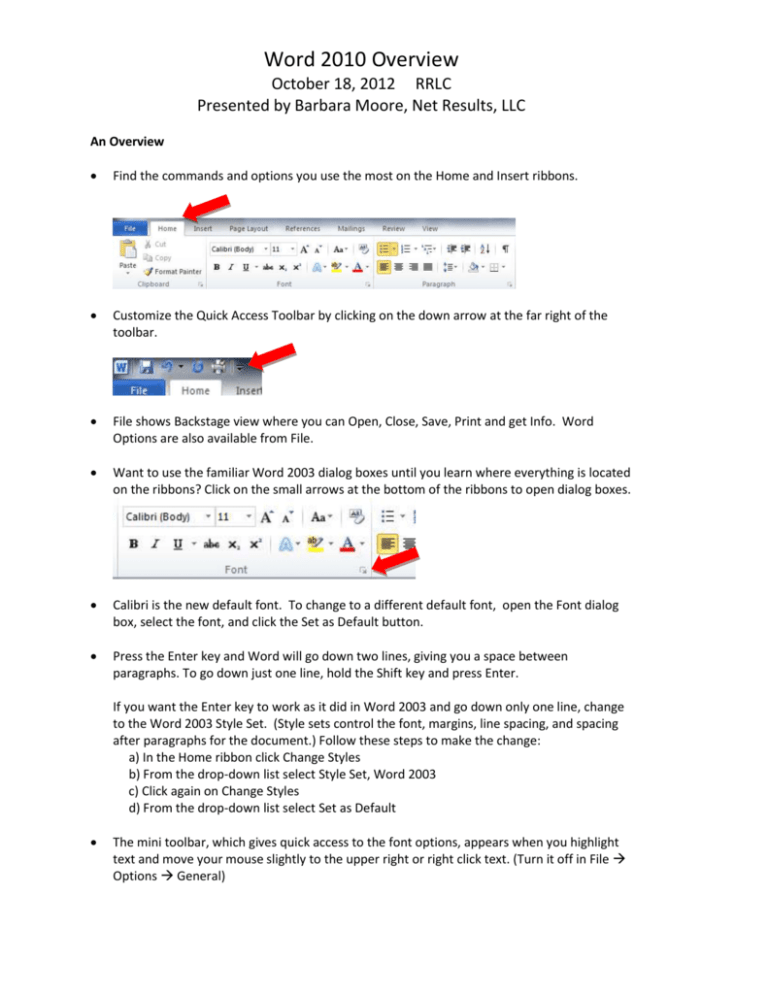
Word 2010 Overview October 18, 2012 RRLC Presented by Barbara Moore, Net Results, LLC An Overview Find the commands and options you use the most on the Home and Insert ribbons. Customize the Quick Access Toolbar by clicking on the down arrow at the far right of the toolbar. File shows Backstage view where you can Open, Close, Save, Print and get Info. Word Options are also available from File. Want to use the familiar Word 2003 dialog boxes until you learn where everything is located on the ribbons? Click on the small arrows at the bottom of the ribbons to open dialog boxes. Calibri is the new default font. To change to a different default font, open the Font dialog box, select the font, and click the Set as Default button. Press the Enter key and Word will go down two lines, giving you a space between paragraphs. To go down just one line, hold the Shift key and press Enter. If you want the Enter key to work as it did in Word 2003 and go down only one line, change to the Word 2003 Style Set. (Style sets control the font, margins, line spacing, and spacing after paragraphs for the document.) Follow these steps to make the change: a) In the Home ribbon click Change Styles b) From the drop-down list select Style Set, Word 2003 c) Click again on Change Styles d) From the drop-down list select Set as Default The mini toolbar, which gives quick access to the font options, appears when you highlight text and move your mouse slightly to the upper right or right click text. (Turn it off in File Options General) 2 To insert a Page Number: o On any page but the first page, go to the Insert ribbon, click Page Number and select where on the page you want the number to appear o The Header & Footer Design ribbon appears – check Different First Page if you do not want numbering on the first page Set margins from the Page Layout ribbon. Live Preview lets you see changes – such as font options, styles - with mouse overs. Word documents are saved in a new file format with the extension .docx. File Save As gives you the option to save in the Word 97 – 2003 file format. Word documents may be saved as PDFs. Want to hide the ribbon to give you more screen space? Double click on the ribbon tab that you have open to minimize the ribbon. The tabs remain visible. Click a tab and the ribbon appears but will disappear when you are done using it. To make the ribbons visible again, double click on any tab. Use the Navigation Pane (open via the View ribbon) to search your document. Insert a Table 1. Click in the text where you want the ribbon 2. Insert ribbon Table icon select one of three ways to insert a table: 1) select cells from a grid, 2) Insert table or 3) Draw table (see steps below) Steps to draw a table: a. Insert ribbon click the down arrow for Table Draw Table your mouse pointer becomes a pencil b. Click and drag a rectangle for the outer boundaries of the table c. Using the pencil draw the columns and rows inside the table. d. Use either Undo or the eraser to delete a line. Click on the table and then click on the Design ribbon under Table Tools. You will find the eraser in the Design ribbon. Your mouse pointer becomes an eraser. Click on a line and the line will be erased. e. Double click to go back to a mouse pointer 3. Type row and column headings – change the font color, alignment and bold 4. Click on the table and two new ribbons appear under Table Tools: 1) Design and 2) Layout; The table handle also appears in the upper left corner 3 5. Use the Design ribbon to select a Table Style. In the Table Style Options section of the ribbon, be sure that Header Row, First Column and Banded Rows are selected. 6. Use the Design ribbon to remove borders for the whole table: Select the table by clicking on the table handle drop down for Borders No Border 7. Add a border to one cell (click inside the cell drop down for Borders Outside Borders 8. Add a background color to a cell: Click inside the cell Shading 9. Use the Layout ribbon to insert rows and columns, delete rows and columns, and evenly distribute rows and columns 10. Use the Layout ribbon to align text within a cell 11. Sort text or data in a table: Select the table Layout ribbon Sort 12. Insert clip art in one cell: Click in the cell Insert ribbon Clip Art search for the clip art drag to cell and resize Create a Letter Using Mail Merge Using Data from an Excel File 1. Click the Mailings ribbon – stay on this ribbon for the following steps 2. Click Start Mail Merge Letters 3. Click Select Recipients Use Existing List the Select Data Source window opens browse to the Excel file Open 4. The Select Table window opens. Select the worksheet you want OK 5. Click Edit Recipient List and the Mail Merge Recipients window opens (see image below). In this window you can uncheck records that you do not want to include as well as sort and filter the recipients. 6. You type everything in the letter that is not a field name – including punctuation. Do not type in a field name. Instead, click on the small arrow below Insert Merge Field (Write & Insert Fields section). A list of the fields in the Excel spreadsheet will appear. Select the field you want. The field is added to your letter inside double angle brackets. 7. Click Preview Results to see the letter with the field names replaced with data. In the Preview Results section you can click through all your letters one-by-one. 8. Click Finish & Merge Edit individual documents keep All selected and click OK. You now have a Word document containing all the letters. 4 Insert a Screenshot or Screen Clipping Use Screenshot to capture a window that is open on your computer and insert into your Word document Use Screen Clipping to capture a portion of a window that is open on your computer and insert into your Word document Note: The windows cannot be minimized Screenshot 1. In Word, go to the Insert ribbon click Screenshot and a list of Available Windows will appear 2. Click the Window you want 3. Resize and position the image in your document Screen Clipping 1. On the Insert ribbon click Screenshot Screen Clipping 2. The window opens (it is frosted over) and your mouse pointer becomes a crosshair. Select the part of the window that you want 3. Resize and position the image in your document Paste Better paste options for copying information from a web page or PDF Option 1: Click in the document where you want to paste down arrow for Paste (Home ribbon) move your mouse over the three Paste Options (Keep Source Formatting, Merge Formatting, and Keep Text Only) for live preview Select the option you want Option 2: Ctrl V or right click Paste in the document to paste the text click the paste icon that appears at the bottom right corner of the text move your mouse over the three Paste Options for live preview Select the option you want To make a specific Paste Option the default: Click the down arrow for Paste Set Default Paste opens the Words Options window stay on the Advanced tab and go to the section for Cut, copy, and paste Text Effects 1. 2. 3. 4. Select the text In the Home ribbon, click Text Effect Select the Effect you want To remove an effect: Select the text Clear Formatting (an eraser icon on the Home ribbon) 5 Use Gradient Fill for a Font Color 1. Select the text and give the font a color 2. In the Home ribbon click the down arrow next to Font Color Gradient move your mouse over the different variations and select the one you want 3. For more control – select More Gradients … and in the Format Text Effects window select Text Fill on the left and Gradient fill on the right. Select Preset Colors or manually set the colors, type, direction, angle, etc. or click Preset Colors File or Backstage View Info – note properties, permissions, sharing (good place to check if you use track changes) Recent – shows recent documents and recent places; also can change how many recent documents appear on the left ; Note: Recover Unsaved Documents New – Templates are located here Print – printer options, page setup and print preview Save and Send Options – note the Customize Ribbon and Quick Access Toolbar options October 18, 2010 Barbara Moore, Net Results, LLC 585.748.1850 bmoore@NetResultsUSA.com www.lilnkedin.com/in/barbaramooreny

