AdditionalCSConcepts..
advertisement
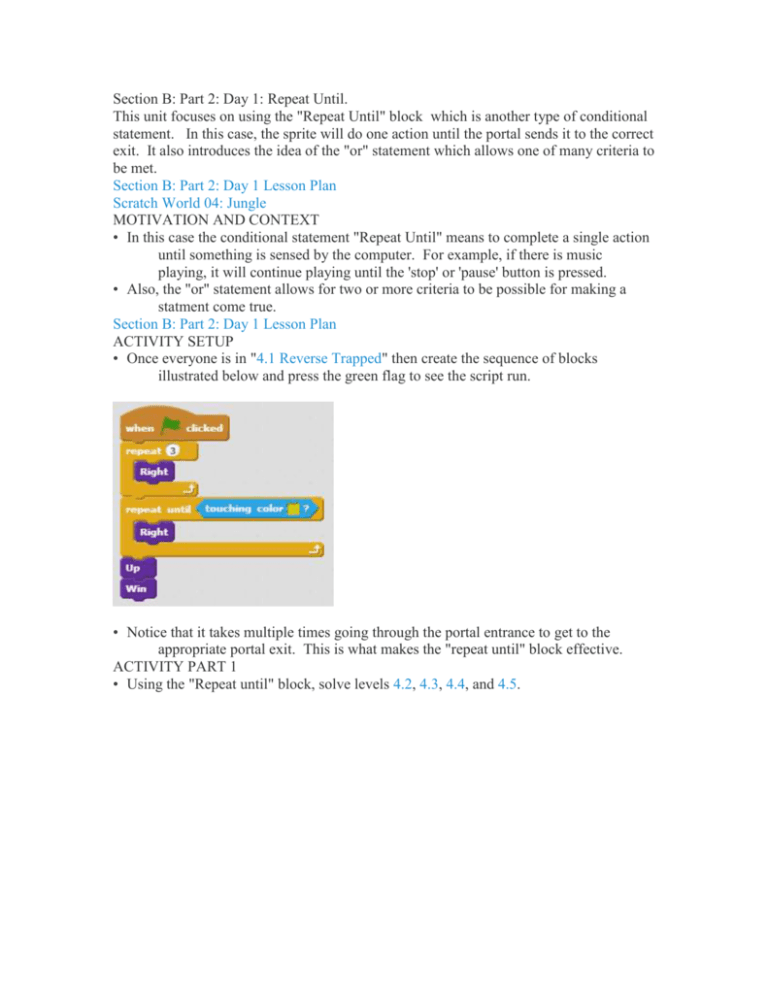
Section B: Part 2: Day 1: Repeat Until. This unit focuses on using the "Repeat Until" block which is another type of conditional statement. In this case, the sprite will do one action until the portal sends it to the correct exit. It also introduces the idea of the "or" statement which allows one of many criteria to be met. Section B: Part 2: Day 1 Lesson Plan Scratch World 04: Jungle MOTIVATION AND CONTEXT • In this case the conditional statement "Repeat Until" means to complete a single action until something is sensed by the computer. For example, if there is music playing, it will continue playing until the 'stop' or 'pause' button is pressed. • Also, the "or" statement allows for two or more criteria to be possible for making a statment come true. Section B: Part 2: Day 1 Lesson Plan ACTIVITY SETUP • Once everyone is in "4.1 Reverse Trapped" then create the sequence of blocks illustrated below and press the green flag to see the script run. • Notice that it takes multiple times going through the portal entrance to get to the appropriate portal exit. This is what makes the "repeat until" block effective. ACTIVITY PART 1 • Using the "Repeat until" block, solve levels 4.2, 4.3, 4.4, and 4.5. Section B: Part 2: Day 1 Lesson Plan REFLECTION PART 1 • Write the following code for "4.6 The Rose-Eyed Man" • Notice that it can be touching the yellow OR the orange. This "or" statement allows both exits to end the "Repeat Until" loop. Section B: Part 2: Day 1 Lesson Plan ACTIVITY PART 2 • Using the "Or" block, as well as "Repeat Until", complete levels 4.7, 4.8, 4.9, and 4.10. REFLECTION PART 2 • In this section the "Or" statement allowed from more possibilities to be met for the "Repeat Until" block. Multiple "Or" statements can be linked together to allow multiple possible exits to break the "Repeat Until". "Repeat Until" allows for something to continue to run unless the criteria is met, so it is a constant part of many programs. Section B: Part 2: Day 2: Named Sprites and Costumes This unit focuses on using the names of sprites for sensing rather than the color background. It also shows how the computer can use conditionals to only let specific things things happen, like have the sprite go through the portal. Section B: Part 2: Day 2 Lesson Plan Scratch World 05: Ghost MOTIVATION AND CONTEXT • In this level we use the specific names of the sprites for sensing. In classic programming everything is named, rather than being identified by color, which is the focus for this world. • Also, now the portals are limited to only allow the sprite to go through if it is in the "ghost" costume. It is an example of the computer using the "if and only if" conditional. Section B: Part 2: Day 2 Lesson Plan ACTIVITY SETUP • Once everyone is in "5.1 Trapped again?" the create the sequence of blocks illustrated below and press the green flag to see the script run. • Notice that we can use the names "portal exit1" and "portal exit2" instead of portal background colors. Section B: Part 2: Day 2 Lesson Plan ACTIVITY PART 1 • Using "touching" block, solve levels 5.2, 5.3, 5.4, and 5.5. Section B: Part 2: Day 2 Lesson Plan REFLECTION PART 1 • Write the following code for "5.6 How lucky are you?" • Notice how the sprite must change into it's ghost costume before it passes through the entrance portal. Section B: Part 2: Day 2 Lesson Plan ACTIVITY PART 2 • Using the "switch costume to", complete levels 5.7, 5.8, 5.9, and 5.10. REFLECTION PART 2 • By switching the costume, it completes the conditional statement built into the puzzle. If, and only if, the costume is the ghost will the sprite be able to get through the portal. This concept is similar to the other portals, but now it can't go through the portal unless its in the correct form, rather than just being limited to a single portal per costume. Section B: Part 2: Day 3: Horizontal and Vertical Motion and Broadcasting. This unit takes away the "Up", "Down", "Left", and "Right" blocks, leaving "Horizontal Block" and "Vertical Block". It also introduces the concept of broadcasting to activate switches. Section B: Part 2: Day 3 Lesson Plan Scratch World 06: Space MOTIVATION AND CONTEXT • The concept of two-directional grid is the basic idea behind the Cartesian coordinate system. In this way up is positive in the vertical direction, while down is negative in the vertical direction. Left is negative in the horizontal direction and right is positive in the horizontal direction. • Also, broadcasting is an effective way of interacting with the programs built into the computer. Section B: Part 2: Day 3 Lesson Plan ACTIVITY SETUP • Once everyone is in "6.1 Back to basics" then create the sequence of blocks illustrated below and press the green flag to see the script run. • Since it goes up and right both values are positive. ACTIVITY PART 1 • Using "Horizontal Block" and "Vertical Block" solve levels 6.2, 6.3, 6.4, and 6.5. Section B: Part 2: Day 3 Lesson Plan REFLECTION PART 1 • Write the following code for "6.6 Switch it!" • Notice how when the sprite broadcasts "switch" it opens the piece of the wall so the sprite can pass through. Section B: Part 2: Day 3 Lesson Plan ACTIVITY PART 2 • Using "broadcast switch", complete levels 6.7, 6.8, 6.9, and 6.10. REFLECTION PART 2 • In this section the "broadcast" block was effective in sending a message to the puzzle to change to situation to make it possible to solve. Broadcasting is not only an effective method for interacting with the computer, but it is also effective if communicating between programs. • Broadcasting is what ends all of the scripts in the puzzles, as well as the way that all programs interact. Section B: Part 2: Day 4: Build Your Own Maze 3 in Scratch This unit allows you to create your own maze in Scratch using a template. Section B: Part 2: Day 4 Lesson Plan Scratch World 00: Part 2 Day 4 Template Feedback Worksheet MOTIVATION AND CONTEXT • After working through all the puzzles in Worlds up to 06, you should have a grasp on some of the more advanced concepts of sensing and interactions. • In this section you will not only make your own puzzle, but you will also be able to post it within the Scratch community for other classmates to play. Section B: Part 2: Day 4 Lesson Plan ACTIVITY SETUP • Have everyone get to World 00: Part 2 Day 4 Template. • Your screen should look like this. If it does, you're ready to make your own puzzle. Section B: Part 2: Day 4 Lesson Plan ACTIVITY PART 1 • From previous template lessons you know how to manipulate and draw all of the different sprites. • Now with multiple villains, they can each go a different direction. • Make your own puzzle with unique sprites and villain motions. REFLECTION PART 1 • There really wasn't much information that makes that first section any different from the last template lesson, so now we will post your puzzle on Scratch. • At the top the puzzle is a button that says "Remix". Click it and share it in your Scratch account so that your classmates and the rest of the Scratch community can see what you made. ACTIVITY PART 2 • After posting your puzzle, have at least 2 classmates try out your puzzle and fill out the Feedback Worksheet. • Make changes accordingly to the feedback you recieve. REFLECTION PART 2 Even after something is published on Scratch it can be worked on so that people can continually update their projects. Section B: Part 2: Day 5: Repeating Patterns and Playing Sounds This unit focuses on repeating patterns to traverse through the puzzles. It also introduces adding audio in the maze to allow walls to disappear. Section B: Part 2: Day 5 Lesson Plan Scratch World 07: Arctic MOTIVATION AND CONTEXT • In this case we are expanding the use of the "repeat" block to more than one motion block. "Repeat" can be around any number of blocks, so a complex pattern can be repeated throughout a script. • Audio is a very popular component of Scratch and other games. In this case we introduce audio in the form of the "open sesame" button which allows walls to disappear due to the audio playing. Section B: Part 2: Day 5 Lesson Plan ACTIVITY SETUP • Once everyone is in "7.1 The Trek", create the sequence of blocks illustrated below and press the green flag to see the script run. • Notice how the "down and over" pattern is inside of the repeat, cutting down on the number of blocks needed. ACTIVITY PART 1 • Using the "Repeat" block for larger patterns, solve levels 7.2, 7.3, 7.4, and 7.5. REFLECTION PART 1 • Write the following code for "7.6 Impass" • Notice that "Open Sesame" plays an audio clip which causes a wall to disappear, allowing the sprite to get to the end. ACTIVITY PART 2 • Using the audio block "Open Sesame", complete levels 7.7, 7.8, 7.9, and 7.10. REFLECTION PART 2 • In this section the majority of the puzzles (7.10 being the exception) required audio to be played to trigger the background change. Audio in games are strictly for the person's benefit. The audio can be a trigger, but it is there for someone to listen to and react to. Section B: Part 2: Day 6: One Directional Motion and Rotation This unit further studies the fundamentals of two dimensional motion by only allowing you to travel in a single direction and then turn. Section B: Part 2: Day 6 Lesson Plan Scratch World 08: Mech MOTIVATION AND CONTEXT • When motion is broken down to it's most basic components it is movement in a single direction, and then turning to change direction. • In many games there is only a single direction in which you can move, but you can turn to go in another direction. This world challenges you to do that in a puzzle setting you are familiar with. Section B: Part 2: Day 6 Lesson Plan ACTIVITY SETUP • Once everyone is in "8.1 Basic Controls" then create the sequence of blocks illustrated below and press the green flag to see the script run. • Notice that the sprite starts facing the right, so it has to turn before it moves. ACTIVITY PART 1 • Using "Block" and "Turn 90* Clockwise", solve levels 8.2, 8.3, 8.4, and 8.5. REFLECTION PART 1 • Write the following code for "8.6 Luck of the Pharohs" • Since you no longer have the "Turn 90* Clockwise" you must use the built-in turning blocks. ACTIVITY PART 2 • Using the "Turn ( ) degrees" block, complete levels 8.7, 8.8, 8.9, and 8.10. REFLECTION PART 2 • This section has been trying to separate you from the classic puzzles that you have been getting used to. • By using the "turn ( ) degrees" block, more freedom is achieved in Scratch. Turning can be in either direction now, breaking the game down to its most basic components. REALISTIC MOTION IN VIDEO GAMES • One of the main goals of video games is to make the experience as realistic as possible. By having the motion based on a single direction and turning it makes the experience more realistic. Section B: Part 2: Day 7: No Grid This unit takes away the grid that was the foundation for the puzzles and requires you to figure out distances without it. Section B: Part 2: Day 7 Lesson Plan Scratch World 09: Air MOTIVATION AND CONTEXT • This optional world takes more of the framework away from the puzzles that have been build previously. • Here there is no longer a grid, as well as taking away the classic motion block. Now motion is pixel by pixel. Section B: Part 2: Day 7 Lesson Plan ACTIVITY SETUP • Once everyone is in "9.1" create the sequence of blocks illustrated below and press the green flag to see the script run. • Notice how even without the grid you can use the block system that you have gotten used to from the previous puzzles. ACTIVITY PART 1 • Solve levels 9.2, 9.3, 9.4, and 9.5. REFLECTION PART 1 • Write the following code for "9.6 Thirty steps is a block" • Notice that each step moves a pixel, and there are thirty pixels to a block as a safe estimation. It will move in whichever direction it is pointing, so use the built in "turn ( ) degrees" for any turning. ACTIVITY PART 2 • Using the "step" block, complete levels 9.7, 9.8, 9.9, and 9.10. REFLECTION PART 2 • In this section we took out all of the framework that you have been used to for the other puzzles. Without the block system that had been established, motion was more difficult at first, but then more flexable. • This is the end of the new concepts that are planned for the Scratch Puzzles. The next lesson is another template lesson, in which you build your own dance and your own background music. The lesson after that is challenging puzzles in Scratch. Section B: Part 2: Day 8: Challenging Concepts This unit has no focus except learning more about the mechanics behind the puzzles. Each puzzle is different with a different lesson. Section B: Part 2: Day 8 Lesson Plan Scratch World 10: Computer MOTIVATION AND CONTEXT • There is no specific context for this level, but it allows to look deeper on how the puzzles were programmed in Scratch. • NOTE: The following information are hints on how to solve each puzzle. Try to do it on your own before looking at these. 10.1 Huh? • This level requres a switch to open the wall by the end. (Don't worry, the wall doesn't come back.) 10.2 Two Choices • This level has two switches. (One of which has the wall come back after 7 seconds.) 10.3 Intrusion Detection • This level is all about timing near the exit. It may take a few tries, but it will work. 10.4 Proximity Alarm • Just try to get to the end, you will get it. 10.5 Dante's Level • Have cases for each portal exit and you will be able to traverse through the whole maze. (Perhaps you could put it in a "Forever" loop to check until it is done.) 10.6 Be vewy vewy quiet... • This one is a bit difficult because now the villain dens can kill you as well. Also, the villains are only activated at certain times. 10.7 Do you know where you are going? • The maze is in a shade of blue that is just barely different than the background, but the background will flash to black walls when you hit it. 10.8 Harveyashi Muddru • A parody of the Kobayashi Maru from Star Trek, this is an impossible puzzle. Take a look at the other sprites in the puzzle to see if you can change anything to make it possible. (Kirk only beat it by cheating anyways.) 10.9 Everything you ever wanted, and then some • Honestly, this is just a long, straightforward puzzle. Enjoy. 10.10 Welcome to the Sandbox • This level is only there for you to play around with the puzzle setup. It's a template for you to see how everything works. Feel free to scroll down to see all of the code which causes the puzzles to run. REFLECTION • These were just some more complex ideas that we didn't want to put into full levels, but we thought you should figure out what's going on in the background. • From completing all of these levels, you should have a firm foundation of Scratch as well as the basic ideas of programming. Section B: Part 2: Day 9: Build Your Own Maze 4 in Scratch The unit allows you to create your own maze in Scratch using a template. This template also allows you to create your own music for the background as well as your own dance for when the sprite wins. Section B: Part 2: Day 9 Lesson Plan Scratch World 00: Part 2 Day 9 Template MOTIVATION AND CONTEXT • At this point, you've done everything that we have planned for you in Scratch puzzles we have built, so it is time for you to build your own. • By adding background music and a unique win dance you will have the capabilities to change anything that has been established for these puzzles. ACTIVITY SETUP • Have everyone get to World 00: Part 2 Day 9 Template. • Your screen should look like this. If it does, you're ready to make your own puzzle. Section B: Part 2: Day 9 Lesson Plan ACTIVITY PART 1 • Make a dance for your sprite using the "turn ( ) degrees" and some of the blocks under the "looks" tab. • Be careful that it doesn't leave it's square when it dances in case the end is near a wall. (If the dance is too big it will hit a wall when it is dancing and reset.) REFLECTION PART 1 • The next part of this unit is going into things that you have probably not worked with in Scratch so far. • When it comes to music, you have two choices. You can upload your own song, or write one in Scratch. • To upload a song, when you have selected the sprite click on the "Sounds" tab, and you can click the folder icon to upload a song from your computer. Then go back to the "Scripts" tab, and write the following script: • To write your own song, use the notes and instruments in the "Sound" block section. Put your tune in the forever loop above (instead of an uploaded song). ACTIVITY PART 2 • Write or upload music to your maze, and then using the skills from previous templates, create and post your own puzzle on your Scratch profile. REFLECTION PART 2 • The "Forever" loop allows the music to play through the entire puzzle. • By adding the music and dance, the puzzle is even more unique for other people to play.
