Lab 20 Charles` Law
advertisement
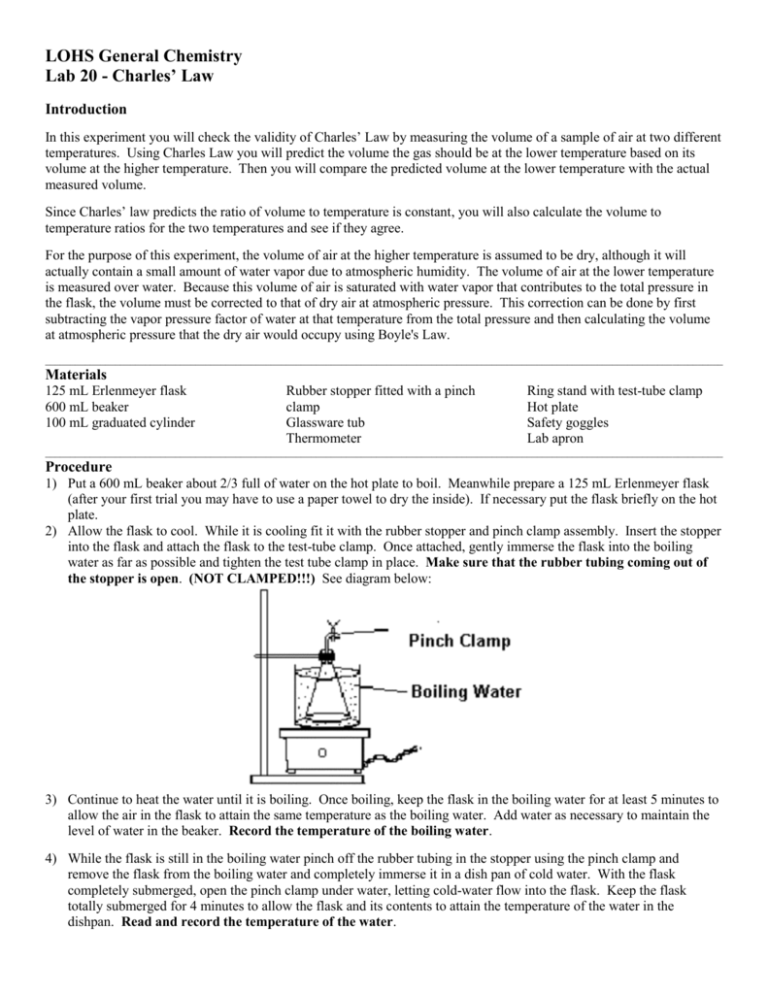
LOHS General Chemistry Lab 20 - Charles’ Law Introduction In this experiment you will check the validity of Charles’ Law by measuring the volume of a sample of air at two different temperatures. Using Charles Law you will predict the volume the gas should be at the lower temperature based on its volume at the higher temperature. Then you will compare the predicted volume at the lower temperature with the actual measured volume. Since Charles’ law predicts the ratio of volume to temperature is constant, you will also calculate the volume to temperature ratios for the two temperatures and see if they agree. For the purpose of this experiment, the volume of air at the higher temperature is assumed to be dry, although it will actually contain a small amount of water vapor due to atmospheric humidity. The volume of air at the lower temperature is measured over water. Because this volume of air is saturated with water vapor that contributes to the total pressure in the flask, the volume must be corrected to that of dry air at atmospheric pressure. This correction can be done by first subtracting the vapor pressure factor of water at that temperature from the total pressure and then calculating the volume at atmospheric pressure that the dry air would occupy using Boyle's Law. _______________________________________________________________________________________________________________________________________ Materials 125 mL Erlenmeyer flask 600 mL beaker 100 mL graduated cylinder Rubber stopper fitted with a pinch clamp Glassware tub Thermometer Ring stand with test-tube clamp Hot plate Safety goggles Lab apron _______________________________________________________________________________________________________________________________________ Procedure 1) Put a 600 mL beaker about 2/3 full of water on the hot plate to boil. Meanwhile prepare a 125 mL Erlenmeyer flask (after your first trial you may have to use a paper towel to dry the inside). If necessary put the flask briefly on the hot plate. 2) Allow the flask to cool. While it is cooling fit it with the rubber stopper and pinch clamp assembly. Insert the stopper into the flask and attach the flask to the test-tube clamp. Once attached, gently immerse the flask into the boiling water as far as possible and tighten the test tube clamp in place. Make sure that the rubber tubing coming out of the stopper is open. (NOT CLAMPED!!!) See diagram below: 3) Continue to heat the water until it is boiling. Once boiling, keep the flask in the boiling water for at least 5 minutes to allow the air in the flask to attain the same temperature as the boiling water. Add water as necessary to maintain the level of water in the beaker. Record the temperature of the boiling water. 4) While the flask is still in the boiling water pinch off the rubber tubing in the stopper using the pinch clamp and remove the flask from the boiling water and completely immerse it in a dish pan of cold water. With the flask completely submerged, open the pinch clamp under water, letting cold-water flow into the flask. Keep the flask totally submerged for 4 minutes to allow the flask and its contents to attain the temperature of the water in the dishpan. Read and record the temperature of the water. 5) In order to equalize the pressure of the air in the flask with that of the atmosphere, bring the water level in the flask to the same level as the water in the pan by raising or lowering the flask. See the diagram below. With the water levels equal, pinch the clamp to close the flask. Remove the flask from the water and set it on the lab bench. 6) Using a graduated cylinder measure and record the volume of water that was drawn into the flask. Then fill the flask completely with water and measure the total volume of the flask by measuring the volume of water that it holds (only after your 1st trail). 7) Dry the flask and repeat the procedure for four trials. 8) You may leave your materials at your lab station. Observations and Data Trial 1 Trial 2 Trial 3 Trial 4 1.Atmospheric Pressure. (record from a barometer) 2.Temperature of cold water 3.Vapor Pressure of water for above Temperature 4.Temperature of boiling water 5.Volume of the flask 6.Volume of water absorbed by the flask Calculations 1) Calculate the pressure of the air at the lower temperature by subtracting the vapor pressure of water (at the temperature of the cold water) from the atmospheric pressure. 2) Calculate the final volume of “wet” air at the lower temperature by subtracting the water absorbed from the total volume of the flask. 3) Using Boyle's Law correct the volume of wet air to what it should be if it were dry Volume of dry air at low temperature = (Volume of wet air) (Adjusted Pressure of dry air) (Atmospheric Pressure) 4) Predict the expected final volume at the lower temperature from the initial volume at the higher temperature using Charles' Law: Predicted Volume at low temperature = (Volume at high temp) (Lower temperature (in Kelvin)) Higher Temperature (in Kelvin) 5) Calculate the percent error between calculation 3 and calculation 4 above, using calculation 4 as the true value. 6) Compare the volume/temperature ratios for the two temperatures. 7) On graph paper plot the temperature and volumes for high temperature and the low temperature, putting the temperature in Celsius on the x-axis. Use values from -350°C to + 400 °C on your x-axis. Draw a straight line between the data points and extend it until it crosses the x-axis. At what temperature does it cross? What is the significance of this point? Sample Calculations This section is designed to help you with the calculations involved in the lab. The following is a Sample Data Table. The data was made up for purposes of illustration: Sample Data *Atmospheric pressure Volume of the Flask Temperature of the boiling water Temperature of the cold water Volume of water absorbed by the flask Volume of air at the low temperature *Vapor Pressure of water at 21 degrees 765.0 mm Hg 280 mL 100.0 oC 21.0 oC 60.0 mL =280-60 =220 mL 18.7 mm Hg Pressure Units Pressure in this example was measured in mm Hg. The vapor pressures of water were copied from the table I gave you in class. Calculations step by step 1) The air at the lower temperature is wet. Convert it to what the volume would be if it were dry. The process is as follows: a) First subtract the vapor pressure of water from the atmospheric pressure 765.0 mm Hg- 18.7 mm Hg = 746.3 mm Hg 2) Calculate the final volume of “wet” air at the lower temperature by subtracting the water absorbed from the total volume of the flask. 280 mL – 60 mL = 220 mL 3) Use Boyle’s Law by multiplying the volume at the lower temperature by a ratio of the pressure at the low temperature over the pressure at the high temperature 220 mL x (746.3 mm Hg/765 mm Hg) = 214.7 mL 4) Calculate what the predicted volume of the air would be at the low temperature based on Charles’ Law. This is the theoretical value. The process is as follows: Convert your temperatures to Kelvin 100oC + 273 = 373 K 21oC + 273 = 294 K Multiply the volume of the flask by a ratio of the low temperature divided by the high temperature (280 mL)(294K / 373K ) = 220.7 mL 5) Compare the two values: 220.7 mL– 214.7 mL = 6.0 mL a) Calculate Percent error = (6.0 mL/220.7 mL) x 100 = 2.7% 6) Compare the two values: V1 V2 220 mL 280 mL , with values substituted , these two ratios are almost equal! 294 K 377 K T1 T2
