Generic Health & Safety Risk Assessment Form for
advertisement
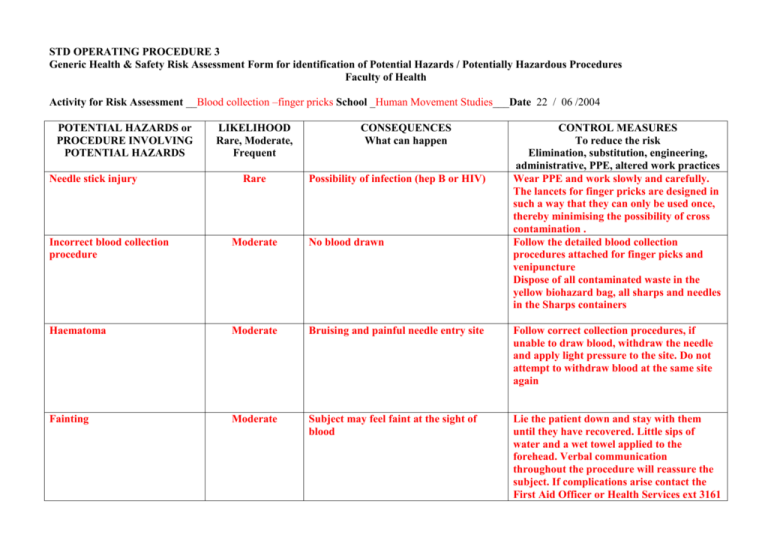
STD OPERATING PROCEDURE 3 Generic Health & Safety Risk Assessment Form for identification of Potential Hazards / Potentially Hazardous Procedures Faculty of Health Activity for Risk Assessment __Blood collection –finger pricks School _Human Movement Studies___Date 22 / 06 /2004 POTENTIAL HAZARDS or PROCEDURE INVOLVING POTENTIAL HAZARDS Needle stick injury LIKELIHOOD Rare, Moderate, Frequent Rare CONSEQUENCES What can happen Possibility of infection (hep B or HIV) CONTROL MEASURES To reduce the risk Elimination, substitution, engineering, administrative, PPE, altered work practices Wear PPE and work slowly and carefully. The lancets for finger pricks are designed in such a way that they can only be used once, thereby minimising the possibility of cross contamination . Follow the detailed blood collection procedures attached for finger picks and venipuncture Dispose of all contaminated waste in the yellow biohazard bag, all sharps and needles in the Sharps containers Incorrect blood collection procedure Moderate No blood drawn Haematoma Moderate Bruising and painful needle entry site Follow correct collection procedures, if unable to draw blood, withdraw the needle and apply light pressure to the site. Do not attempt to withdraw blood at the same site again Fainting Moderate Subject may feel faint at the sight of blood Lie the patient down and stay with them until they have recovered. Little sips of water and a wet towel applied to the forehead. Verbal communication throughout the procedure will reassure the subject. If complications arise contact the First Aid Officer or Health Services ext 3161 Given the risks identified, specify the Health & Safety training provided to staff and/or students undertaking this activity: The finger pricks are undertaken by students who are supervised after having had the procedure explained to them_. The attached procedure is given out at all the tutorials The workstations that are used by the students are covered with disposable bench cote, which is replaced constantly. The Lancets are sterile and are of a “one use” nature. Sharps containers are provided for the disposal of these. All students wear gloves during the procedure and these are disposed of in the path waste bags. _All students to attend 1.Life Sciences H&S course 2. QUT Health and Safety Advisory Services - Biosafety training ________________________________________________________________________________________________________ SKIN PUNCTURE PROCEDURE 1. The following supplies are needed - gloves, sterile cotton balls or gauze sponges, alcohol swabs, sterile lancets, capillary tubes or microcollection tubes, marking pen, micropore. 2. Introduce yourself to the patient and explain what procedure you will be performing 3. Settle the patient in a chair with arm rests. Ensure that they are comfortable. Do not position them on a high stool or chair because of the possibility of fainting Wash your hands, apply gloves 4. Choose a finger that is not cold, cynatic or swollen. If possible, prick the tip of the fourth, or ring finger of the nondominant hand. 5. Gently massage the finger five or six times from base to tip to aid blood flow. 6 With an alcohol swab, cleanse the ball of the finger. Allow to air dry. 7.Remove the protective cover from the lancet 9.Hold the patient’s finger firmly with one hand and make a swift deep puncture with the lancet halfway between the centre of the ball of the finger and its side. The cut should be made across the fingerprints to produce a large round drop of blood. 10. Wipe the first drop of blood away with a clean gauze or tissue. 11. Gently massage the finger from base to tip to obtain the proper amount of blood for the tests required. Blood flow is better and air bubbles are less likely if the puncture site is held downward and gentle pressure applied. 12. Dispose of all contaminated items eg swabs, wipes , gloves in a biohazard bag, the lancet is placed in the “Sharps container” 13. Clean gloves, lancets and wipes for every patient If the patient’s hands are cold, wrap them in warm-to-hot towel 10-15 min, or immerse the hand in warm water before the puncture is performed. A freeflowing puncture is essential to obtain accurate test results. Do not use excessive squeezing or massaging to obtain blood.
