Milling Tool Parameters Documentation
advertisement
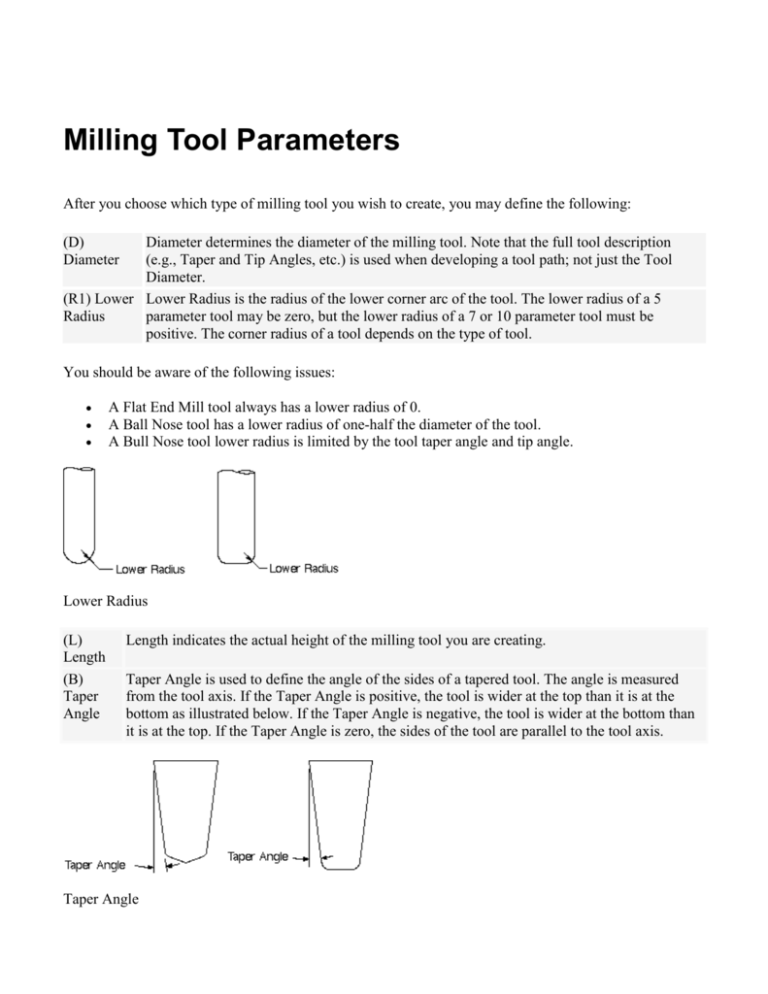
Milling Tool Parameters After you choose which type of milling tool you wish to create, you may define the following: (D) Diameter Diameter determines the diameter of the milling tool. Note that the full tool description (e.g., Taper and Tip Angles, etc.) is used when developing a tool path; not just the Tool Diameter. (R1) Lower Lower Radius is the radius of the lower corner arc of the tool. The lower radius of a 5 Radius parameter tool may be zero, but the lower radius of a 7 or 10 parameter tool must be positive. The corner radius of a tool depends on the type of tool. You should be aware of the following issues: A Flat End Mill tool always has a lower radius of 0. A Ball Nose tool has a lower radius of one-half the diameter of the tool. A Bull Nose tool lower radius is limited by the tool taper angle and tip angle. Lower Radius (L) Length (B) Taper Angle Length indicates the actual height of the milling tool you are creating. Taper Angle is used to define the angle of the sides of a tapered tool. The angle is measured from the tool axis. If the Taper Angle is positive, the tool is wider at the top than it is at the bottom as illustrated below. If the Taper Angle is negative, the tool is wider at the bottom than it is at the top. If the Taper Angle is zero, the sides of the tool are parallel to the tool axis. Taper Angle (A) Tip Tip Angle is the angle of the tip of the tool. This is a non-negative angle measured from a line Angle through the tool end point and perpendicular to the tool axis. If the Tip Angle is positive, the tool has a sharp point at the very bottom (like the vertex of a cone). Tip Angle (FL) Flute Length (X1) X Center R1 Flute Length is the measured distance between the beginning and end teeth of the flute. The flute length does not necessarily indicate the length of cut. X1 and Y1 define the center of the arc representing the lower radius of the tool profile. X Center R1 is the horizontal distance between the center of the lower corner arc and the tool axis; it can be positive (lower arc and its center on the same side of the tool axis) or negative (lower arc and its center on opposite sides of the tool axis) or zero. This parameter is only available for 7 and 10 parameter tools. Center of the Lower Arc (Y1) Y X1 and Y1 define the center of the arc representing the lower radius of the tool profile. Center R1 Y Center R1 is the vertical distance between the center of the lower corner arc and the tool end. The value must be non-negative. This parameter is only available for 7 and 10 parameter tools. (R2) Upper radius is the upper corner radius of the tool. The value must be positive. This Upper parameter is only available for 10 parameter tools. Radius Upper and Lower Radius (X2) X Center R2 X2 and Y2 define the center of the arc representing the upper radius of the tool profile. X Center R2 is the horizontal distance between center of the upper corner arc and the tool axis. It can be positive (upper arc and its center on the same side of the tool axis) or negative (upper arc and its center on opposite sides of the tool axis) or zero. This parameter is only available for 10 parameter tools. Center of the Upper Radius (Y2) Y Center R2 Number Flutes Direction X2 and Y2 define the center of the arc representing the upper radius of the tool profile. Y Center R2 is the vertical distance between the center of the upper corner arc and the tool end. The value must be non-negative. This parameter is only available for 10 parameter tools. Number Flutes is the number of flutes (2, 4, 6, etc.) specified for the cutting tool. This data is not currently used in the processors, but should be included to make tool libraries correct for future use. Direction may be set to one of the following: CLW allows you to define the tool that has a clockwise spindle direction. ZOFF CCLW allows you to define a tool that has a counterclockwise spindle direction. ZOFF indicates the value representing the Z axis offset distance (typically representing the differences in various tool lengths). The system uses this value to initialize the load tool Z offset post command. Enter a value to activate the LOAD/TOOL command for output. ADJUST Adjust Register is the LOAD/TOOL or TURRET Adjust Register Number,n and SET Adjust Register Register Number,n. The value you enter provides the location of the tool offset coordinates in the controller memory. Enter a value to activate the LOAD/TOOL or TURRET command for output. If you do not enter a value, then the associated ADJUST register for LOAD (or TURRET) and SET/ADJUST will be cancelled. CUTCOM Cutcom Register (Cutter Diameter Compensation Register Number) is the register number Register which contains the value that the system uses to adjust the tool path to allow for variation due to an undersized or oversized cutter or tool. This value initializes the CUTCOM post command and activates it for output only if you set one of the following parameters: Right, Left, or On. If you toggle this option off after you had previously specified a value, then the CUTCOM register number will be cancelled and the command deactivated. If, however, the command was previously activated for output without a register value, then the CUTCOM command will not be deactivated. This allows a previously active CUTCOM/LEFT or CUTCOM/RIGHT (with no register value) to remain active. Tool Number Catalog Number If CUTCOM is the referenced command, it will become active only if you have set one of the menu parameters: RIGHT, LEFT, or ON. This is the Number, n value used in the LOAD/TOOL command for the tool. You may define a tool using up to ten digits (to a maximum of 2147483647). Tool numbers cannot be negative. Subsequent output of LOAD/TOOL and SELECT/TOOL post commands includes all ten digits. In this option, only numbers are legal. Catalog Number allows you to either enter or remove a catalog number for the tool. You can enter as many as 20 characters (letters, numbers, periods and hyphens only) for the Catalog Number. This is a tool tracking number which you can use to retrieve tools. Manual Tool Change Holder Remove Catalog Number removes a previously specified catalog number. Manual Tool Change allows you to toggle on and off a stop for the tool to be changed manually. Use holder to select a right angle holder with a number between 1 and 6. The holder will be assigned in the postprocessor to indicate the orientation. There will be a mapping of the tool axis along the axis specified Text Status During CLS output the system adds this text to the LOAD or TURRET command. During postprocessing the system stores this text in a mom variable. Display Tool Display Tool graphically display the tool you are creating at the origin of the Work Coordinate System (WCS). Milling Tool When you set the Type to Milling Tool, the New option allows you to create tools for milling operations. You may create the following types of Milling Tools: Ball Mill Valid Cutter Shapes The 5, 7, and 10 parameter milling tools allow you to define a variety of differently shaped tools. These pictures represent the mathematical definitions of the valid shapes. Not all of the parameters in the pictures are used in the tool definition dialogs. The following cutter shape is valid if you choose to create a Barrel Cutter: Invalid Cutter Shapes The following figure illustrates some tool shapes that may not be defined in Unigraphics NX. The shapes a, b, c, d, f, and g are not valid because their surface normals intersect. Shape e is not valid because the length h is too small for the diameter d and the tip angle a. Milling Tool Rules Observe the following rules when you create a Milling tool: The values you enter for Diameter, Lower Radius, Length, Tip Angle, and Flute Length, must all be non-negative. The Taper Angle must be greater than -90 degrees and less than 90 degrees. The Tip Angle must be less than 90 degrees. The Taper Angle plus the Tip Angle be less than 90 degrees. The Flute Length must not be greater than the Length of the tool. The Number of Flutes must be positive. The Length must not be too small for the Diameter and Tip Angle. See the section Invalid Cutter Shapes, shape. The Lower Radius is constrained by the side (Tip Angle and Taper Angle, if any) and the bottom of the tool. The system displays an appropriate error message each time you deviate from the above restrictions. For example, if you enter a Diameter value of -.2000, the system displays the error message Diameter Cannot Be Negative. Choose OK and the system returns control to the data specification menu with the illegal data displayed. You can then enter the appropriate data. Only use the 7 and 10 parameter milling tools for Planar Milling, Surface Contouring, and Sequential Mill. Other milling operations ignore the extended definitions of these tools.

