Blood Pressure Determinations
advertisement
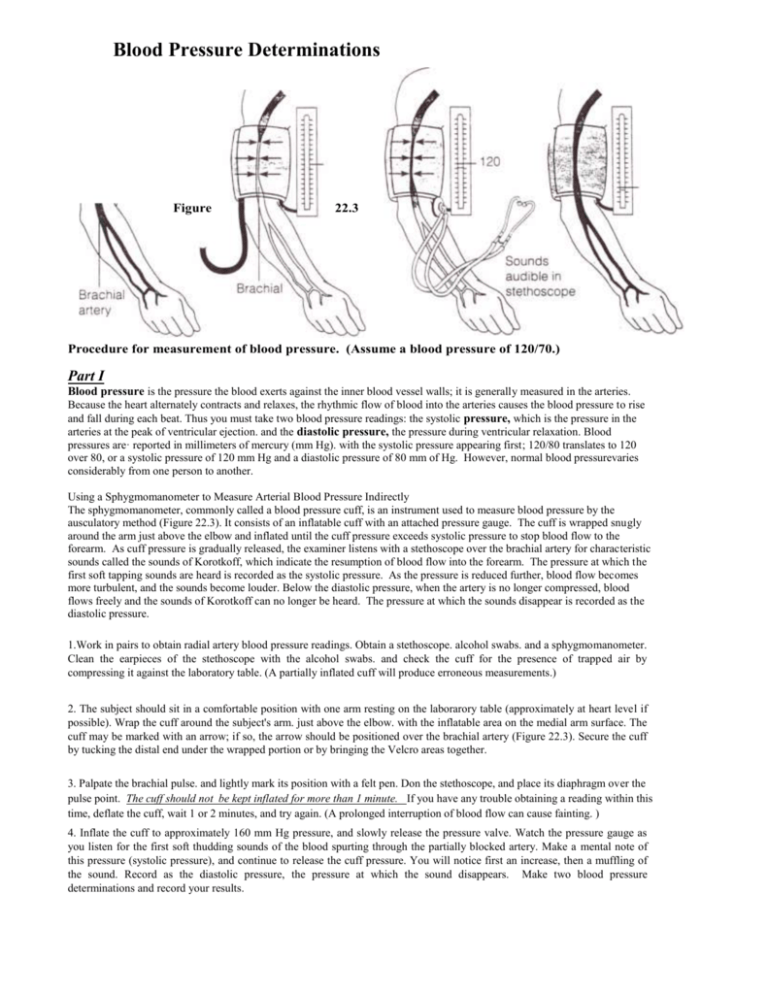
Blood Pressure Determinations Figure 22.3 Procedure for measurement of blood pressure. (Assume a blood pressure of 120/70.) Part I Blood pressure is the pressure the blood exerts against the inner blood vessel walls; it is generally measured in the arteries. Because the heart alternately contracts and relaxes, the rhythmic flow of blood into the arteries causes the blood pressure to rise and fall during each beat. Thus you must take two blood pressure readings: the systolic pressure, which is the pressure in the arteries at the peak of ventricular ejection. and the diastolic pressure, the pressure during ventricular relaxation. Blood pressures are· reported in millimeters of mercury (mm Hg). with the systolic pressure appearing first; 120/80 translates to 120 over 80, or a systolic pressure of 120 mm Hg and a diastolic pressure of 80 mm of Hg. However, normal blood pressurevaries considerably from one person to another. Using a Sphygmomanometer to Measure Arterial Blood Pressure Indirectly The sphygmomanometer, commonly called a blood pressure cuff, is an instrument used to measure blood pressure by the ausculatory method (Figure 22.3). It consists of an inflatable cuff with an attached pressure gauge. The cuff is wrapped snugly around the arm just above the elbow and inflated until the cuff pressure exceeds systolic pressure to stop blood flow to the forearm. As cuff pressure is gradually released, the examiner listens with a stethoscope over the brachial artery for characteristic sounds called the sounds of Korotkoff, which indicate the resumption of blood flow into the forearm. The pressure at which the first soft tapping sounds are heard is recorded as the systolic pressure. As the pressure is reduced further, blood flow becomes more turbulent, and the sounds become louder. Below the diastolic pressure, when the artery is no longer compressed, blood flows freely and the sounds of Korotkoff can no longer be heard. The pressure at which the sounds disappear is recorded as the diastolic pressure. 1.Work in pairs to obtain radial artery blood pressure readings. Obtain a stethoscope. alcohol swabs. and a sphygmomanometer. Clean the earpieces of the stethoscope with the alcohol swabs. and check the cuff for the presence of trapped air by compressing it against the laboratory table. (A partially inflated cuff will produce erroneous measurements.) 2. The subject should sit in a comfortable position with one arm resting on the laborarory table (approximately at heart level if possible). Wrap the cuff around the subject's arm. just above the elbow. with the inflatable area on the medial arm surface. The cuff may be marked with an arrow; if so, the arrow should be positioned over the brachial artery (Figure 22.3). Secure the cuff by tucking the distal end under the wrapped portion or by bringing the Velcro areas together. 3. Palpate the brachial pulse. and lightly mark its position with a felt pen. Don the stethoscope, and place its diaphragm over the pulse point. The cuff should not be kept inflated for more than 1 minute. If you have any trouble obtaining a reading within this time, deflate the cuff, wait 1 or 2 minutes, and try again. (A prolonged interruption of blood flow can cause fainting. ) 4. Inflate the cuff to approximately 160 mm Hg pressure, and slowly release the pressure valve. Watch the pressure gauge as you listen for the first soft thudding sounds of the blood spurting through the partially blocked artery. Make a mental note of this pressure (systolic pressure), and continue to release the cuff pressure. You will notice first an increase, then a muffling of the sound. Record as the diastolic pressure, the pressure at which the sound disappears. Make two blood pressure determinations and record your results. Observing the Effect of Various Factors on Blood Pressure a Heart Rate Arterial blood pressure is directly proportional to cardiac output (amount of blood pumped out of the left ventricle per minute) and peripheral resistance, that is: BP = CO X PR Peripheral resistance is increased by constriction of blood vessels (most importantly the arterioles), by an increase in blood viscosity or volume, and by a loss of elasticity of the arteries (seen in arteriosclerosis). Any factor that increases either the cardiac output or the peripheral resistance causes an almost immediate reflex rise in blood pressure. The influence of two factors that alter blood pressure-posture and exercise-are investigated here. To do the following tests efficiently, one student should act as the subject and two as examiners (one taking the radial pulse and the other ausculating the brachial blood pressure). A fourth student collects and records the data. The sphygmomanometer cuff should be left on the subject's arm throughout the experiments (in a deflated state, of course) so that, at the proper times, the blood pressure can be taken quickly. In each case, take the measurements at least twice. To monitor circulatory adjustments to changes in position, take blood pressure and pulse measurements under the conditions noted in Chart 1. Also record your results on that chart. Investigate the effects of exercise on blood pressure, pulse, and cardiovascular fitness. Changes in blood pressure and pulse during and after exercise provide a good yardstick for measuring overall cardiovascular fitness. Although there are more accurate tests to evaluate fitness, the Harvard Step Test described here is a quick way to compare the relative fitness level of a group of people. You will be working in groups of four. duties assigned as indicated above. except that student 4, in addition to recording the data. will act as the timer and call the cadence (rhythm). Any student with a known heart problem should refuse to be the subject. All four students may act as the subject in turn, if desired. but the bench stepping is to be performed at least twice in each group-once with a well-conditioned person acting as the subject, and once with an individual that does not exercise on a regular basis. Bench stepping is the following series of movements repeated sequentially: 1. Place one foot on the step. 2. Step up with the other foot so that both feet are on the platform. Straighten the legs and the back. 3. Step down with the other foot. 4. Bring the other foot down. The pace for the stepping will be set by the "timer" (student 4), who will repeat "Up-2-3-4. up-2-3-4" at such a pace that each "up-1-2-3" sequence takes 2 sec (so there are 30 cycles/min). 1. Student 4 should obtain the step (20-in. height for male subject. or 16 in. for a female subject) while baseline measurements are being obtained on the subject. 2. Once the baseline pulse and blood pressure measurements have been recorded on Chart 2. the subject is to stand quietly at attention for 2 min to allow his or her blood pressure to stabilize before beginning to step. 3. The subject is to bench step for as long as possible, up to a maximum of 5 min, according to the cadence called by the timer. Watch the subject for crouching (posture must remain erect). If he or she is unable to keep the pace up for 15 sec, stop the test. 4. When the subject is stopped by the pacer, stops voluntarily because he or she is unable to continue, or has completed 5 min of bench stepping, he or she is to sit down. At this point, record the duration of exercise (in seconds), and measure the blood pressure and pulse immediately and thereafter at l-min intervals for 3 min post-exercise. 5. The subject's index of physical fitness is to be calculated using the following formula: Index = duration of exercise in seconds X 100 2 x sum of the 3 pulse counts in recovery Scores are interpreted according to the following scale: below 55 55 to 62 63 to 71 72 to 79 80 to 89 90 and over poor physical condition low average average high average good excellent 6. Record the test values on Chart 2, and repeat the testing and recording procedure with the second subject. Answer the question. Skin Color as an Indicator of Local Circulatory Dynamics Skin color reveals with surprising accuracy the state of the local circulation. The experiments on local circulation outlined below consider a number of factors that affect blood flow to the tissues. A good clinical diagnosis often depends on good observation skills and logical interpretation of the findings. A single example is given to demonstrate this: A massive hemorrhage may be internal and hidden (thus, not obvious), but will still threaten the blood delivery to vital organs. One of the earliest responses of the body to such a threat is constriction of the skin's blood vessels, which reduces blood flow to the skin and diverts it into the circulatory mainstream to serve other, more vital tissues. As a result, the skin, particularly that of the extremities, becomes pale, cold, and eventually moist with perspiration. Therefore, pale, cold, clammy skin should immediately lead the careful diagnostician to suspect that the circulation is dangerously inadequate. Activity: Examining the Effect of Local Chemical and Physical Factors on Skin Color The local blood supply to the skin (indeed, to any tissue) is influenced by (1) local metabolites, (2) the oxygen supply, (3) local temperature, and (4) substances released by injured tissues. to name a few. Three of these factors are examined in the simple experiments that follow. Each experiment should be conducted by students in groups of three or four. One student will act as the subject: the others will conduct the tests and make and record observations. Vasodilation and Flushing of the Skin Due to lack of Oxygen I. Obtain a blood pressure cuff (sphygmomanometer) and stethoscope. You will also need a watch with a second hand. 2. The subject should roll up the sleeves as high as possible and then lay the forearms side by side on the bench top. 3. Observe the general color of the subject's forearm skin, and the normal contour and size of the veins. Notice whether skin color is similar bilaterally. Record your observations in the table: 4. Apply the blood pressure cuff to one arm, and inflate it to 250 mm Hg. Keep it inflated for 1 min. During this period, repeat the observations made above and record the results: 5. Release the pressure in the cuff (leaving the deflated cuff in position), and again record the forearm skin color and the condition of the forearm veins. Make this observation immediately after deflating and then again 30 sec larger. The above observations constitute your baseline information. Now conduct the following tests. 6. Instruct the subject to raise the cuffed arm above his or her head and to clench the fist as tightly as possible. While the hand and forearm muscles are tightly contracted. rapidly inflate the cuff to 240 mm Hg or more. This maneuver partially empties the hand and forearm of blood, and stops most blood flow to the hand and forearm. Once the cuff has been inflated, the subject is to relax the fist and return the forearm to the bench top so it can be compared to the other forearm. 7. Leave the cuff inflated for exactly I min. During this interval, compare the skin color in the "ischemic" (blood-deprived) hand to that of the "normal"' (non-cuffed-limb) hand. After 1 min. quickly release the pressure. Effects of Venous Congestion I. Again, but with a different subject, observe and record the appearance of the skin and veins on the forearms resting on the bench top. This time, pay particular attention to the color of the fingers, particularly the fingertips and the nail beds. Record this information: 2. Wrap the blood pressure cuff around one of the subject's arms, and inflate it to 40 mm Hg. Maintain this pressure for 5 min. Record the subjective and objective findings just before the 5 min are up, and then again immediately after release of the pressure at the end of 5 min. 3. With still another subject, conduct the following simple experiment: Raise one arm above the head, and let the other hang by the side for 1 min. After 1 min, quickly lay both arms on the bench top and compare their color. From this and the two preceding observations, analyze the factors that determine the tint of color (pink or blue) and inten sity of skin color (deep pink or blue as opposed to light pink or blue). Record your conclusions. Effect of Mechanical Stimulation of Blood Vessels of the Skin With moderate pressure, draw the blunt end of your pen across the skin of a subject's forearm. Wait 3 min to observe the effects and then repeat with firmer pressure. The redness, or flar, observed after mechanical stimulation of the skin results from a local inflammatory response promoted by chemical mediators released by injured tissues. These mediators stimulate increased blood flow into the area and cause the capillaries to leak fluid into the local tissues. (Note: People differ considerably in skin sensitivity. Those most sensitive will show dermographism, a condition in which the direct line of stimulation will swell quite obviously. This excessively swollen area is called a wheal.) •
