Chapter 21: Perspective Drawing
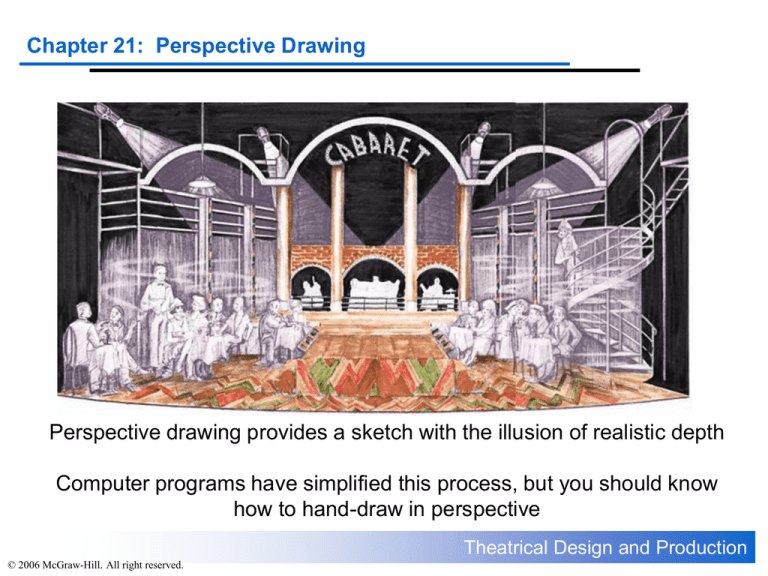
Perspective drawing provides a sketch with the illusion of realistic depth
Computer programs have simplified this process, but you should know
how to hand-draw in perspective
Theatrical Design and Production
© 2006 McGraw-Hill. All right reserved.
Chapter 21: Perspective Drawing
Principles of Perspective
Based on the following terminology:
Foreshortening – Representing the lines of an object as shorter
than they are in order to give the illusion of proper relative size
Vanishing point – The point on the horizon to which a set of
parallel lines recedes
Horizon line – A line in a perspective drawing representing the
meeting of the earth and sky; normally drawn parallel to the top or
bottom edge of the paper
Theatrical Design and Production
© 2006 McGraw-Hill. All right reserved.
Chapter 21: Perspective Drawing
Principles of Perspective
Foreshortening at work
Vanishing point
Theatrical Design and Production
© 2006 McGraw-Hill. All right reserved.
Chapter 21: Perspective Drawing
Principles of Perspective
To draw an accurate perspective sketch you must know…
1. The distance from the observer to the object being drawn
2. The height of the observer’s eye above the object being drawn
3. The size and shape of the object
Theatrical Design and Production
© 2006 McGraw-Hill. All right reserved.
Chapter 21: Perspective Drawing
Principles of Perspective
More to know…
Relative position
of the object in
relation to a
vertical plane
that is placed
between the
observer and
the object
Theatrical Design and Production
© 2006 McGraw-Hill. All right reserved.
Chapter 21: Perspective Drawing
Principles of Perspective
The vertical plane in various
theatre spaces shifts…
Theatrical Design and Production
© 2006 McGraw-Hill. All right reserved.
Chapter 21: Perspective Drawing
Creating a Perspective Drawing
Observation
point
Floor line: The base of the vertical plane in a perspective drawing;
for a proscenium sketch, usually drawn across the stage in contact
with the downstage edge of the proscenium arch; in a thrust drawing,
normally placed just outside the auditorium end of the thrust; in an
arena sketch, usually placed in the aisle closest to the observer
Theatrical Design and Production
© 2006 McGraw-Hill. All right reserved.
Chapter 21: Perspective Drawing
Creating a Perspective Drawing
Theatrical Design and Production
© 2006 McGraw-Hill. All right reserved.
Exercise
Steps:
A
Chapter 21:
Perspective
Drawing
Start with this drawing
as your base
Theatrical Design and Production
© 2006 McGraw-Hill. All right reserved.
Exercise
Steps:
B
Chapter 21:
Perspective
Drawing
Establish vanishing points
for AB / DC and AD / BC
Theatrical Design and Production
© 2006 McGraw-Hill. All right reserved.
Exercise
Steps:
C
Chapter 21:
Perspective
Drawing
Contact the perspectiveview base line – establishes
perspective view of the
object
Theatrical Design and Production
© 2006 McGraw-Hill. All right reserved.
Exercise
Steps:
D
Chapter 21:
Perspective
Drawing
Find the perspective view
of the AB line & point A1
Theatrical Design and Production
© 2006 McGraw-Hill. All right reserved.
Exercise
Steps:
E
Chapter 21:
Perspective
Drawing
Find the location of point B1
Theatrical Design and Production
© 2006 McGraw-Hill. All right reserved.
Exercise
Steps:
F
Chapter 21:
Perspective
Drawing
Find the perspective view
of the AD line & point D1
Theatrical Design and Production
© 2006 McGraw-Hill. All right reserved.
Exercise
Steps:
G
Chapter 21:
Perspective
Drawing
Find the location of point C1
Theatrical Design and Production
© 2006 McGraw-Hill. All right reserved.
Exercise
Steps:
H
Chapter 21:
Perspective
Drawing
Complete the view
Theatrical Design and Production
© 2006 McGraw-Hill. All right reserved.
Chapter 21: Perspective Drawing
Review of the Perspective Procedure
All drawings are
made on a basic
grid composed of
four lines
Theatrical Design and Production
© 2006 McGraw-Hill. All right reserved.
Chapter 21: Perspective Drawing
Review of the Perspective Procedure
The vanishing point is
determined by extending
(from OP) a line parallel to
the ground plan view of that
particular line until it
intersects the floor line.
From intersection, a vertical
line is dropped until it
intersects the horizon line
Theatrical Design and Production
© 2006 McGraw-Hill. All right reserved.
Chapter 21: Perspective Drawing
Review of the Perspective Procedure
Any point in contact with the
floor line is unaffected by the
laws of perspective
A line parallel to the line of
vision can be dropped from
that point to the perspectiveview base line
Theatrical Design and Production
© 2006 McGraw-Hill. All right reserved.
Chapter 21: Perspective Drawing
Review of the Perspective Procedure
A perspective view of a
line can be established
by extending a line from
the pint of contact with
the perspective-view
base line to a vanishing
point for that particular
line
Theatrical Design and Production
© 2006 McGraw-Hill. All right reserved.
Chapter 21: Perspective Drawing
Review of the Perspective Procedure
To find the location of any
point on the perspective
view of a line, draw a sight
line from the observation
point (OP) to the ground
plan view of that point
From the point of
intersection between the
sight line and the floor, drop
a vertical line until it
intersects the extended line
Theatrical Design and Production
© 2006 McGraw-Hill. All right reserved.
Chapter 21: Perspective Drawing
Review of the Perspective Procedure
After all the perspective
points have been located
using these techniques,
connect those points to
provide a perspective view
of the object
Theatrical Design and Production
© 2006 McGraw-Hill. All right reserved.
Chapter 21: Perspective Drawing
Perspective Exercises
Exercise 1
Scale: ¼” = 1’-0”
OP: 36’-0” right and 8’-0” up1
Floor Line: 20’-0” from OP
Horizon Line: 3’-0” from OP
Perspective-view base line: extends horizontally through OP
Object being drawn: an 8’-0” square resting on the stage floor
with its sides at a 45-degree angle to the floor line and the near
corner (A) in contact with the floor line at the line of vision
Theatrical Design and Production
© 2006 McGraw-Hill. All right reserved.
Exercise21:
1 Perspective Drawing
Chapter
Theatrical Design and Production
© 2006 McGraw-Hill. All right reserved.
Chapter 21: Perspective Drawing
Perspective Exercises
Exercise 2
Scale: ¼” = 1’-0”
OP: 36’-0” right and 8’-0” up
Floor Line: 22’-0” from OP
Horizon Line: 7’-0” from OP
Perspective-view base line: extends horizontally through OP
Object being drawn: a flat 6’-0” by 10’-0” with its sides at a 45degree angle to the floor line. The near corner (A) is in contact with
the floor line and 7’-0” to the left of the intersection between the line
of vision and the floor line
Theatrical Design and Production
© 2006 McGraw-Hill. All right reserved.
Chapter 21: Perspective Drawing
Exercise 2
Theatrical Design and Production
© 2006 McGraw-Hill. All right reserved.
Chapter 21: Perspective Drawing
Perspective Exercises
Exercise 3
Scale: ¼” = 1’-0”
OP: 50’-0” right and 8’-0” up
Floor Line: 23’-0” from OP
Horizon Line: 8’-0” from OP
Perspective-view base line: extends horizontally through OP
Object being drawn: a platform 8’-0” square by 3’-6” high is placed
on the stage with its sides forming 30- and 60- degree angles with the
floor line. Corner A is in contact with the floor line and 12’-0” to the left
of the intersection of the floor line and the line of vision
Theatrical Design and Production
© 2006 McGraw-Hill. All right reserved.
Chapter 21: Perspective Drawing
Exercise 3
Theatrical Design and Production
© 2006 McGraw-Hill. All right reserved.
Chapter 21: Perspective Drawing
Perspective Exercises
Exercise 4
Scale: ¼” = 1’-0”
OP: 40’-0” right and 10’-0” up
Floor Line: 20’-0” from OP
Horizon Line: 8’-0” from OP
Perspective-view base line: extends horizontally through OP
Object being drawn: a small flat, 6’-10” by 10’-0”, lying on the
stage floor with its sides at a 45-degree angle to the floor line. The
near corner A is 4’-6” to the left of the intersection between the floor
line and the line of vision and 2’-6” upstage of it
Theatrical Design and Production
© 2006 McGraw-Hill. All right reserved.
Chapter 21: Perspective Drawing
Exercise 4
Theatrical Design and Production
© 2006 McGraw-Hill. All right reserved.
Chapter 21: Perspective Drawing
Perspective Exercises
Exercise 5
Scale: ¼” = 1’-0”
OP: 36’-0” right and 8’-0” up
Floor Line: 20’-0” from OP
Horizon Line: 3’-0” from OP
Perspective-view base line: extends horizontally through OP
Object being drawn: a large rectangular ceiling flat, 10’-10” by 14’-0”,
lying on the stage floor with its longer side parallel with, and 2’-0” upstage
from, the floor line. Notice the floor line has been placed at the outer face
of the proscenium arch to facilitate your creating a perspective drawing of
the arch – Dimensions – 32’-0” wide, 16’-0” high, 1’-0” thick
Theatrical Design and Production
© 2006 McGraw-Hill. All right reserved.
Chapter 21: Perspective Drawing
Exercise 5A
Theatrical Design and Production
© 2006 McGraw-Hill. All right reserved.
Chapter 21: Perspective Drawing
Exercise 5B
Theatrical Design and Production
© 2006 McGraw-Hill. All right reserved.
Chapter 21: Perspective Drawing
Perspective Exercises
Exercise 6
Scale: ¼” = 1’-0”
OP: 36’-0” right and 6’-0” up
Floor Line: 22’-0” from OP
Horizon Line: 6’-0” from OP
Perspective-view base line: extends horizontally through OP
Proscenium arch: 16’-0” high, 36’-0” wide, and 1’-0” thick
Object being drawn: a full stage setting
Theatrical Design and Production
© 2006 McGraw-Hill. All right reserved.
Chapter 21: Perspective Drawing
Exercise 6
Theatrical Design and Production
© 2006 McGraw-Hill. All right reserved.
Chapter 21: Perspective Drawing
Perspective Exercises
Exercise 7
Scale: ¼” = 1’-0”
OP: 36’-0” right and 4’-0” up
Floor Line: 20’-0” from OP
Horizon Line: 6’-0” from OP
Perspective-view base line: extends horizontally through OP
Proscenium arch: 16’-0” high, 32’-0” wide, and 1’-0” thick
Objects being drawn: a very simple set with 14’-0” walls, a 7’-0” door, a
sofa, a chair, a table, and a rug. Sofa = 6’-0” long, 2’-6” deep, and 3’-0”
high. Wingback chair = 3’-0” wide, 3’-0” deep, and 4’-0” high. The table
is 2’-0” square and 3’-0” high.
Theatrical Design and Production
© 2006 McGraw-Hill. All right reserved.
Chapter 21: Perspective Drawing
Exercise 7
Theatrical Design and Production
© 2006 McGraw-Hill. All right reserved.
Chapter 21: Perspective Drawing
When drawing furniture in a box…
1. Draw a box the height, width, and depth
of the overall dimensions
2. Sketch the furniture on the faces of the
box
3. ‘Uncrate’ the furniture by erasing the box
Theatrical Design and Production
© 2006 McGraw-Hill. All right reserved.
Chapter 21: Perspective Drawing
Perspective Exercises
Exercise 8
Scale: ¼” = 1’-0”
OP: 36’-0” right and 6’-0” up
Floor Line: 15’-0” from OP (Note floor line is placed 2’-0” toward the
audience from the edge of the stage…
Horizon Line: 8’-0” from OP
Perspective-view base line: extends horizontally through OP
Proscenium arch: 16’-0” high, 32’-0” wide, and 1’-0” thick
Objects being drawn: a scenic design for an arena production
Theatrical Design and Production
© 2006 McGraw-Hill. All right reserved.
Chapter 21: Perspective Drawing
Exercise 8
Theatrical Design and Production
© 2006 McGraw-Hill. All right reserved.
Chapter 21: Perspective Drawing
Perspective Exercises
Exercise 9
Scale: ¼” = 1’-0”
OP: 24’-0” right and 14’-0” up
Floor Line: 25’-0” from OP (Note that the paper has been turned 90
degrees and the floor line is located just in front of the front edge of a
thrust stage…
Horizon Line: 7’-0” from OP
Perspective-view base line: extends horizontally through OP
Proscenium arch: 16’-0” high, 32’-0” wide, and 1’-0” thick
Objects being drawn: a scenic design for a thrust production – the flats
are 14’-0” tall and the doors are 6’-9”
Theatrical Design and Production
© 2006 McGraw-Hill. All right reserved.
Chapter 21: Perspective Drawing
Exercise 9 A
Theatrical Design and Production
© 2006 McGraw-Hill. All right reserved.
Chapter 21: Perspective Drawing
Exercise 9 B
Theatrical Design and Production
© 2006 McGraw-Hill. All right reserved.


