PowerPoint projection practice
advertisement
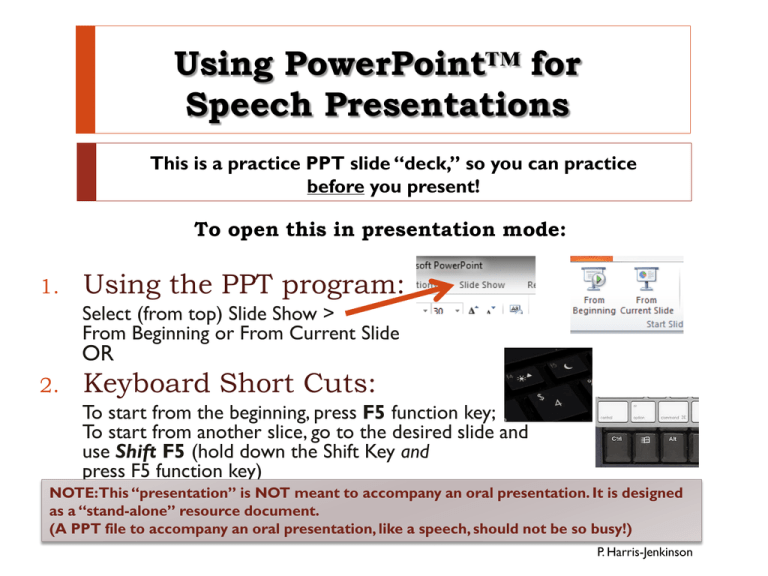
Using PowerPoint™ for Speech Presentations This is a practice PPT slide “deck,” so you can practice before you present! To open this in presentation mode: 1. Using the PPT program: Select (from top) Slide Show > From Beginning or From Current Slide OR 2. Keyboard Short Cuts: To start from the beginning, press F5 function key; To start from another slice, go to the desired slide and use Shift F5 (hold down the Shift Key and press F5 function key) NOTE:This “presentation” is NOT meant to accompany an oral presentation. It is designed as a “stand-alone” resource document. (A PPT file to accompany an oral presentation, like a speech, should not be so busy!) P. Harris-Jenkinson Connecting a laptop to a projector or “smart” panel Equipment: Look for the connector ports (the VGA in/out ports look the same on the laptop and the projector): Connection cable Audio cable (if you want sound AND the projector has speakers) (some panels have both combined) If using a Mac, you’ll need an adapter to connect the cable to your Mac On the laptop On the projector (if there are two, you want the “computer in”) On the “smart” panel (it will be there somewhere) Audio ports are there as well (microphone port on your laptop) Connect and see if it works! (see next slide if it’s not…) HELP! My image isn’t showing on the projection screen! If you don’t see what is on your laptop or computer monitor on the projection screen: Look for the monitor selection key on the function keys of the computer/laptop NOTE: Each computer has a different Function Key dedicated to monitors: Press down the Function key AND the monitor key; you will see the following: Continue pressing the Function key until you have selected “Duplicate”; when you release both keys, you should have the same image on both your computer and the projection screen. How can I move from screen to screen? You can do this on the computer/laptop in a variety of ways: Press the space bar Press the down or right slide) and the up or left arrow key (to advance a arrow key (to back up a slide) A remote should be self-explanatory: NOTE: Some have “mouse trackballs” and some don’t! Most require set up with a USB “dongle” Purpose of the “Deck” What is the deck being used for? Is it supposed to accompany and “aid” the presentation? (as in a classroom speech) Limit the amount of information shown The slides should “enhance” and help make key points understandable, not stand by themselves Is it supposed to stand alone so that someone can read and understand without hearing the presentation? (as in a deck that is supposed to serve as a final report to a client) Still need to limit words, not make it busy No need for bells and whistles (it will likely end up being printed out) Is it supposed to serve both purposes? (it is accompanying an oral presentation AND will serve as a reference document) Prepare for reference document, but redesign after the fact for leave behind (hide slides during presentation that provide info for discussion) Design Hints (assuming the “accompany and aid” purpose) These must be done in PowerPoint when designing the presentation, NOT when you are presenting No title slide (with the presentation title and your name on it); instead, if you aren’t using a slide as an attention-getter, start with a blank (dark) slide. Text: Do NOT put your notes on the slides: Limit number of lines and number of characters per line Make sure font is readable and is appropriate for presentation (e.g., no chiller font for a presentation on cats, don’t use all caps) Limit “bells and whistles” No unnecessary clipart, sounds, etc. If using transitions, keep them consistent and low-key No crazy animations (e.g., grow and spin text) Review several times Proofread!!! Make sure order is correct To add a blank (dark) slide Create a new slide From the top ribbon, choose Insert Fill with black and choose “no outline” Then select Shapes Select the one that looks like a rectangle (it could be in recently used shapes or further down the menu) “Draw” the rectangle so that it completely fills the slide (the default color likely won’t be black) Right click on the rectangle to select it, then play with the fill (bucket) and the outline (pencil) Next slide is blank… see for yourself! Creating “Fake” Animation Builds You will create two or more slides that will “build” on each other. Examples: Bullet points that you want to show up when you click so that all don’t show at once Pictures “building on each other” (think of the transparent pages that, when laid over each other, allow you to see the human body’s bones, then organs, then arteries, etc.) The first slide has the first bullet point The second slide has the first AND second bullet points Try it on the next couple of slides! This is/are the fake build slide(s) First bullet point shows up here This is/are the fake build slide(s) First bullet point shows up here Now the next bullet point shows up This is/are the fake build slide(s) First bullet point shows up here Now the next bullet point shows up (this is the second slide) You can even add a picture! (this is the third slide) Of course, you can always play around with the animation options built right into PowerPoint. It’s fun! PowerPoint Check List Proofread for spelling, typos, grammatical errors. (Does it have a squiggly red line under it? It’s probably mispelled!) Check “Mispelled” is misspelled on purpose so you can see the line in “normal” design view to see that it “aids” the presentation and doesn’t replace the presentation. (If you’re doing a speech, the deck shouldn’t be able to stand by itself.) Be ethical: If not in a classroom, make sure you are not violating copyright. Is there anything that would distract the audience? (Too many bells and whistles, old clip art, overly dramatic transitions, etc.?) Is it readable? (Font size, color combination, etc.) Are you managing the information flow? (builds/animation, blank slides, etc.)
