Oaxacan Power Point
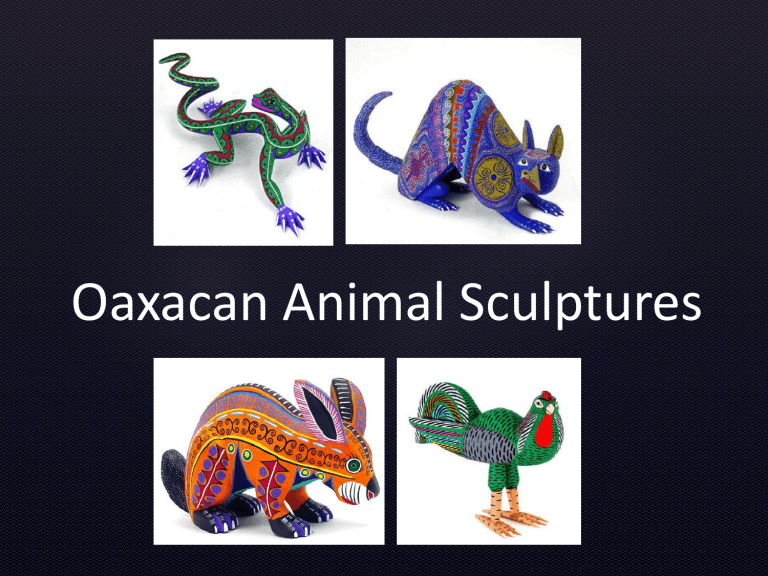
Oaxacan Animal Sculptures
Oaxacan Animal Sculptures
When you look at these sculptures, what do you think of?
Do the bright colors look realistic or exaggerated?
Exaggerated!
Do you see any of these animals where we live?
Some, but the lizard is from a warmer climate
Do the body proportions look like animals you might see in the zoo?
Not really – they look a little silly or made up
What material do you think the sculptures are made of? (What is under the paint?)
Oaxacan Animal Sculptures
Today we are going to learn about exciting Folk Art from a culture of people named the Zapotec Indians from the Oaxacan (pronounced
Wah-HAH-kaan) Valley of Mexico
The state of Oaxaca is in the southern most part of Mexico
A man named Manuel Jimenez
(1919-2005) broke out of the tradition of making piñatas and began making these imaginary creatures
There are about 500 carvers in the
Oaxacan Valley now
Oaxacan Animal Sculptures
The sculptures are carved out of wood from the “copal” tree, hardwood right from the Oaxacan Valley
The artist draws ideas from the natural bends and twists of the tree/branch as to the spirit of the creature to be carved and often connects a myth or story about the creature and what it’s special qualities might be
Fresh green wood is used since it is easiest to carve with pocket knives, kitchen knives, or machetes
This technique is called subtractive
sculpture which means starting with a large block of marble or wood, and carving or taking away…like subtracting numbers
Oaxacan Animal Sculptures
Creating these sculptures is quite the process and involves the whole family
• First the wood is collected from the tree, green and fresh, then carved and dried
• Next the wood is carved by the men (in the off season from farming), sanded and smoothed, and occasionally dressed up with teeth or hair from a goat or zebra
• Lastly the animal is painted by the women and children using paints made from fruit, vegetable, insect and mineral material
This process is a great source of pride for the whole family and has made this culture very famous for their beautiful sculptures
Oaxacan Animal Sculptures
Let’s go back and look more closely at these sculptures
These animals are often exaggerated - meaning their
proportions (the correct size of the parts in relation to the whole) don’t look like real animals might
For example, a hen or chicken doesn't have that thick of legs so it is out of proportion of what it normally looks like
The cat-like picture at the top is also an example of how two animals can be mixed together – like the paws of a mouse and the body of a cat
Oaxacan Animal Sculptures
These dynamic poses (moving or active versus being still) and
repetition of bright colors and
patterns are what make these animals so interesting and unique
Notice the lizard’s dynamic body twisted and curving
Colors repeat along the body:
Blue is repeated for each foot
Green is in a scalloped curvy pattern around the whole body
Red is also repeated around the body as well as blue again
White stripes are the last detail along with the black and yellow dots
Oaxacan Animal Sculptures
Now it’s time for our project!
First you are going to watch while I demonstrate how to:
Sketch an animal that takes of the whole space of my big piece of paper using two or more different animal bodies from the
“helper sheets” on your desks
Create details on my animal using patterns and repetition
Print a few details at the end with a q-tip or sponge brush and white or black paint
Staple my animal to the smaller paper and gluing the head to the side
Oaxacan Animal Sculptures
Head back to your desks and grab one large piece of light colored paper to draw your animal onto
Use the animal helper sheets to help you sketch and remember:
Use the WHOLE paper
Make feet and all pieces thick – no skinny little legs
Make your head facing out on one of the short sides
Once you have finished your drawing, raise your hand to have it checked by an assistant and they will then allow you to cut your animal out
Now it’s time for patterns and repetition!
Using your markers create lines and designs, thick and thin lines, big and small patterns, and make sure that they repeat throughout your animals body
Oaxacan Animal Sculptures
After your designs are almost done, choose black or white paint, a q-tip or a sponge and create a print on your animal. DO NOT USE the paint on the LEGS or FACE as we will be stapling those very soon and the paint won’t be dry yet!
Once done with your printing, choose a small 9x12 piece of paper to attach your animal to
Put your name on the smaller piece of paper
Next, raise your hand and a volunteer will help you staple your animal to the smaller piece of paper
Lastly you can glue your head to the side to create a dynamic look for your animal and think of a story and or special qualities to your animal that you can share with the class
Oaxacan Animal Sculptures
Let’s review the art vocabulary we learned today:
Subtractive sculpture - starting with a large block of marble or wood, and carving or taking away
Proportions - the correct size of the parts in relation to the whole
Dynamic – moving or active versus being still
Patterns – repeating a line, shape or color
Repetition – a color, shape or line used more than once in an artwork
Oaxacan Animal Sculptures
Discussion Questions -
What’s the name of your Oaxacan style animal?
What animals did you use to put together your animal?
What patterns did you use to create your animal?
Did you think of a story behind what your animal is doing?
Do you like this method of creating art?
What was your favorite part of this process?
Where is this type of art from?
Who can pronounce Oaxaca correctly?
