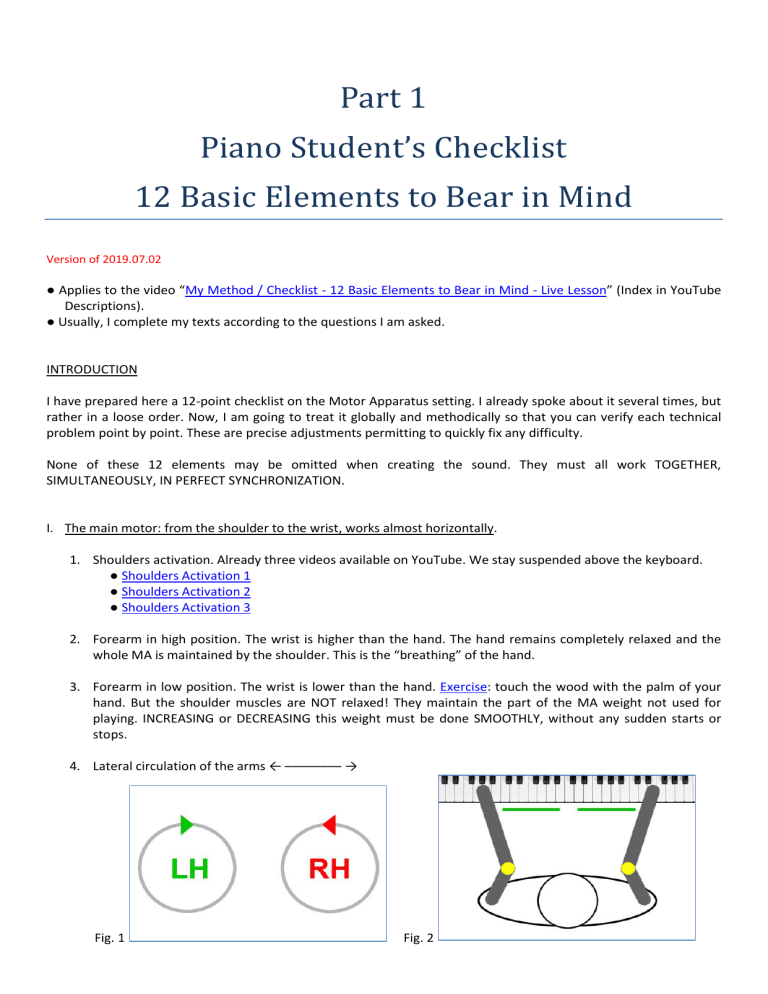
Part 1 Piano Student’s Checklist 12 Basic Elements to Bear in Mind Version of 2019.07.02 ● Applies to the video “My Method / Checklist - 12 Basic Elements to Bear in Mind - Live Lesson” (Index in YouTube Descriptions). ● Usually, I complete my texts according to the questions I am asked. INTRODUCTION I have prepared here a 12-point checklist on the Motor Apparatus setting. I already spoke about it several times, but rather in a loose order. Now, I am going to treat it globally and methodically so that you can verify each technical problem point by point. These are precise adjustments permitting to quickly fix any difficulty. None of these 12 elements may be omitted when creating the sound. They must all work TOGETHER, SIMULTANEOUSLY, IN PERFECT SYNCHRONIZATION. I. The main motor: from the shoulder to the wrist, works almost horizontally. 1. Shoulders activation. Already three videos available on YouTube. We stay suspended above the keyboard. ● Shoulders Activation 1 ● Shoulders Activation 2 ● Shoulders Activation 3 2. Forearm in high position. The wrist is higher than the hand. The hand remains completely relaxed and the whole MA is maintained by the shoulder. This is the “breathing” of the hand. 3. Forearm in low position. The wrist is lower than the hand. Exercise: touch the wood with the palm of your hand. But the shoulder muscles are NOT relaxed! They maintain the part of the MA weight not used for playing. INCREASING or DECREASING this weight must be done SMOOTHLY, without any sudden starts or stops. 4. Lateral circulation of the arms ← –––––––– → Fig. 1 Fig. 2 Circulation of the arms forward ↑↑ Fig. 3 Fig. 4 Fig. 5 5. Resultant circulation of the arms \ / Fig. 6 Fig. 7 Fig. 8 Exercises - the fingers: a. on the surface of the keyboard (without pressing the keys); b. on the bottom of the keyboard (without releasing the keys). II. ACTUATORS (from wrist to fingertips). 6. Metacarpus activation: a. flat knuckles - the fingers curve automatically; b. knuckles in a high position - the fingers are stretched to the maximum; c. flat again, but we force the stretching of the fingers. 7. Bend your fingertips (almost “scratch” the keys). ● “Touch” in Chopin’s method - point 8.2. “Caress the keys”, but not too strongly - point 8.2.2. ● Whenever possible, the first phalanx should be placed on the key entirely flat (Liszt) - see below point 10. III. TRANSMISSION from HORIZONTAL to VERTICAL (creating sound). Assemble the MAIN MOTOR with the ACTUATORS. 8. It is the impulse from the shoulder that always starts the process of playing. That impulse makes the hand and fingers “catch” the keys - usually with the wrist moving from below which is the most efficient and comfortable. But we should keep a general direction of all the elements towards the piano (including the fingers that must be shot forward from the metacarpus to the keyboard). N.B. In fact, you must activate simultaneously all the elements below: ● the back (bend it down slightly); ● the head (lower a bit); ● the shoulder (suspension); ● the arm / forearm (must fold slightly in order to better unfold when pushing); ● the wrist (low position); ● the metacarpus (enlarge it moving your knuckles slightly apart); ● the fingers (stretch, elongate them in the 2nd joint); ● the fingertips (put them on the keys keeping them flat and bend them slightly at the moment of the impulse from the shoulder). When the whole mechanism is well set and synchronized, I have the impression that ALL the muscles are completely relaxed. This is a FALSE IMPRESSION - there are plenty of working muscles! You can watch Alfred Brendel. 9. Whenever possible, the first phalanx should be placed on the key entirely flat. ● Quotations from Liszt and Chopin. ● Moving your head back helps to push away your upper body from the keyboard. ● I feel the contact between my back (and even between the feet) and the hammer striking the string. ● The key’s depth is about 1 cm. Divided between 6 joints, it makes about 1,5 mm per joint. It’s almost nothing - you don’t feel it while playing. 10. Never forget to relax the neck! Then we have two options: a. You do not move your head - it moves spontaneously in accordance with the rules of mechanical resonance; b. You make deliberate head movements in order to increase or decrease the MA pressure on the keyboard. ● It is like riding a motorcycle. When the motorcyclist takes a turns he must lean in the same direction in order to follow the movement of the machine. He can even lean more than necessary in order to be able to go faster. ● If you are a passenger, you must follow the motorcyclist’s movements. You will disturb him if you remain stiff in a vertical position. And if you move of your own, out of sync with the driver, you will cause a dangerous situation. DIRECTION AND SYNCHRONIZATION OF MOVEMENTS Fig. 9 Impulses* from the shoulders synchronized with micro-movements* of the wrist, head and backbone**. Red arrows: preparation before pushing. Green arrows: pushing i.e. opening arm/forearm. Blue arrows: the wrist can either rise or fall - depending on the situation. * Of about 2-3 mm. ** Mechanical resistance of the body. EXAMPLES ● Pianist's backbone must NOT be STIFF ● How to easily obtain the Neuhaus' Bridge? ● Young Glenn Gould 11. All these movements must be very fluid. As told before, all the parts of the Motor Apparatus should work SIMULTANEOUSLY and HARMONIOUSLY, without exception. The 12 points above form a chain. Any technical problem means that some link in this chain is braked or blocked. So you can look for a solution point by point, but always starting from the shoulder and the neck. ● You must never forget to adapt the forearm angle to the keyboard, as well as the hand’s adduction / abduction. These settings should make the contact of the fingertip with the key as easy as possible. ● The number of possibilities of setting the MA is astronomical considering that there are 50 muscles in each hand, without even taking into account the other muscles of the body that also participate in the playing process ● And that is all. Just apply all these points. Without forgetting indirect attack (see below). Part 2 Indirect Attack i.e. playing “from below” BASIC RULE: you should play with the whole body, not just with your hands/fingers or even the Motor Apparatus. Moreover, you must know that when more energy on the keyboard is needed (for dynamics or difficult spots): ● An inexperienced pianist gets 100% of it from his muscles. ● An experienced pianist gets it from impulses made by: a. the falling of the weight (of the MA, of torso or of the whole body), b. the movements of his body, c. and the muscles (as little as possible). Let’s make a simple TEST - sit down at the piano and... 1. ...put your hands on your thighs, and nod your head 2-3x/sec. You will notice that your entire body vibrates. Some people feel it mainly in the abdominals, others in the lumbers. That’s not important, the essential thing is to feel it. 2. ...put your hands on the keyboard and your 2nd or 3rd fingers on the white keys. Lock all the joints of the MA and nod your head again like above. a. You will notice that when your head is going downwards, you are pressing the keys. This is the most basic way of using the falling weight of the whole body on the piano: head + wrists ↓. b. Reversing the movement = head + wrists ↑, i.e. playing “from below”, pushing yourself away from the keyboard, is a much more useful and efficient way, because the MA works as a lever then. Here are two examples of the head movements - these are excerpts from my videos of only a few seconds each (direct links): 3. Very exaggerated movements - Exercise 2. 4. Moderately exaggerated movements - Example 3c. ►You should first stimulate the movements of the head to eliminate the neck’s stiffness. When your neck is sufficiently relaxed, you’ll forget it - your head will move by mechanical resonance. ►The raising of the head (impulse/sound) should be more vigorous (the work of the muscles) and the lowering softer, it falls by its own weight. Anyway, the entire MA, wrists, head and backbone must do regular, sinusoidal waving. Continued on the next page ► In other words: When you play using direct attack, you produce the sound on the lowest position of the circle (South) as in Exercise 1. To play using indirect attack, you start the movement in the same way, but instead of playing directly ↓ at the South point, you produce the sound a bit later - when your MA is already rising. Never forget to “push the piano” (open the forearm and arm). Otherwise, the lever will not work! So for the “C” direction (simultaneously LH clockwise [CW] and RH counterclockwise [CCW]): a. Prepare your fingers on the keys without pressing them; b. Prepare your elbows close together, like in point 6 above - Fig. 6,7 and 8; c. Simultaneously breathe out and lower the head and bend a little forwards; d. Simultaneously breathe in and begin to turn your arms: i. Elbows move outside; ii. Hands move from abduction to adduction; e. Produce the sound as indicated by the notes in the picture below: And for the “Ɔ” direction (LH CCW and RH CW): f. Prepare your fingers on the keys without pressing them; g. Prepare your elbows opened, like in point 6 above - Fig. 6,7 and 8; h. Lower the head and bend a little forwards; i. Start to turn your arms: i. Elbows move inside; ii. Hands move from adduction to abduction; j. Produce the sound as indicated by the notes in the picture below: Play this exercise portato in both directions “C” and “Ɔ” as indicated above. VERY IMPORTANT! Once the “Rear Guard” problem is fixed, you must learn to be able to “hear” with your fingertips, as I call it, i.e. imagine what sound you will produce. To do it, play “from below” not only with your wrists, but with your fingertips as well: 1. Before playing: a. lower your wrist b. touch the key with your flat finger’s pad (cf. Part 1, point 9 above). This preparation touch should be done for EACH key you intend to strike, at any tempo. 2. When playing: a. make an impulse from the shoulder (i.e. push the piano) b. bend the first phalanx of your finger - just a little bit, but strongly enough to make it raise your wrist and the whole MA with a lever movement. Do it very smoothly and softly - just like a cat walking on the keyboard :) Copyright © 2019 Aleksander Woronicki

