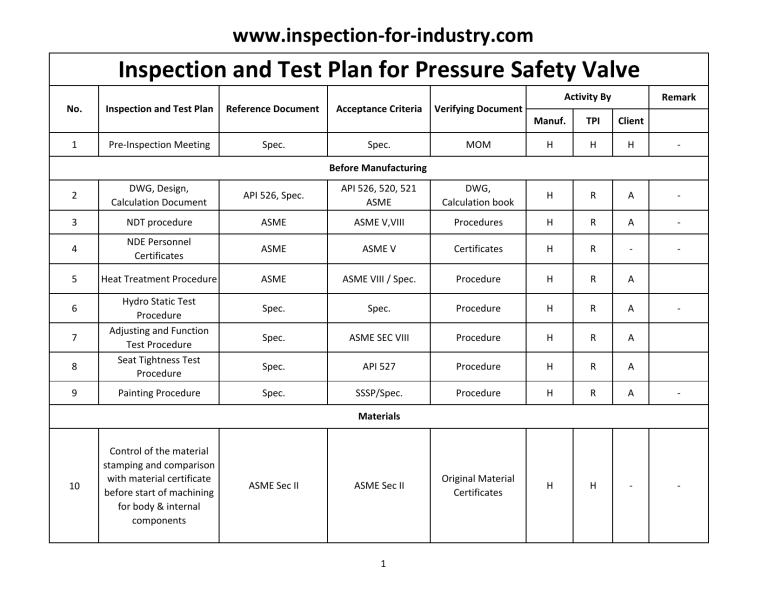
www.inspection‐for‐industry.com Inspection and Test Plan for Pressure Safety Valve Activity By No. 1 Inspection and Test Plan Pre‐Inspection Meeting Reference Document Spec. Acceptance Criteria Spec. Remark Verifying Document Manuf. TPI Client MOM H H H ‐ Before Manufacturing 2 DWG, Design, Calculation Document API 526, Spec. API 526, 520, 521 ASME DWG, Calculation book H R A ‐ 3 NDT procedure ASME ASME V,VIII Procedures H R A ‐ 4 NDE Personnel Certificates ASME ASME V Certificates H R ‐ ‐ 5 Heat Treatment Procedure ASME ASME VIII / Spec. Procedure H R A Spec. Spec. Procedure H R A Spec. ASME SEC VIII Procedure H R A Spec. API 527 Procedure H R A Spec. SSSP/Spec. Procedure H R A ‐ Original Material Certificates H H ‐ ‐ 6 7 8 9 Hydro Static Test Procedure Adjusting and Function Test Procedure Seat Tightness Test Procedure Painting Procedure ‐ Materials 10 Control of the material stamping and comparison with material certificate before start of machining for body & internal components ASME Sec II ASME Sec II 1 www.inspection‐for‐industry.com During Manufacturing 11 Casting Part Visual Inspection Spec. SP‐55 Report H R ‐ ‐ 12 Heat Treatment Procedure ASME VIII Report/Graph H R ‐ ‐ Procedure API 598 Report H H ‐ ‐ DWG DWG Report H R ‐ ‐ ASME Sec VIII ASME SEC VIII Report H H ‐ ‐ Procedure API 527 Report H H ‐ ‐ DWG DWG Report H W ‐ ‐ Spec. Spec. Report H R ‐ ‐ Spec. Spec. Report H R ‐ ‐ DWG/ Datasheet DWG, PO ‐ H H ‐ ‐ Procedure SSSP/Spec. Report H W ‐ ‐ ‐ 13 14 15 16 17 18 19 20 21 Body Hydrostatic and Leak Test Visual Control of all Parts Before Assembly Adjusting and Function Test Seat Leak Test Control of Main Dimensions Visual Surface Check Inside and Outside Cleanliness Control Valve Name Plate marking control Visual Control of Protective Coating Pre‐Shipment Inspection 22 Packing, Marking PO. Spec. Report H H ‐ 23 Final Book Spec. Spec. Final Book H H ‐ 24 Release Note and Loading Spec. Spec. Release Note H H ‐ 2 www.inspection‐for‐industry.com H: Hold Point = Hold on the production till TPI Inspector performs inspection and supervise the required test W: Witness Point = Manufacture shall notify client and TPI Inspector but there is no hold on the production; Client can waive this inspection based on his discretion and informs TPI Inspector accordingly. R: Document Review = Review means Review document, which includes of material test certificates, WPS, PQR, NDT Procedures and etc. A: Approval SW: Spot Witness = for items with spot witness manufacture shall notify TPI inspector as fulfilling the monitoring; For example one random visit for whole UT tests or one or two visits for whole surface preparation works for painting. MOM: Minute of Meeting P.O: Purchase Order For more information review following articles: http://www.inspection‐for‐industry.com/pressure‐safety‐valve‐inspection.html http://www.inspection‐for‐industry.com/inspection‐and‐test‐plan‐for‐pressure‐safety‐valve.html 3
